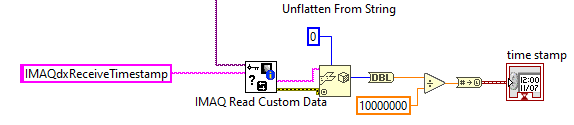
Unless the NI-IMAQdx camera that you are using explicitly has a timestamp attribute that you can utilize, you will have to use the system generated NI-IMAQdx timestamp. The NI-IMAQdx driver will record a timestamp at the time of the Frame Done Interrupt. This absolute timestamp will represent the timestamp when each frame is acquired by the system based on the system clock.
However, it is important to note that this timestamp does not represent the actual time the frame is acquired by the camera and is subject to whatever system jitter is present on the OS/system as well as jitter caused by the network or lost packets (if using with GigE camera).
To set up the NI-IMAQdx driver to generate this absolute timestamp you must configure the camera to do so in NI Measurement & Automation Explorer (MAX). Within MAX, navigate to your NI-IMAQdx device and click the
Camera Attributes tab. Make sure that all of the attributes are exposed by clicking
View Options » All Attributes. Scroll down to the
Receive Timestamp Mode attribute and select
System Time.

By making this selection the NI-IMAQdx driver will now append the timestamp information as custom data on each acquired frame. The custom data is stored with the NI-IMAQdx image data in the form of two custom data keys,
IMAQdxRecieveTimestampHigh and
IMAQdxReceiveTimestampLow. A timestamp in LabVIEW consists of 64 bits of data, and both keys represent 32-bits of this information corresponding to the upper and lower halves, respectively.
In LabVIEW, you can extract these data keys by using the function called
IMAQ Get Custom Keys VI found in the
Vision and Motion » Vision Utilities » Image Management palette. Once the key has been extracted, you can get the value associated with the key by using the function
IMAQ Read Custom Data VI.

Please see the attached VI and LabVIEW Help links for more detailed information on these functions and how to acquire timestamps with the NI-IMAQdx vision driver.
Unfortunately, the TimeStamp Custom Data property is only available for cameras supported by the NI-IMAQdx driver. Cameras supported by the NI-IMAQ driver cannot use this functionality.
Note: If the "Custom Data Out" Indicator reads unkown symbols instead of actual Timestamp, the correct value can be read by using the "
Unflatten From String Function ".