Solution
Sometimes, simply unplugging your camera and plugging it back in can allow Windows to correctly identify the camera. If it is still not correctly recognized, you must manually associate the camera with the appropriate IMAQdx Vision driver:
- Open Device Manager from the Control Panel in Windows.
- Right-click on the Unknown Device and select Update Driver.
- Select Browse my computer for driver software.
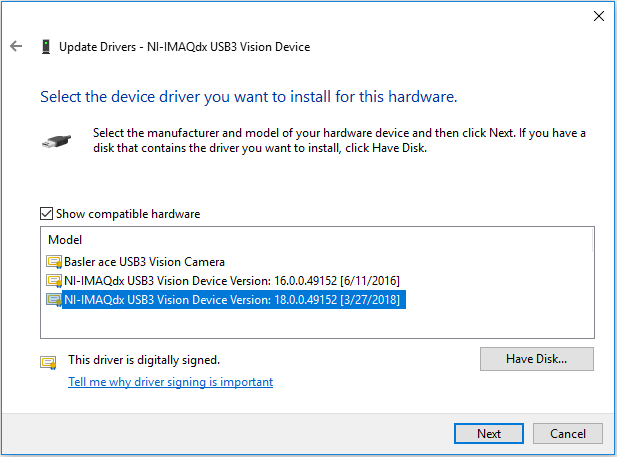
- Select Let me pick from a list of available drivers on my computer.
- With Show compatible hardware checked, choose the NI-IMAQdx Vision Device version that matches the version of IMAQdx that you have installed and click Next to install the driver.
- After install completes, you should see "Windows has sucessfully updated your driver" and your camera should now show up under NI Vision Acquisition Devices.
- The specific name of the driver will depend on the type of camera you are using. If you are using a USB camera, you should see NI-IMAQdx USB3 Vision Device. If you are using a GigE camera, you will see NI-IMAQdx GigE Vision Universal Driver or NI-IMAQdx GigE Vision High Performance Driver.
- If no NI-IMAQdx Vision driver shows up in the list, continue with step 6.

If steps 1-5 do not lead to a successful install of a driver, we can point the utility to directly to the inf file for the camera.
- In the "Select the driver you want to install for this hardware" window, select Have Disk...
- In the "Install From Disk" window, select Browse...
- Navigate to C:\Program Files (x86)\National Instruments\NI-IMAQdx\Staging\ and then select the folder associated with the appropriate camera type (Ex: NI USB Vision or NI GigE Vision). Choose the .inf file within this folder and select Open.
- In the Install From Disk window, click OK. You should now see NI-IMAQdx Vision Device in the list of models. Click Next to install the driver for your camera.
The camera should now show up in Device Manager under the NI Vision Acquisition Devices category as NI-IMAQdx Vision Device.