Temporarily Enable Jumbo Frames
Jumbo Frames can be enabled temporarily by accessing the shell of the Linux target. If the target is rebooted after following the steps below, the settings will revert to default.
1. Access the shell of the Linux target by following the steps in
Accessing the Shell on NI Linux Real-Time Devices.
2. Once connected, enter the username and password of your target.
- If a username has not been set, the default username is admin. The default password is left blank.
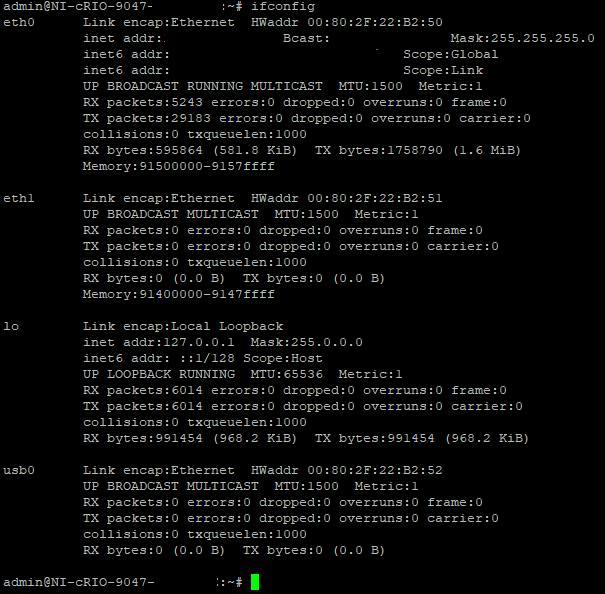
3. Type
ifconfig and press
Enter to check the configuration of the Ethernet ports.
- The default MTU (maximum transmission unit) value should be 1500.
4. Type
ifconfig eth0 mtu 9000 to enable Jumbo Frames. Press
Enter.
- This enables Jumbo Frames on the eth0 port. To enable Jumbo Frames on a different port, replace eth0 with the desired port name.

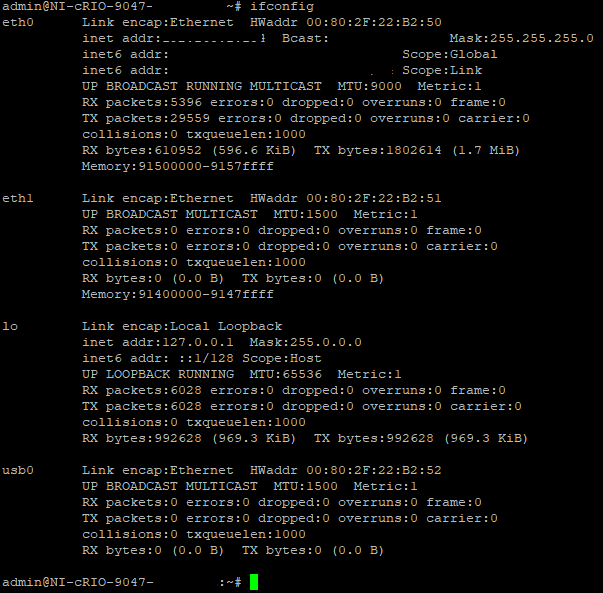
5. Verify that the settings have been changed by typing
ifconfig followed by
Enter.
- The new MTU value should be 9000.
Permanently Enable Jumbo Frames
Jumbo Frames can be permanently enabled by:
- Modifying a configuration file that already exists on the controller.
- This is the simplest option.
- Creating a new Linux script that runs automatically at startup.
Modifying a Configuration File
1. Access the shell of the controller by following
Accessing the Shell on NI Linux Real-Time Devices.
2. Once connected, enter the username and password of your target.
- If a username has not been set, the default username is admin. The default password is left blank.
3. Navigate to the
/etc/natinst/share folder.
- Type cd /etc/natinst/share and then press Enter.

4. Type
ls to display a list of files in this directory. Verify that
ni-rt.ini is present.

5. Use the in-built text file editor to modify
ni-rt.ini so that Jumbo Frames are enabled.
- Type vi ni-rt.ini and then press Enter.
- Press i on the keyboard to start editing the file.
- Use the arrow keys to scroll to the bottom of the [eth0] section.
- If you need to enable Jumbo Frames on a different ethernet port, scroll to the bottom of the desired [ethX] section instead.
- Add the line mtu="9000" at the bottom of the section. Press Enter.
- Press Esc on the keyboard to leave edit mode.
- Type :w and then press Enter to save changes to the file.
- Type :q and then press Enter to quit the text editor.
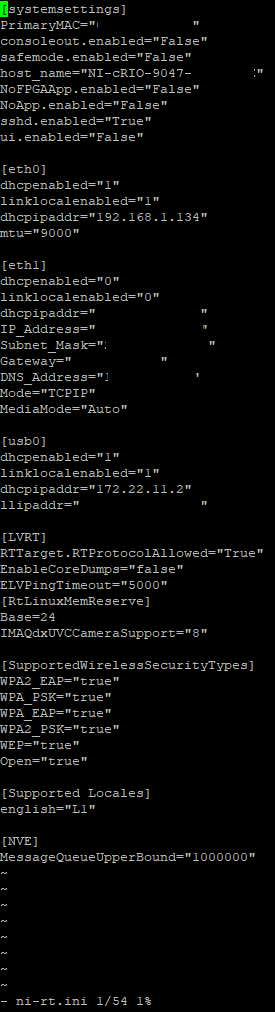
6. To verify that the file changes have been saved, type
vi ni-rt.ini and check that the new
mtu="9000" line is present.
- The file should resemble the following image.
7. Restart the controller by typing
reboot followed by the
Enter key.

8. When the system reboots, you can verify that the Jumbo Frames setting has persisted by following steps 1 -3 in the
Temporarily Enable Jumbo Frames section.
- The MTU value should now be 9000.

Creating a New Linux Script
1. Access the shell of the controller by following
Accessing the Shell on NI Linux Real-Time Devices.
2. Once connected, enter the username and password of your target.
- If a username has not been set, the default username is admin. The default password is left blank.
3. Navigate to the
/etc/rc5.d folder.
- Type cd /etc/rc5.d and then press Enter.

4. Type ls and then press
Enter to see a list of files in this folder.

5. Identify a file number that is currently
not in use.
- In this folder, file names will be formatted as Sxx-yyyyyyyyy where xx are numbers and yyyyyyyyy is a string. Each of these files are executed by the controller in numerical order.
- The file number chosen should be closer to the beginning of execution since the network settings will be applied at the start of the controller's boot sequence.
- From the image below, a value of S12 is acceptable.
6. Create a new file called
SXX-jumbo, where
XX is the chosen number from step 5. For example,
S12-jumbo.
- Type vi S12-jumbo to create a file called S12-jumbo. Press the Enter key after.
7. Press
i on the keyboard to enter file editing mode.
8. Type
#! /bin/sh and press
Enter.
9. Type
ifconfig eth0 mtu 9000 and press
Enter.
- This command enables Jumbo Frames for the eth0 port. Replace eth0 with the ethernet port of your choice.

10. Press
Esc on the keyboard to exit edit mode.
11. Type
:w and then press
Enter to save changes to the file.
12. Type
:q and then press
Enter to quit the file editor view.
13. Verify that the file was successfully saved.
- Type ls and then press Enter to view a list of files in the current directory. Your new file should be present.

14. Type
chmod +x S12-jumbo and then press
Enter to make the file an executable.

15. Restart the controller.
- Type reboot and then press Enter.

16. When the controller reboots, verify that the Jumbo Frames setting has persisted.
- Follow steps 1 -3 in the Temporarily Enable Jumbo Frames section. The MTU value should now be 9000.
