Follow the steps below to configure a static VISA address for USB devices connected to a Linux real-time target:
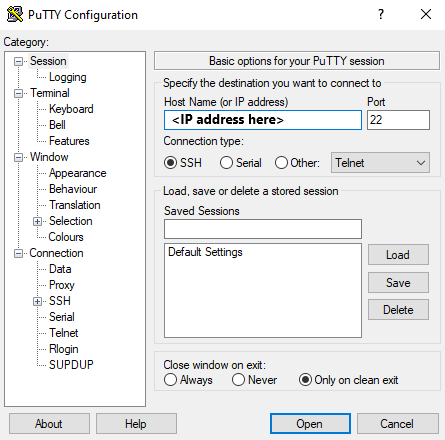
1. Connect to the real-time target using a SSH client. For demonstration purposes, this article uses PuTTY.
- In Windows, type "putty" into the search bar and launch the PuTTY executable.
- In the Host Name (or IP address) input, enter the Linux device's IP address.
- Set the Port to 22.
- Verify that Connection type is SSH.
- Click Open.
- If a PuTTY Security Alert appears, click Accept.

2. Login to the Linux real-time device using the credentials that you have set.
- If credentials have not been set, the default user is admin and the password is blank.
3. Download package information from all configured sources.
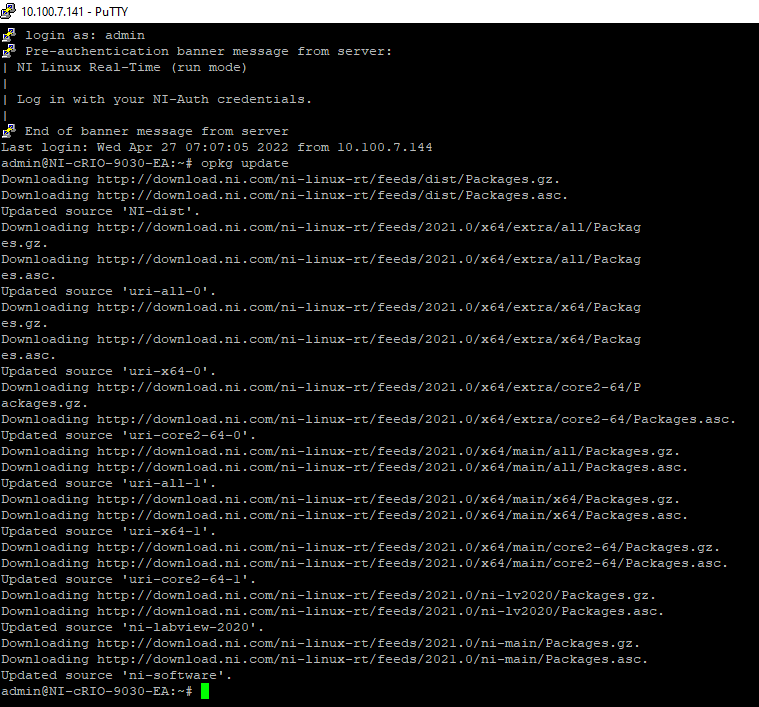
- Enter opkg update into the terminal.
- The output should appear similar to the following image:

4. Install the
usbutils package.
- In the terminal, enter opkg install usbutils-dev. Once successfully installed, the output will appear as follows:

5. If the device does not already have a text editor, install one. For demonstration purposes, the
nano text editor is used throughout this article.
- Enter opkg install nano-dev.

6. Set the current directory to the
usb folder.
7. List all USB devices connected to the system so that a particular device can be queried later on.
- Enter ls -a into the terminal to retrieve a list of USB devices. Note the name of the USB device to make static.
- In the example image below, the "hiddev0" will be used.

8. Query the USB device's attributes and properties.
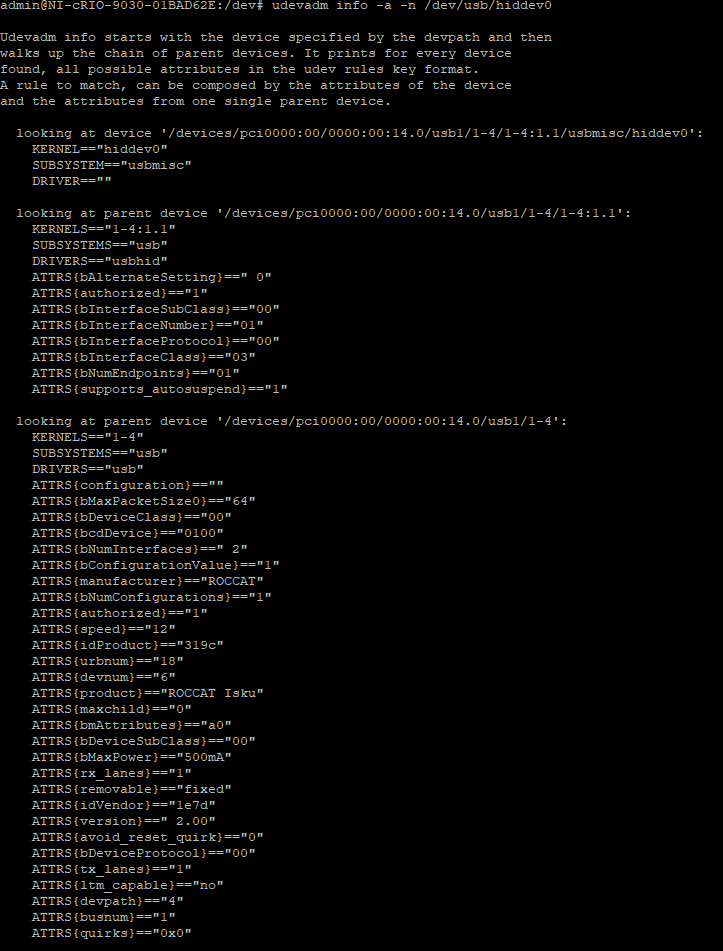
- Enter udevadm info -a -n /dev/usb/hiddev0 where hiddev0 represents the device being queried. Change hiddev0 to match the device name on your system.
- Observe the output and note which attributes are unique to the device. Common unique attributes are Product ID, Vendor ID or Kernel number. For this example, the Product ID and Vendor ID will be used to define which USB device is static.
- The output will appear similarly to the following image:

9. Create or modify a
udev rule on the Linux system so that the USB device is associated with a
symlink attribute.
- Set the current directory to /etc/udev/rules.d by entering the following command: cd "/etc/udev/rules.d"
- Using the chosen text editor, create or modify a udev rule file. If using nano, enter nano 99-usbtest.rules
- This command creates a file titled "99-usbtest.rules" inside /etc/udev/rules.d if one does not already exist.
- Note: it is imperative that the udev rules file name is formatted as <number>-<name>.rules
- the nano text editor will appear onscreen.
- Enter the USB device's unique attributes and define a new symlink and mode value.
- For example, the udev rules file below lists the Vendor ID and Product ID to identify a specific USB device. Then, a known address and access permission is set using symlink and mode fields respectively.
- Note: a mode value of 0666 allows any user to access the device.
- Press Ctrl+X to finish editing the file.
- When prompted to Save modified buffer? press Y.
- Press the Enter key to exit the text editor and return to the standard terminal screen.

10. Set the read and write access for the new
udev rules files.
- Enter chmod 0644 99-usbtest.rules into PuTTY, where 99-usbtest.rules represents the file name.
- This sets the read, write and execute permission on the 99-usbtest.rules file. 0644 determines the permission level for the user, owner, group and everyone. A value of 0644 indicates that users have no permission (0), owners have read and write permissions (6), groups have read and write permissions (6) and everyone has read permission (4).
- Refer to Unix / Linux - File Permission / Access Modes for a further explanation of permission values.
11. Trigger
udev so that it recognises that new rules have been added.
- First, set the current directory to the root by entering cd "/"
- Then enter udevadm trigger

12. Modify the Linux target's NI-VISA configuration file so that LabVIEW and NI MAX are able to recognise the static USB device(s) as intended.
- Set the directory to the location of the visaconf.ini file with command cd "/etc/ni-visa"
- Make a copy of the existing visaconf.ini file so that changes can be reverted. Enter cp /etc/ni-visa/visaconf.ini visaconf.ini.old. Note: This sets the original configuration file to be titled visaconf.ini.old

- Enter nano visaconf.ini to edit the VISA configuration file.
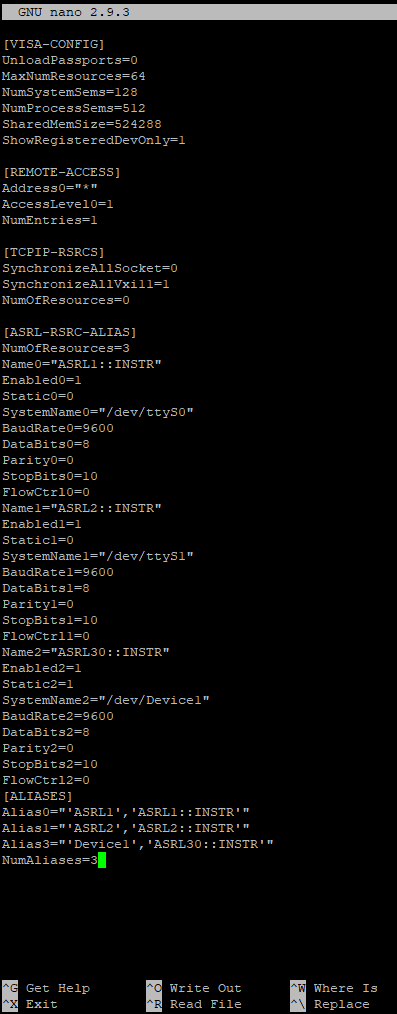
- Once opened, find the section titled [ASRL-RSRC-ALIAS] and move the NumOfResources=x line directly underneath the section heading. Use the image below as reference.
- Identify the last target port (ASRL2::INSTR in the image) and copy it. Paste the copy directly underneath the last list of [ASRL-RSRC-ALIAS]. Repeat this for each USB device that requires a static address.
- For each copied section:
- Increment the suffix on the end of each property. Refer to the image below for reference.
- Modify the ASRL number to a value higher than expected.
- Change the Static field to 1.
- Change the Baud Rate, Parity, StopBits, DataBits and FlowCtrl fields to match the USB device.
- Change the SystemName to "/dev/<symlink>" where <symlink> represents the symlink value assigned inside the udev rules file. For this example, the SystemName equals "/dev/Device1"
- Update the NumOfResources field to the total number of devices listed under the [ASRL-RSRC-ALIAS] section.
- Define an alias for each of the ASRL devices, as shown below. Ensure that the value of NumAliases matches the total number of aliases present.
- Press Ctrl+X to end editing. When prompted to save, press Y. Press Enter to exit nano text editor.

13. On the Windows PC, launch NI MAX and refresh the device list.
- If the procedure was followed correctly, the ASRL ports on the Linux real-time target will be updated.
14. Reboot the cRIO and verify that the VISA resource names have remained static.