Set Up NI 5G NR mmWave Signal Analyzer

Updated Apr 28, 2023

Environment

Hardware

  • PXI Vector Signal Analyzer
  • PXI Vector Signal Generator
  • PXI Controller
  • PXIe-5832

Software

  • RFmx NR
  • RFmx SpecAn
  • RFmx Demod

Driver

  • LabVIEW Instrument Design Libraries for Vector Signal Transceivers

Operating System

  • Windows

This article discusses the method of procedure for 5G NR signal analyzing in mmWave band with NI mmWave signal analyzer - RFmx on NI mmWave VST - PXIe-5832. The intended audiences are NI VST and RFmx users who have the basic knowledge of 5G NR.

Set UP mmWave VST PXIe-5832

  1. Follow PXIe-5832 Getting Started Guide to install the necessary software and hardware.
  2. Install LabVIEW 64 bits version which is needed for PXIe-5832 calibration.
  3. Make sure the cables between PXIe-5820 and PXIe-3623 I/Q ports are connected probably and with the same length to avoid calibration error. Cables must be the same length.jpg
  4. Follow PXIe-5832 Getting Started Guide to complete the calibrations and the system is ready for tests.

Set Up RFmx Waveform Creator

  1. Launch RFmx Waveform Creator: In Search window beside Start >> RFmx Waveform Creator.
  2. From RFmx Waveform Creator >> Modulation >> NR >> New Settings File, select either New Default Settings or Example Setting, select New Default Settingsfor example, shown below
Waveform_1.JPG
  1. In Signal Configuration >> Link Direction >> Downlink, in Duplex Scheme >> TDD or FDD based on your system, leave others as default or you can configure them accordingly, one example is shown below:Waveform_2.JPG
  2. In Carrier Definition 0 >> Channel Bandwidth >> 100MHz (as an example), leave others as default, shown below:Waveform_3.JPG
  3. In BWP 0 >> Subcarrier Spacing >> 120 kHz as an example, shown below:
Waveform_4.JPG
  1. From Instrument >> Download & Play.
Waveform_5.JPG
  1. Configure the device accordingly, for example: Device Name >> 5832, Center Frequency >> 26.5GHz, leave others as default or configure them accordingly, click on Create & Play to generate the 5G NR signal: 
Waveform_6.JPG

Set Up Vector Signal Analyzer

  1. Launch RFmx Soft Front Panel: In Search window beside Start >> RFmx Soft Front Panel, Select Device >> PXIe-5841 >> OK.
  2. Launch 5G NR VSA: Personalities >> NR.
SFP_1.JPG
  1. Select CENTER FREQUENCY, BANDWIDTH, DOWNLINK CHANNEL CONFIGURATION MODE match the created waveform, select the Trigger >> Digital Edge, shown below: SFP_2.JPG
  2. Click on Add/Remove from Measurements >> Channel Power, Occupied Bandwidth are added for example:
Add_Remove_Measure.JPG                                                                                                    
  1. Screen shooting with Adjacent Channel Power, Channel Power, Modulation Accuracy and Occupied Bandwidth is shown below:SFP_3.JPG

The results shown in Steps are only some measuring examples of the configured and generated waveform in RFmx Waveform Creator. Users can reconfigure the waveform in RFmx Waveform Creator and adjust the settings in RF Signal Analyzer to have different measuring results.
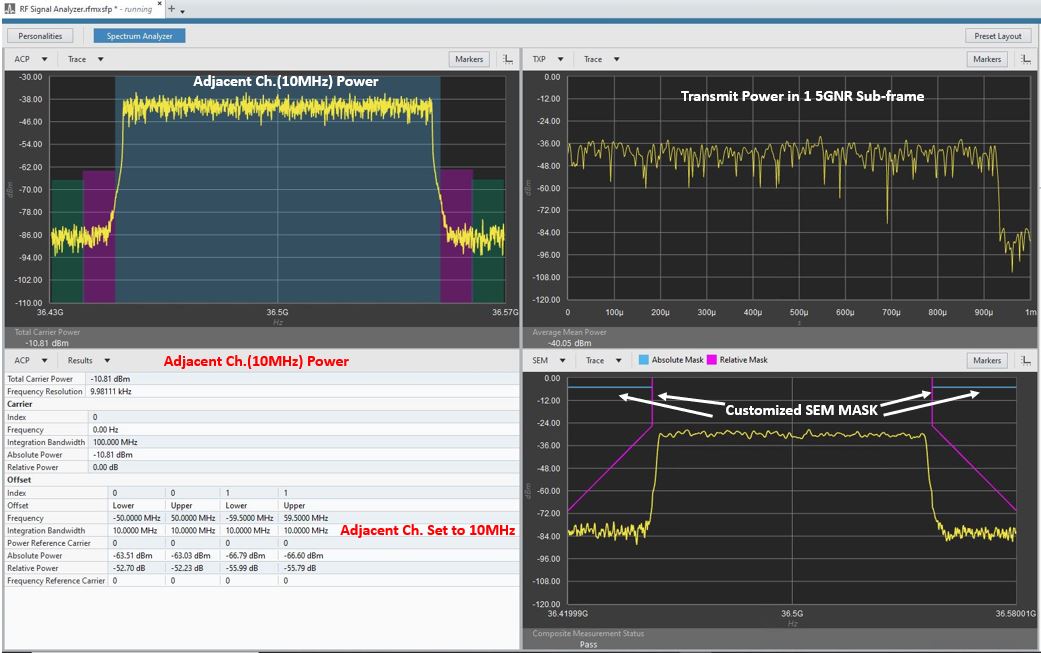
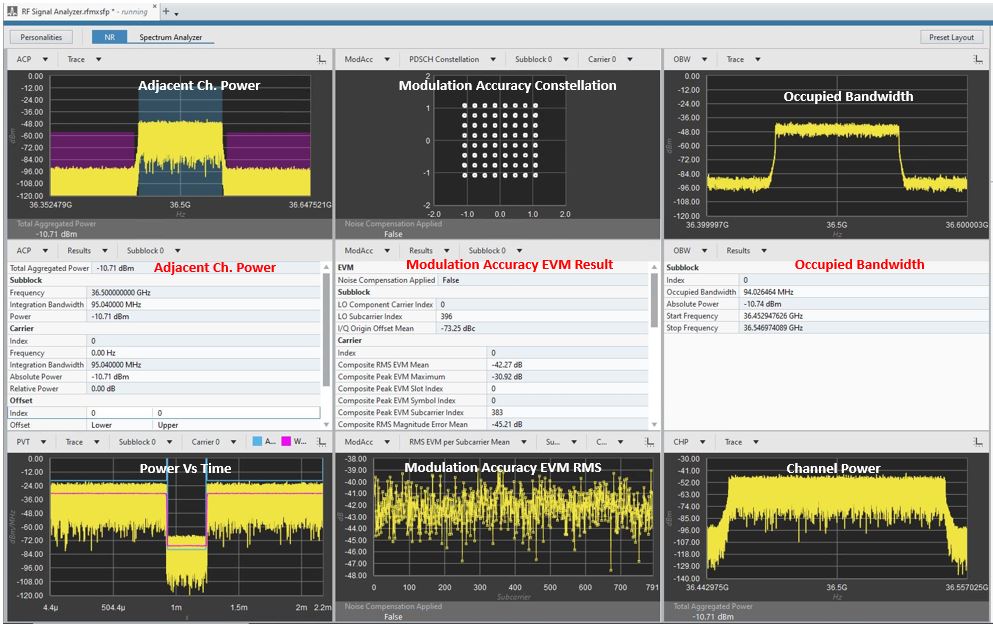
Refer to below two screenshots for examples.
  1. The first example of Signal Analysis of 5G NR at 36.5GHz with RFmx default settings.Result_Signal A_2.jpg
  2. The second example of Spectrum Analysis of 5G NR at 36.5GHz with customized RFmx settings (such as customizing the Adjacent Channel Bandwidth to 10MHz, customized Spurious Emission Mask). Result_Spectrum A_2.jpg