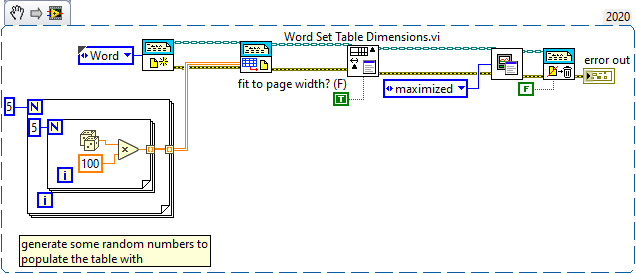
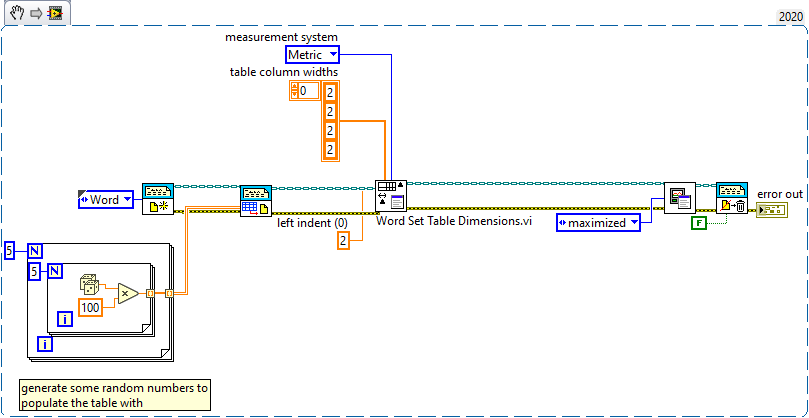
The Word Set Table Dimensions VI can be used to centre the Word document table in two ways:
- By stretching the table to fit the width of the page.
- By specifying the left indentation of the table with respect to the page.
Method 1: Stretching the Table
This is the simplest method since LabVIEW automatically handles the resizing and repositioning of the table.
- Wire a True Constant to the Fit to Page Width? (F) input, as shown below.
- This will force the columns in the table to resize so that they expand across the entirety of the Word document.
- If the Word document has margins, the table will not enter the margins.
 Note:
Note: This image is a LabVIEW snippet, which includes LabVIEW code that you can reuse in your project. To use a snippet, right-click the image, save it to your computer, and drag the file onto your LabVIEW diagram.
Method 2: Specifying a Left Indentation
This method is more involved, but offers greater flexibility and control over the table's format.
- Create a Constant on the Measurement System input to define whether the VI will use inches (in) or centimetres (cm) for repositioning.
- Define the width of each of the table's columns by wiring a Numeric Array to the Table Column Widths input.
- If a column width is not defined, then LabVIEW will use the default width.
- Wire a Constant to the Left Indent (0) input.
- This specifies the distance between the left Word document margin and the left edge of the table.
The image below indicates that the table consists of five columns, each measuring 2 cm in width. The Word document measures 21 cm in width (for a standard A4 sheet) and has a 2.54 cm left margin by default. Therefore, it can be calculated that a 2.96 cm left indentation is required to centre the table.
 Note: This image is a LabVIEW snippet, which includes LabVIEW code that you can reuse in your project. To use a snippet, right-click the image, save it to your computer, and drag the file onto your LabVIEW diagram.