The steps below describe how to develop a Web Service on a host PC that reads and writes NPSVs. The same steps can be applied if using a Real-Time target.
1. Create a new LabVIEW project containing a Web Service.
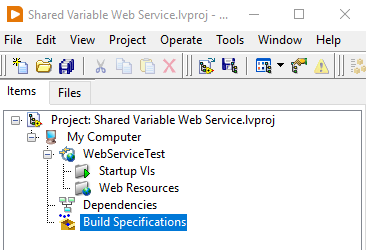
- Launch LabVIEW and click File >> Create Project >> Blank Project. Save the project as "Shared Variable Web Service.lvproj".
- Right-click My Computer and select New >> Web Service. Name the Web Service " WebServiceTest".

2. Create a Shared Variable Library.
- Right-click My Computer and click New >> Variable.
- In the Shared Variable Properties window, select the Variable tab. Define a Name and Data Type, and ensure that Variable Type is set to Network-Published. Ensure that Enable Aliasing is unchecked.
- The example below shows a Double called Variable1.
- Press OK to save changes.
- Save the project (if prompted to save new files, click Yes). Save the lvlib file as "Shared Variables.lvlib".

3. Create a Method VI that writes the NPSV.
- Expand the LabVIEW Web Service, right-click on Web Resources and select New VI.
- Save the new VI as "Write Variable.vi".
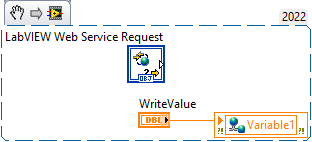
- Drag the NPSV from the project window onto the VI's Block Diagram.
- Right-click NPSV on the Block Diagram and select Access Mode >> Write.
- Create a Numeric Control and name it "WriteValue".
- Connect the Numeric Control to the NPSV on the Block Diagram.
- Connect the Numeric Control to the VI's Connector Pane.
- Save the VI.

 Note:
Note: This image is a LabVIEW snippet, which includes LabVIEW code that you can reuse in your project. To use a snippet, right-click the image, save it to your computer, and drag the file onto your LabVIEW diagram.
4. Create a Method VI that reads the NPSV.
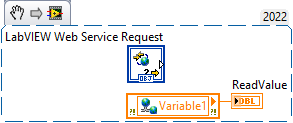
- Repeat the steps in step 3, but change the Access Mode to Read. Connect a Numeric Indicator to the NPSV and then link it on the Connector Pane.
- Save the VI as "Read Variable.vi".

 Note:
Note: This image is a LabVIEW snippet, which includes LabVIEW code that you can reuse in your project. To use a snippet, right-click the image, save it to your computer, and drag the file onto your LabVIEW diagram.
5. Check the Web Service Properties.
- From the project window, right-click the Web Service and select Properties.
- In the Web Service Properties window, select the HTTP Method VI Settings tab.
- Select a Method VI from the tab and ensure that:
- In the URL Mapping tab: Method is set to GET, Use standard URL mapping and Include VI name in the URL are checked.
- In the Output Type tab: Terminal is selected and Output format is set to JSON.
- Repeat the previous step for the other Method VI.
- Click OK to save changes.
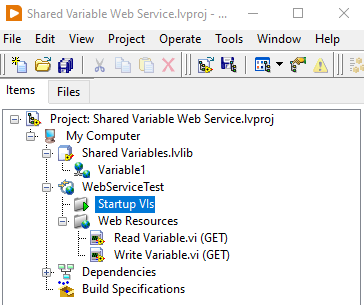
- The project hierarchy should now resemble the following image.

6. Publish the Web Service and deploy the NPSV.
- Right-click the Web Service and select Application Web Server >> Publish. This hosts the Web Service on the Application Web Server.
- Right-click the Shared Variable Library and select Deploy. The Web Service cannot access the NPSV until the library has been deployed. The Shared Variable Library must be redeployed after making any changes to the NPSV.
7. Access the NPSV.
- To write the NPSV:
- Right-click "Write Variable.vi" and select Show Method URL.
- In the HTTP Method URL window, select 8080 - Application from the Available Servers drop-down menu.
- Click Copy URL.
- In a browser, paste the URL and replace {value} with a value to write to the NPSV. For example, the URL for this project takes the format of http://127.0.0.1:8080/WebServiceTest/Write_Variable?WriteValue=5
- To read back the NPSV value:
- Right-click "Read Variable.vi" and select Show Method URL.
- In the HTTP Method URL window, select 8080 - Application from the Available Servers drop-drop menu.
- Click Copy URL.
- In a browser, paste the URL. The image below shows that the URL returns a value of "5" when {value} was set to 5.
