For demonstration purposes, this tutorial utilises a cRIO-9030 as the Real-Time Controller, but the same concept applies to any other Real-Time Controller. Follow the steps below to create and configure a Real-Time Application that uses a Global Variable for data transfer.
Creating a Web Service That Accesses a Global Variable
1. Launch LabVIEW and create a new project.
- Go to File >> Create Project... and select Blank Project.
- Save the project as "Web Service and Global Variable Example".
2. Add your Real-Time Controller to the project.
- Right-click the top-level project item and select New >> Targets and Devices. If this option is not available, refer to Target and Devices Option Missing When Adding a Real-Time Controller in LabVIEW.
- In the pop-up window, select New target or device. Select the model of your controller from one of the expandable menus.
- Click OK.
- Right-click the Real-Time Controller and select Properties.
- In the pop-up window, enter the IP address of your controller in the IP Address / DNS Name field. Click OK.
3. Add a Web Service to the Real-Time Controller.
- Right-click the controller and select New >> Web Service.
- Save the Web Service as "RTWebService".
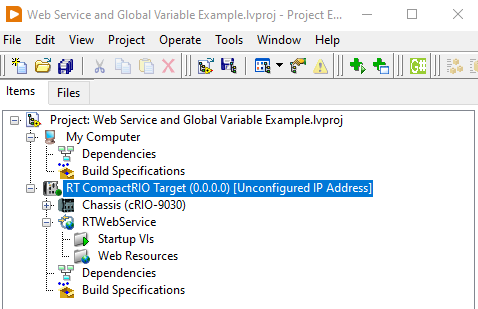
- The project hierarchy should now resemble the following image.
4. Create a Real-Time VI that updates a Global Variable.
- Right-click the Real-Time Controller and select New >> VI. Save the VI as "RT Main".
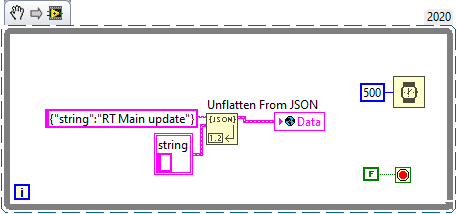
- On the Block Diagram, place a While Loop from the Structures Palette.
- Right-click the stop condition and select Create Constant. Ensure that a False Constant is wired to the stop condition.
- Place an Unflatten From JSON function inside the While Loop. Locate this function in the String >> Flatten/Unflatten String Palette. Connect the following inputs:
- On the JSON String input, connect a String Constant that contains a property name and associated value. For example, the code snippet below creates a property called string with a value of RT Main update. To understand the structure of JSON, refer to [External] Working with JSON.
- On the Type and Defaults input, connect a Cluster Constant. Inside the Cluster, place a data type that matches the property in your JSON string.
- Press Ctrl+Space on the keyboard to open up Quick Drop. Search for "Global Variable" and place it on the Block Diagram.
- Double-click the new Global Variable to open it's Front Panel. Save the file as "Global Variable".
- On the Global Variable Front Panel, place the following:
- A Cluster from the Data Containers Palette. Name it "Data".
- Place a String Indicator inside the Cluster.
- Save and close the file.

- On the "RT Main" Block Diagram, click the Global Variable and select "Data" from the list of available variables. Connect the Value output of Unflatten From JSON to the Global Variable.
- From the Timing Palette, place a Wait (ms) Function inside the While Loop. Connect a Numeric Constant with a value of 500 to it.
- Save and close the VI.
 Note:
Note: This image is a LabVIEW snippet, which includes LabVIEW code that you can reuse in your project. To use a snippet, right-click the image, save it to your computer, and drag the file onto your LabVIEW diagram.
5. Create a GET HTTP Method VI that reads from the Global Variable.
- Expand the "RTWebService" from the LabVIEW project hierarchy. Right-click Web Resources and select New VI.
- Save the new VI as "GET Data".
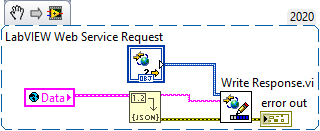
- On the VI Block Diagram, place a Flatten to JSON Function from the String >> Flatten/Unflatten String Palette.
- Drag the Global Variable VI from the project hierarchy onto the Block Diagram. Right-click the Global Variable and select Change to Read.
- Connect the Global Variable to the Anything input of Flatten to JSON.
- From the Connectivity >> Web Service >> Output Palette, place a Write Response VI. Connect the following inputs:
- The LabVIEW Web Service Request Object to the LabVIEW Web Service Request input.
- The JSON String output from Flatten to JSON to the Response String input.
- The VI should now resemble the code snippet below.
 Note:
Note: This image is a LabVIEW snippet, which includes LabVIEW code that you can reuse in your project. To use a snippet, right-click the image, save it to your computer, and drag the file onto your LabVIEW diagram.
6. Configure the HTTP Method VI to use Stream output.
- From the project hierarchy, right-click "RTWebService" and select Properties.
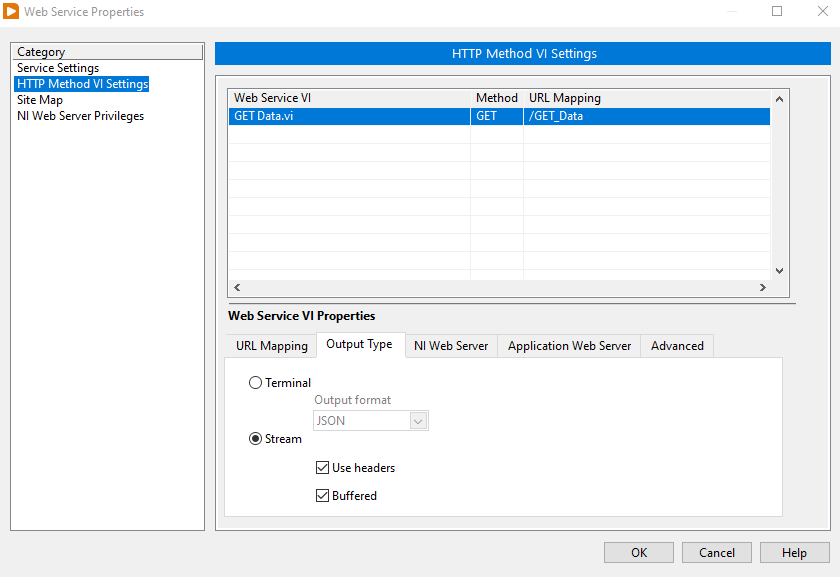
- In the Web Service Properties window, select the HTTP Method VI Settings Category.
- Click GET Data.vi from the Web Service VI table to select this instance of a HTTP Method VI.
- Navigate to the Output Type tab and select Stream as shown below.
- Click OK.
7. Publish the Web Service to the Debug Server to check functionality thus far.
- Right-click "RTWebService" and select Start (Debug Server).
- Right-click the "GET Data" HTTP Method VI and select Show Method URL...
- In the pop-up window, select 8001 - Remote Debugging from the Available Servers and click Copy URL.
- Paste the URL in a browser. At first, the JSON string output will be empty, as shown below. This is expected.

- From the LabVIEW project, open and run "RT Main".
- Refresh the browser accessing the HTTP Method URL and the JSON string should update as follows.

- This demonstrates that the Real-Time VI successfully writes data to a Global Variable, which is accessible in a Web Service.
- Note: This concept cannot be proven when publishing to the Application Web Server. This is because the Application Web Server hosts the Web Service in a separate application instance to the Real-Time VI and therefore, the Global Variable is out of scope. When publishing to the Debug Server, all VIs and Web Services are hosted in the same application instance.
Including the Web Service and Global Variable in a Real-Time Application
1. Define and build a Real-Time Application.
- From the project hierarchy, right-click Build Specifications and select New >> Real-Time Application.
- In the pop-up window, navigate to the Information tab. Select the output directory in Local destination directory.
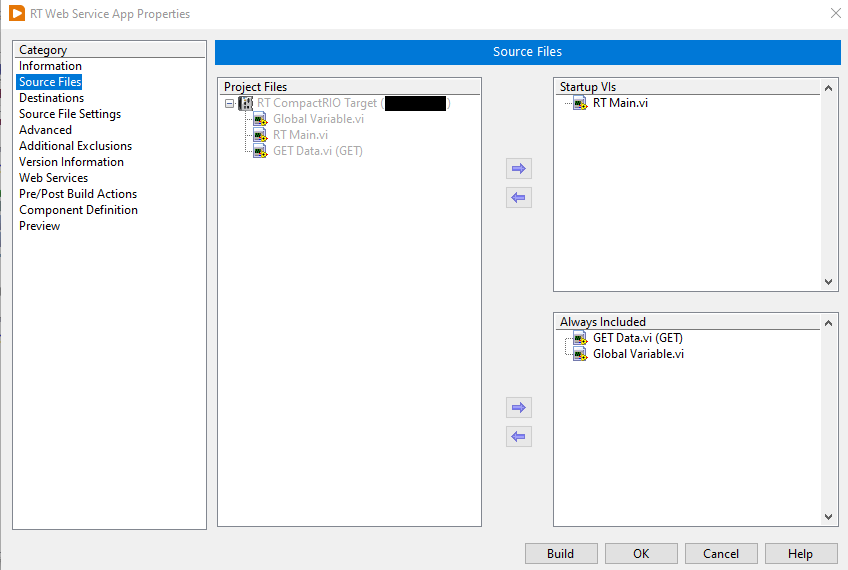
- Navigate to the Source Files tab and include "RT Main" in Startup VIs. "GET Data" and "Global Variable" should be included in Always Included.
- Navigate to the Web Services tab. Ensure that "RTWebService" is checked under Web service name.
- Make a note of the HTTP port. This is 8002 by default.
- Click Build.
2. Run and verify the Real-Time Application.
- Right-click the Real-Time Application and select Run as startup.
- When prompted to restart the controller, click Yes. Note: If asked for the controller credentials, the default username is admin and password should be left blank.
- Monitor when the controller restarts in NI Measurement & Automation Explorer (MAX).
- Once restarted, navigate to the HTTP Method URL. This takes the format of <Controller IP Address>:<Web Service port>/<Web Service Name>/<HTTP Method VI Name>
- If you've followed along with the steps in this article, the URL will be <IP Address>:8002/RTWebService/GET_Data. Note: Ensure that the port in the URL matches the port specified in the Real-Time Application Build Specifications.