You will need to have
NI MAX installed on your system in order to complete any of the steps.
Create Report Using NI Measurement & Automation Explorer (MAX)
- Launch NI MAX
- Select File » Create Report to launch the MAX Report Wizard:
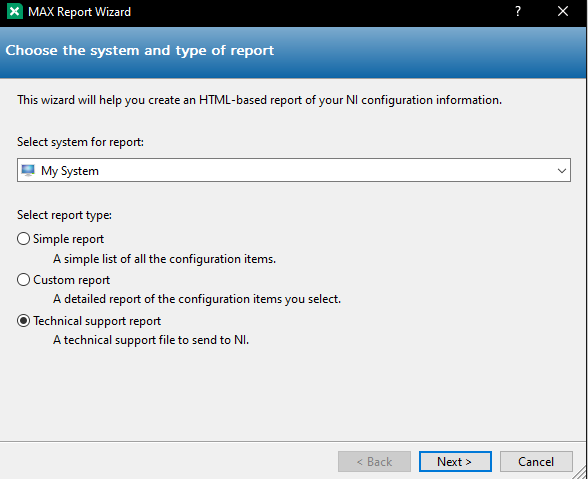
- Choose the system you want the report for. Choose My System to create a report for the development computer or choose a remotely connected systems to create a report specific for a remote system:
- Select the report type to be generated:
- Simple report: A simple report which consists of just the MAX configuration tree item names and icons.
- Custom report: A custom report in which you can select the items you want to document and receive a more detailed report for those items.
- Technical support report: Choose this option if you are working with NI technical support on an issue, and you need to send in your MAX Report to provide more detailed information about your setup, including an installation log of NI software.

- If you choose Custom report or Technical support report, click Next and configure the custom options for the custom report or add any additional files you would like to include in the Technical support report. Otherwise, continue to the next step.
- Click Next to enter a location and file name for your report. The report generated will need to have an .htm or .html extension.
- Click Generate.
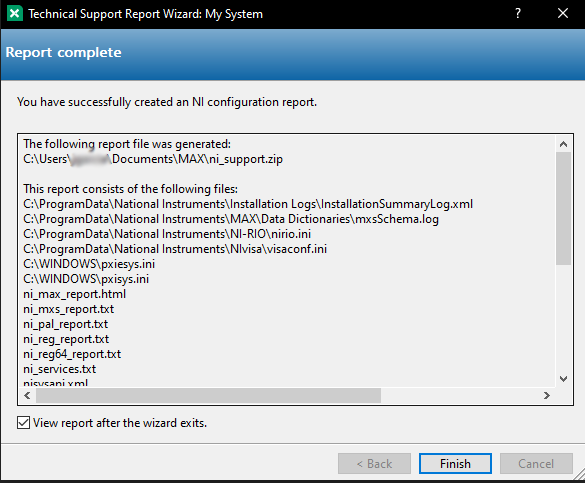
- Once the report is complete, the View report after the wizard exists box will be automatically selected. You can uncheck the box if you do not want to view the report right away. Take note of the location.
- Click Finish to either launch the html report (for Simple or Custom report), navigate to the report location (for Technical support report) or close the report window.

Create Reports Programmatically Using LabVIEW
- Launch LabVIEW
- Go to Help » Find Examples… to launch the NI Example Finder
- Navigate to the Search tab and type in Max Report in the Enter keyword(s) text box:
- Click on Search
- Double-click on example Generate Max Report.vi to open the Front Panel of this VI.
- On the Front Panel, select the Report Type that you wish to generate.
- XML: System consumable report.
- HTML: Human consumable and can open in any web browser. Similar to the Custom report option in MAX Report Wizard.
- Technical Support: Choose this option if you are working with NI technical support on an issue. You cannot add extra files when using LabVIEW. If you want to add more files within the report, please use NI MAX to create the report.
- In the File Path control, input the directory you'd like the report saved in and a file name with the extension corresponding to the Report Type. e.g. .zip for Technical Support type. You can click the Open icon to use your operating system's Open dialog.
- Run the VI.
- Once the VI has completed running, the report will be available in the file path you specified.
Create Reports Using Command Prompt
Note: The creation of remote system reports is currently not supported from the Command Prompt. If you want to create a report for a remote system, you need to use the NI MAX.
- Using the Windows search, launch Command Prompt
- Navigate to the folder that contains NIMax.exe. This location depends on where you installed your NI software. The default location is <Program Files (x86)>\National Instruments\MAX\. To change the current file path, use the cd command and then enter the directory you want to move to. An example of this is shown below:
cd C:\Program Files (x86)\National Instruments\MAX\
- Click the Enter key on your Keyboard to complete the navigation
- Once you have navigated to this location, enter your desired parameters to the MAX report generation command (nimax /REPORT) to generate your report. Parameter value must have quotes, are case-insensitive, be separated by semicolons and have no spaces. Reports will not be created if the syntax is incorrect.
The syntax is as follows:
nimax /REPORT:fileName="<absolute path to a file>";reportType="<custom|simple>";silent="<true|false>"
- (required) filename: Filename for the generated report. It must be an absolute path to a file. Valid file formats are .htm, .html, and .xml. In case you provide a non-valid file extension, NI MAX will silently refrain from creating a report. Any existing file will automatically be overwritten.
- (optional) reportType:
- custom: Default value when not specified. Full details.
- simple: No details
- (optional) Silent:
- true: Default value when not specified. All errors will be silently ignored by NI MAX. No message boxes will be displayed to report errors or a completion status.
- false: A completion message will be shown. Report destinations that are not writeable.
The following examples demonstrate correct uses of the command line report generation:
- nimax /REPORT:fileName="C:\reports\my_file.html"
- nimax /REPORT:fileName="C:\reports\my_file.xml";reportType="custom"
- nimax /report:fileName="C:\reports\my_file.htm";Silent="false"
- nimax /report:fileName="C:\reports\my_file.htm";reportType="simple";Silent="false"
- Click the Enter key on your keyboard to complete the action.
- If you specified “false” for the silent parameter, you will get a completion message after a few seconds or minutes. Otherwise, check your folder path to see if the report generated.