Developing the FPGA VI
Note: This tutorial requires the installation of at least LabVIEW 2009 along with NI-RIO 4.0 and the FPGA Interface C API 2.0 .
To begin, create a new LabVIEW FPGA project. Add any R Series (784xR or 785xR) to the project. Add a FIFO and configure the FIFO type as Target to Host - DMA and the data type as I16. The project should look like Figure 2.
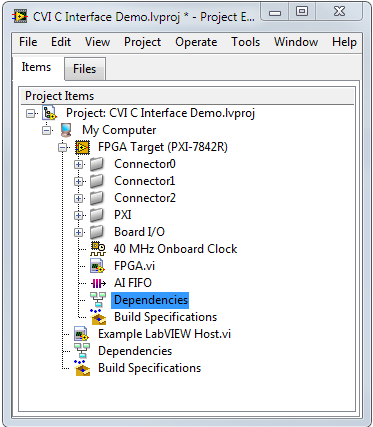
Figure 2. LabVIEW FPGA project with PXI-7833R.
Create a new FPGA VI and design the block diagram as shown in Figure 3. In the first loop, a sine wave is generated and then output on AO0. The rate at which the sine wave is generated is determined by the AO Loop Timer control. In the second loop, a sample from AI0 is acquired and if below the Threshold input, is placed onto the DMA FIFO. The rate at which samples are taken is determined by the AI Loop Timer control.
Physically wire AO0 to AI0 on the R Series card.
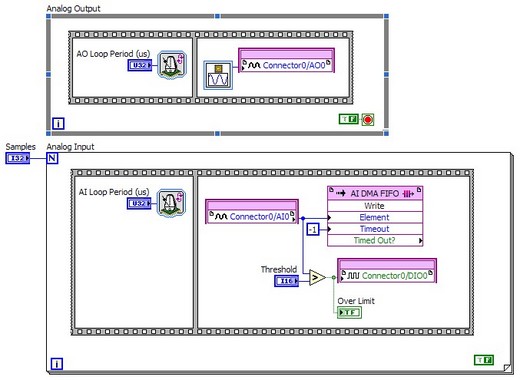
Figure 3. FPGA VI – Performs finite analog input at the desired rate.
Right click the the FPGA VI in the project explorer and click on Compile to compile your FPGA application. The compilation process will create a bitfile and store it in Your Project folder\FPGA Bitfiles.
Generating the C FPGA Interface
Next, generate the C API files needed to build and run a C FPGA interface application. There are three ways to launch the FPGA Interface C API Generator.
- From LabVIEW: Right click on the FPGA VI in the Project Explorer and click on Launch C API Generator… as shown in Figure 4.0. If this option is not available, make sure at least NI-RIO 4.0 is installed along with the FPGA Interface C API 2.0. This will generate the necessary header files needed to interface the host code with the FPGA. Make note of the destination location for later.
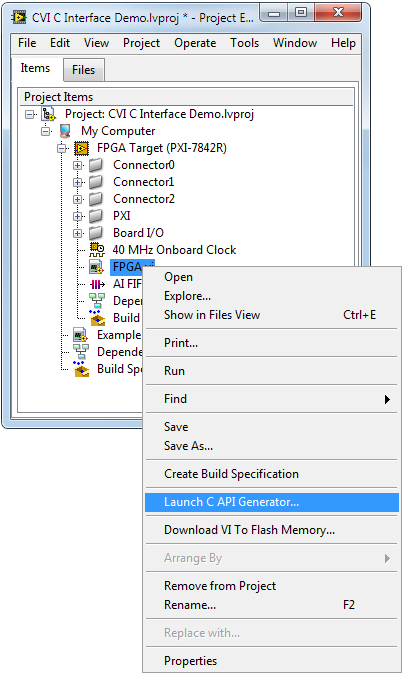
Figure 4.0. Launch C API Generator... Function on Project Explorer
-
From Start Menu: From the Windows Start » All Programs » National Instruments » FPGA Interface C API Generator. If this option is not available, make sure at least NI-RIO 4.0 is installed along with the FPGA Interface C API 2.0. This will generate the necessary header files needed to interface the host code with the FPGA. Make note of the destination location for later.
-
From LabWindows/CVI: Open LabWindows/CVI and create a new project. Navigate to Tools » Launch FPGA Interface C API Generator... as shown in Figure 4.1. If this option is not available, make sure at least NI-RIO 4.0 is installed along with the FPGA Interface C API 2.0. This will generate the necessary header files needed to interface the host code with the FPGA. Make note of the destination location for later.
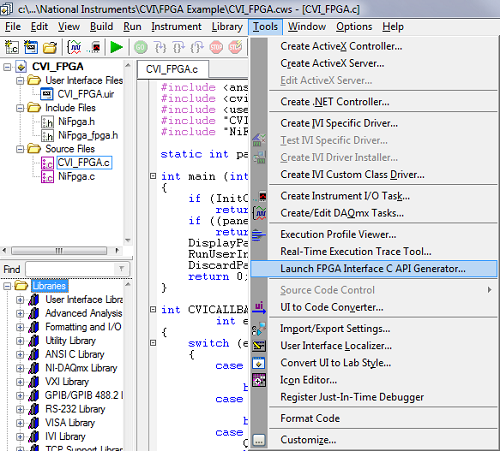
Figure 4.1. Launch FPGA Interface C API Generator... LabWindows/CVI Tools Menu Option
Developing the Application in LabWindows™/CVI
Open LabWindows™/CVI and create a new user interface file. Design the user interface as shown in Figure 5. Add a graph to display the analog input data, a button labeled Acquire to start the acquisition, two numeric inputs labeled AI Loop Rate (uSec) and AO Loop Rate (uSec) to select the sampling rates, a third numeric input labeled Samples to select the number of samples to acquire, a numeric slide labeled Threshold to set the maximum threshold of the output, and a LED boolean indicator labeled Over Limit? to let the user know if the analog output is over the threshold.
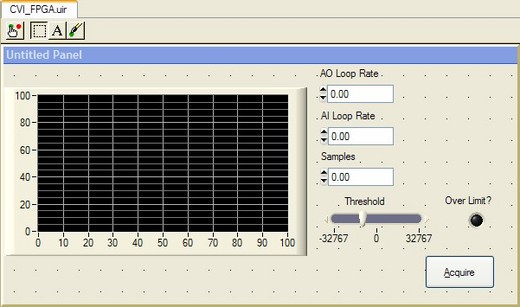
Figure 5. R Series analog input application user interface.
Double-click each user interface control to configure its settings. Be sure to designate callback functions for the Acquire button and the panel. These functions are required to perform actions after user interface events occur.
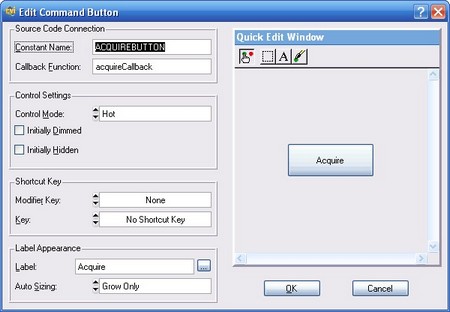
Figure 6. LabWindows™/CVI control editor window.
When the user interface is complete, on the menu bar select Code » Generate » All Code (Figure 7). LabWindows™/CVI CodeBuilder automatically generates skeleton C code that compiles and runs based on your user-interface(.uir) file. The skeletons for the callback functions designated in the last step are automatically generated as well.
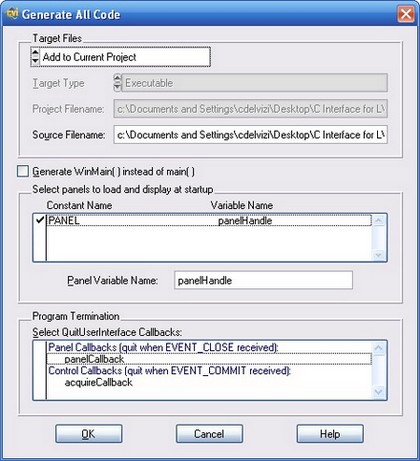
Figure 7. LabWindows™/CVI code generator.
The generated skeleton code will look as following (minus the bold items):
#include <ansi_c.h>
#include <cvirte.h>
#include <userint.h>
#include "CVI_FPGA.h"
#include "NiFpga_fpga.h"

static int panelHandle;

int main (int argc, char *argv[])
{
    if (InitCVIRTE (0, argv, 0) == 0)
        return -1;

    /* out of memory */
    if ((panelHandle = LoadPanel (0, "CVI_FPGA.uir", PANEL)) < 0)
        return -1;

    DisplayPanel (panelHandle);
    RunUserInterface ();
    DiscardPanel (panelHandle);
    return 0;
}

int CVICALLBACK panelCB (int panel, int event, void *callbackData,
                                          int eventData1, int eventData2)
{
    switch (event)
    {
       case EVENT_GOT_FOCUS:
           break;

       case EVENT_LOST_FOCUS:
           break;

       case EVENT_CLOSE:
           QuitUserInterface(0);
           break;
   }

   return 0;
}

int CVICALLBACK acquireCallback (int panel, int control, int event,
                                                    void *callbackData, int eventData1, int eventData2)
{
    switch (event)
    {
        case EVENT_COMMIT:

               /* INSERT FPGA CODE HERE */

        break;
    }
    return 0;
}
Add the QuitUserInterface(0); code to the EVENT_CLOSE case of the panelCallback. This quits the program when the panel is closed.
Next, add the files generated from the FPGA Interface C API Generator to the project: NiFpga.h, NiFpga.c, and NiFpga_fpga.h as seen in Figure 8. Also add the #include statement for the NiFpga_fpga.h and ansi_c.h files. Your project should look like Figure 9.

Figure 8. Adding files to the LabWindows™/CVI FPGA interface project.

Figure 9. Project after adding LabWindows™/CVI FPGA and adding include statements.
Implementing the FPGA Interface
The files generated and added to the LabWindows™/CVI project define the functions needed to interact with the compiled LabVIEW FPGA VI. The FPGA functions should be called inside the callback function where it says /* INSERT FPGA CODE HERE */ such that when the Acquire button is clicked, the code will open a session to the FPGA VI and read the data from the DMA FIFO.
First, initialize the FPGA interface with the NiFpga_Initialize() function. This function must be called before any other NI FPGA functions.
NiFpga_Status status = NiFpga_Initialize();
The NiFpga_IsNotError() function checks if errors have occurred. It is good practice to check for errors after the FPGA interface has been initialized and after you open the session to the FPGA VI.
if (NiFpga_IsNotError(status))
The NiFpga_Open() function opens a session to the FPGA and automatically downloads the bitfile. The bitfile is referenced in the NiFpga_fpga.h header file that was generated earlier and in this case is defined as NiFpga_fpga_Bitfile. "RIO0" is the resource name for the targeted FPGA device. By default, the FPGA VI will automatically run, but in this case the NiFpga_OpenAttribute_NoRun attribute specifies otherwise.
NiFpga_MergeStatus(&status, NiFpga_Open(NiFpga_fpga_Bitfile, NiFpga_fpga_Signature,
   "RIO0", NiFpga_OpenAttribute_NoRun, &session));
Next, write to the FPGA VI Samples,AI Loop Rate (uSec), and AO Loop Rate (uSec), Threshold controls using the NiFpga_WriteI32(), NiFpga_WriteU32(), and NiFpga_WriteI16 functions (the controls are I32 and U32 representation) to specify the number of samples to acquire, the sample rates, and threshold. These values are set from the user interface before writing to the FPGA VI.
NiFpga_MergeStatus(&status, NiFpga_WriteI32(session, NiFpga_fpga_ControlI32_Samples,
    numSamples));

NiFpga_MergeStatus(&status, NiFpga_WriteU32(session,
    NiFpga_fpga_ControlU32_AILoopPeriodus, airate));

NiFpga_MergeStatus(&status, NiFpga_WriteU32(session,
    NiFpga_fpga_ControlU32_AOLoopPeriodus, airate));

NiFpga_MergeStatus(&status, NiFpga_WriteI16(session, NiFpga_fpga_ControlI16_Threshold,
    airate));
The NiFpga_Run() function runs the FPGA VI.
NiFpga_MergeStatus(&status, NiFpga_Run(session, 0));
To read from the DMA FIFO, use the NiFpga_ReadFifoI16() function. The FIFO is referenced in the NiFpga_fpga.h header file, and in this case is defined as NiFpga_fpga_TargetToHostFifoI16_AIFIFO . In this example, the parameter data is provided as the pointer to the location to store the data. The number of points to return from the FIFO read is specified by numSamples.
NiFpga_MergeStatus(&status, NiFpga_ReadFifoI16 (session,
    NiFpga_fpga_TargetToHostFifoI16_AIFIFO, data, numSamples, timeout,
    &r));
To read the Over Limit? indicator, use the NiFpga_ReadBool() function.
NiFpga_MergeStatus(&status, NiFpga_ReadBool(session, NiFpga_fpga_IndicatorBool_OverLimit,

    &overLimit));
When everything is complete, you can call the NiFpga_Close() function to close the session to the FPGA VI and the NiFpga_Finalize() function to close the FPGA interface.
NiFpga_MergeStatus(&status, NiFpga_Close(session, 0));

NiFpga_MergeStatus(&status, NiFpga_Finalize());
The 2009 LabVIEW FPGA Module or later, along with any RIO off-the-shelf hardware, provides developers a graphical programming environment to develop custom hardware. Previously, methods to interface to RIO hardware were limited to LabVIEW. The FPGA Interface C API opens up the doors for C developers to interface these LabVIEW FPGA applications.