Obtaining the GNU Toolchain
You can obtain the GNU tool chain for VxWorks either by purchasing a VxWorks development license from Wind River or by downloading the redistributable GNU tool chain attached to this document. Purchasing VxWorks enables you to use the Wind River Workbench IDE, featuring source code-level debugging and build management. The redistributable GNU tool chain downloadable here offers debugging only at the assembly code level, and you must use the included GNU Make to build binaries.
Note: NI LabVIEW Real-Time 8.5, LabVIEW Real-Time 8.6, and LabVIEW 2009 Real-Time install version 6.3 of the VxWorks OS to compatible targets. LabVIEW Real-Time 8.20 installs version 6.1 of the VxWorks OS to compatible targets. All builds should be targeted to corresponding versions and use corresponding header files. As new versions of LabVIEW Real-Time become available, different versions of VxWorks may be installed and may require you to rebuild your libraries. Refer to the readme file for LabVIEW Real-Time to find the corresponding VxWorks OS version.
Important Notes about Compiling
- Microsoft OS Support. Microsoft Windows Vista and Windows 7 are not supported for version 6.1 or 6.3 of VxWorks.
- ABI Incompatibility. Shared libraries compiled for VxWorks controllers are completely incompatible with those compiled for other controllers, and vice versa.
- Alignment changes. PowerPC-based controllers, including the cRIO-901x series, use 4-byte alignment for all numbers, arrays, pointers, clusters, and handles. This can cause incompatibilities with the binary file formats of some existing Real-Time shared libraries, or with data passed to and from LabVIEW. Consult the Passing Variably-Sized Data to CINs section of Calling Code Written in Text-Based Programming Languages in the LabVIEW Help for more information.
- LabVIEW can only call C functions. The Windows host cannot directly look up symbols in VxWorks-compiled shared libraries. As a result, it cannot call symbols with C++ linkage. All functions called from LabVIEW must have extern “C” linkage.
- The Win32 API is not available. VxWorks does not support Windows API calls. Replace them, if possible, with ISO C or C++ calls. If you have a full license for VxWorks, the complete OS API is made available to you; consult the VxWorks documentation for additional details.
- Incompatibilities between the GNU tool chain and the Microsoft Visual C++ tool chain. Code compiled using the Microsoft Visual C++ compiler may not immediately compile in GCC. Follow the guidelines for cross-platform development and consult the GNU Compiler Collection documentation.
- Avoid duplicate symbol names between shared libraries. VxWorks places all global symbols in the same symbol namespace. If two libraries are loaded with the same global symbol, a warning is displayed, but the load succeeds. This may cause a silent failure if a third library is loaded that expects to reference a symbol from one module, but is linked against another library. To avoid this issue, keep as many symbols marked local (static) as possible, and prefix the remaining symbols with a unique identifier.
- Larger code size. Code compiled for cRIO-901x controllers is roughly 50-300% larger than equivalent code compiled for Windows targets.
- Strict aliasing optimizations can introduce bugs in your code. The use of strict aliasing optimizations, through the use of “-Os”, “-O2” or higher optimizations, or “-fstrict-aliasing,” is highly discouraged. Use the “-fno-strict-aliasing” compiler flag for all optimized builds.
- Autodownloading is not supported. LabVIEW will not download a shared library to a VxWorks target if it is referenced by a VI and does not already exist on the target. The library must be sent via FTP to the appropriate folder on the target.
- Directory restrictions. Shared libraries for use by LabVIEW VIs must exist in either the ni-rt/ or the ni-rt/system/ directory. Paths specified in the Call Library Node will be ignored.
- Use –mlongcall for all compiles. This option allows function calls between modules separated by more than 32MB of memory and is required for correct shared library linkage. If you do not use –mlongcall, you may see console errors of the form “Relocation value does not fit in 24 bits.” and the library will fail to load.
- DllMain() is not supported for library initialization. One workaround is to place initialization and shutdown code in static global constructors and destructors. Alternatively, consult the VxWorks Application Programmer’s Guide for information on the _WRS_CONSTRUCTOR macro, which you can use to initialize libraries.
Compiling with GNU Make
If you are using the redistributable GNU tool chain attached to this document, you can compile your projects using GNU Make. Use the following makefile as a template to construct the makefile for your project.
# These variables control the compiler and linker flags. Change them as

# appropriate.

DEBUG_MODE = 0

ADDED_CFLAGS =

ifeq ($(DEBUG_MODE),1)

OBJ_DIR := PPC603gnu_DEBUG

CFLAGS = -g -mlongcall

else

OBJ_DIR := PPC603gnu

CFLAGS = -Os -fstrength-reduce -fno-builtin -fno-strict-aliasing -mlongcall

endif

LINKFLAGS = $(CFLAGS)

LIBPATH =

# List all the *compiled* object files here, under the OBJ_DIR

# directory. Make will automatically locate the source file and

# compile it.

OBJECTS := $(OBJ_DIR)/example.o

# This is the name of the output shared library.

PROJECT_TARGETS := $(OBJ_DIR)/example.out

# If you have other VxWorks .a files to reference, list them here.

LIBS =

LIBPATH =

# Everything after this line should not need to be modified for

# basic compilation. However, significant changes to the build structure

# will probably involve modifying these lines.

WIND_BASE := $(subst \,/,$(WIND_BASE))

CPU = PPC603

TOOL_FAMILY = gnu

TOOL = gnu

CC_ARCH_SPEC = -mcpu=603 -mstrict-align -mno-implicit-fp

IDE_INCLUDES = -I$(WIND_BASE)/target/h -I$(WIND_BASE)/target/h/wrn/coreip

# This basic rule compiles a .c file into a .o file. It can be adapted to

# all other source files that GCC can compile, including assembly (.s) and

# C++ (.cpp, .cc, .C, .cxx) files. To enable support for those extensions,

# copy this rule and modify its extension and compile flags for the

# required source file type.

$(OBJ_DIR)/%.o : %.c

ccppc $(CFLAGS) $(CC_ARCH_SPEC) -ansi -Wall -MD -MP $(ADDED_CFLAGS) $(IDE_INCLUDES) $(ADDED_INCLUDES) -DCPU=$(CPU) -DTOOL_FAMILY=$(TOOL_FAMILY) -DTOOL=$(TOOL) -D_WRS_KERNEL $(DEFINES) -o "$@" -c "$<"

# Adapted rule for .cpp files

$(OBJ_DIR)/%.o : %.cpp

c++ppc $(CFLAGS) $(CC_ARCH_SPEC) -ansi -Wall -MD -MP $(ADDED_CFLAGS) $(IDE_INCLUDES) $(ADDED_INCLUDES) -DCPU=$(CPU) -DTOOL_FAMILY=$(TOOL_FAMILY) -DTOOL=$(TOOL) -D_WRS_KERNEL $(DEFINES) -o "$@" -c "$<"

all : check_objectdir $(PROJECT_TARGETS)

$(PROJECT_TARGETS) : $(OBJECTS)

rm -f "$@" ctdt.c;nmppc $(OBJECTS) | tclsh $(WIND_BASE)/host/resource/hutils/tcl/munch.tcl -c ppc > ctdt.c

ccppc $(LINKFLAGS) $(CC_ARCH_SPEC) -fdollars-in-identifiers -Wall $(ADDED_CFLAGS) $(IDE_INCLUDES) $(ADDED_INCLUDES) -DCPU=$(CPU) -DTOOL_FAMILY=$(TOOL_FAMILY) -DTOOL=$(TOOL) -D_WRS_KERNEL $(DEFINES) -o ctdt.o -c ctdt.c

ccppc -r -nostdlib -Wl,-X -T $(WIND_BASE)/target/h/tool/gnu/ldscripts/link.OUT -o "$@" $(OBJECTS) $(LIBPATH) $(LIBS) $(ADDED_LIBPATH) $(ADDED_LIBS) ctdt.o

rm -f ctdt.c ctdt.o

check_objectdir :

@if [ ! -d "$(OBJ_DIR)" ]; then\

mkdir -p $(OBJ_DIR);\

fi

clean :

rm -f $(OBJECTS) $(PROJECT_TARGETS) $(wildcard $(OBJ_DIR)/*.unstripped)

.DUMMY: check_objectdir clean
Compiling with Wind River Workbench
Creating a New Project
Launch Wind River Workbench, the main VxWorks application IDE. The following splash screen appears the first time you launch Wind River Workbench.
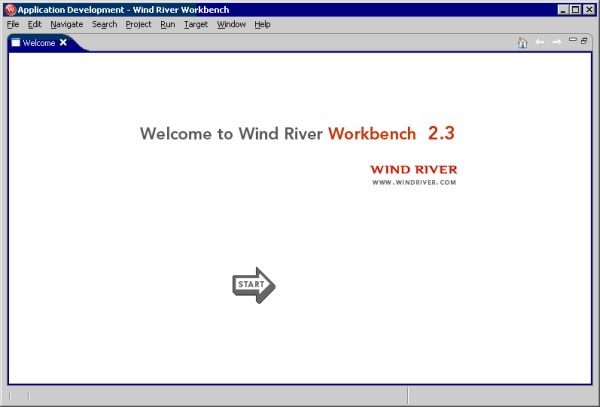
Select Start to continue.
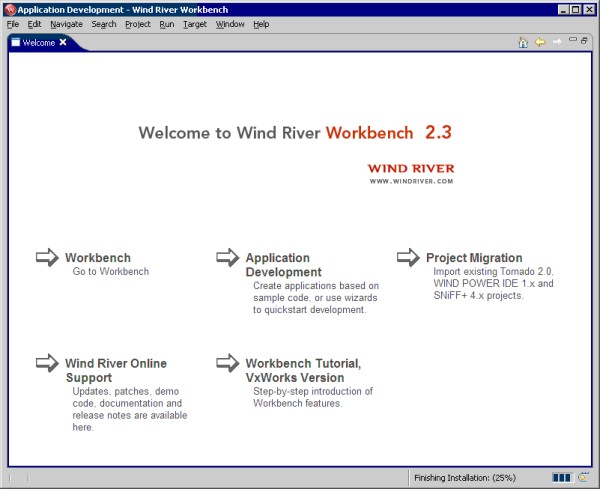
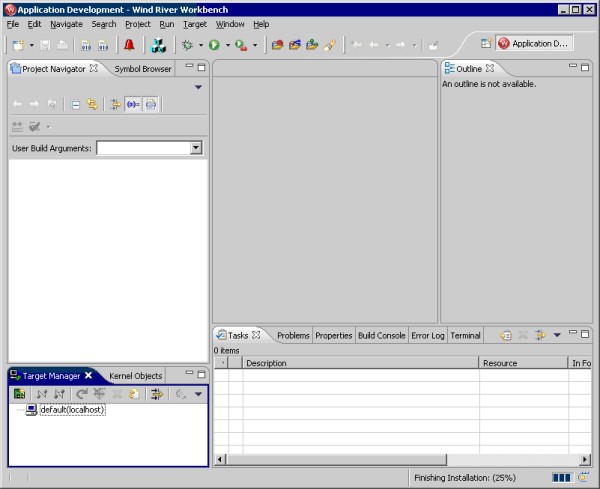
Select Workbench to display the Wind River Workbench window.
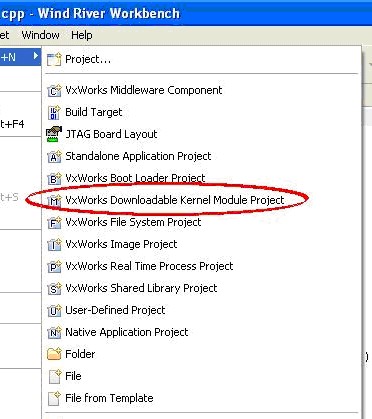
You must create a new Wind River Workbench project to build a VxWorks Kernel Library. Select File » New » VxWorks Downloadable Kernel Module Project to create a new project.
Enter a unique name for the project using the Project name text box. Click the Next button until you arrive at the Build Specs page. Click the Deselect All button and the select PPC603gnu. Click the Finish button.
Importing the Library Source Code
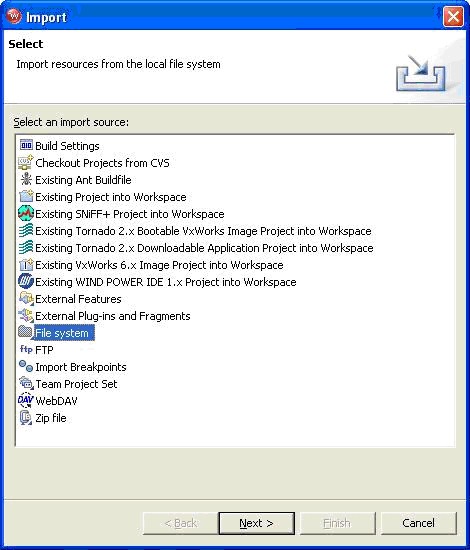
In the IDE, select File » Import to open the Import dialog box. Select File system from the import source list and then click the Next button.
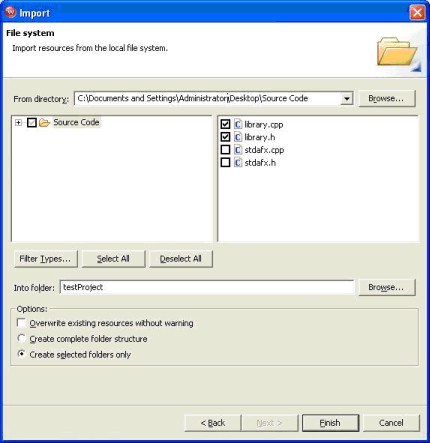
Browse to your tutorial source code directory and select the library.cpp and library.h files. These files are the included sample code for the example library. Click Finish to import the source code into your new project.
Building the Library
Select Project » Build Project from the Workbench window.
The build output will appear in the Build Console. A dialogue for generating includes may appear on the first build. Accept the recommended include paths.

Downloading and Executing Shared Library Code
Use an FTP program to upload your built library to the ni-rt/system directory on the target. Your library is now ready to use from within LabVIEW VIs.
LabVIEW VIs call shared libraries on a VxWorks controller using the Call Library Function node, the same way they call libraries on other Real-Time targets. However, because the LabVIEW development environment cannot read the library information in VxWorks shared libraries, the Call Library Function node must be configured blindly, without parsed symbol lists. (You can work around this limitation by configuring the node to use a Win32 build of the same library. The VxWorks library will be used on the target.) Note that the Calling Convention configuration parameter is ignored.
For more information on calling shared library code, consult LabVIEW Help>>Fundamentals » Calling Code Written in Text-Based Programming Languages » Concepts » Using External Code in LabVIEW, and NI Developer Zone: An Overview of Accessing DLLs or Shared Libraries from LabVIEW.
Debugging through the Serial Console
This section describes debugging techniques available with the GNU tool chain that do not require the Wind River Workbench IDE.
Configuring the Serial Console
VxWorks development often requires using the serial console. The serial console provides standard input/output for running code and a command shell for executing commands.
To connect your computer to the serial console, follow these instructions.
- Connect a null-modem serial cable from your computers serial port to the controller serial port.
- Configure a terminal program for 9600 bps, no parity bit, 8 data bits, and 1 stop bit.
- Turn the CONSOLE OUT DIP switch on the controller to the ON position and reboot the controller. The terminal will display output and diagnostics during the boot process. When it is finished, the message “Welcome to LabVIEW Real-Time” will print.
Loading LVRT...
Welcome to LabVIEW Real-Time 8.2.1
For more information about using the console, consult the VxWorks Kernel Programmer’s Guide.
Disabling the CPU Exception Handler
CPU exceptions include crashes and breakpoints. By default, CPU exceptions trigger a reboot of the controller. You must disable the exception handler in order to set breakpoints or to debug a task that has crashed. There are two ways to disable the exception handler.
Editing the INI file to Disable the Exception Handler
Adding the following text to the ni-rt.ini file on the controller will disable exceptions until the text is removed:
[debug]
InstallExceptionHandlers=false
Using the Serial Console to Disable the Exception Handler
If you use the following procedure, the exception handler will be re-enabled on the next reboot.
- Reboot the controller and the following text should appear, along with a countdown:
Press any key to stop auto-boot…
- Press any key, then type the following text into the console:
@tffs=0,0(0,0)host:/c/ni-rt/system/vxWorks f=0x8 o=0x1000
- When the “->” prompt appears, type the following text:
realInitVxExec
Using the Console
The console can print debug statements compiled into the library, and can set breakpoints at functional scope. Execution debugging can be performed at assembly code scope. No licensing is required to use this functionality.
Here is a brief summary of the commands you can use through the console to debug shared libraries. Please consult the VxWorks documentation for more details.
| Name | Command | Example |
| Function breakpoints | b <function name or instruction address> | b MyFunction |
| Resolve a symbol to an address | lkup “<symbol name>” | lkup “MyFunction” |
| Disassemble a function | l <function name or instruction address> | l MyFunction |
| Step through a single instruction | s [<task name or id>] | s 0xc73d08 |
| Step through a single instruction; step over subroutine calls | so [<task name or id>] | so 0xc73d08 |
| Continue execution | c [<task name or id>] | c 0xc73d08 |
| Spawn a new task |
taskSpawn “<task name>”, 100, 8, 65536,
<function name>
| taskSpawn “test”,100,8,65536,MyFunction |
| List all running tasks | i | I |
| Show task information | ti <task name or id> | ti 0xc73d08 |
| Load library from disk | ld < <library path> | ld < mylib.out |
| Memory dump | d <symbol name or address> | d 0x100000 |
Debugging with Wind River Workbench
The techniques described in this section require the Wind River Workbench, which can be obtained from and is supported by Wind River. You must disable the CPU exception handler before debugging. Refer to the Disabling the CPU Exception Handler section of this document.
Configuring the Target Server
The target server is a process running on the host that sends debugging commands to the target. You can use the target server for source-level debugging and to download shared libraries. By default, the CompactRIO controller is not configured to receive and process debugging commands from the target server, but you can configure it to do so as follows:
- Boot the controller with the serial console enabled. Refer to the Configuring the Serial Console section of this document.
- When booting is complete, run the following command in the serial console:
debuggingInit
You should see output similar to the following:
Debugging is up, target server mounted at /z
VxWorks
Copyright 1984-2005 Wind River Systems, Inc.
CPU: MPC5200 -- Wind River Lite5200 BSP.
Runtime Name: VxWorks
Runtime Version: 6.1
BSP version: 2.0/10
Created: Sep 19 2006, 14:16:01
ED&R Policy Mode: Lab
WDB Comm Type: WDB_COMM_END
WDB: Ready.
value = 0 = 0x0 - FTP the file “ni-rt/system/vxWorks” from the controller to the host.
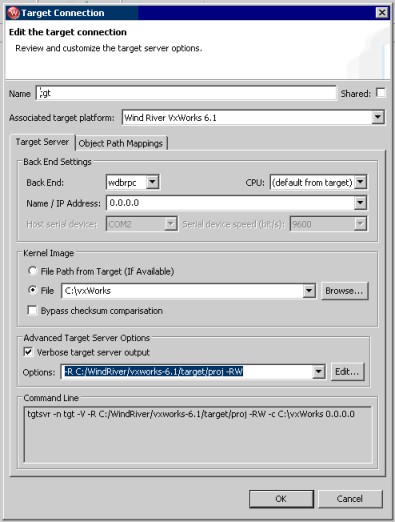
- Create a new Target Connection in Workbench, under the Target Manager view. The following configuration parameters are required:
- Name / IP Address = IP address of controller
- Kernel Image File = Path to downloaded vxWorks file
- The configuration window should look similar to this:
- Connect to the target through the new connection entry.
For more information, refer to the Wind River Workbench User’s Guide.
Using the Workbench Debugger
Workbench can capture standard I/O from the console, set breakpoints at function and line scope, and trace running code at source code scope.
Debugging with Workbench requires the following:
- A fully licensed copy of Workbench
- A debug build of the shared library
- An active target server connection (visible via the Target Manager view in Workbench)
- The shared library must be loaded on the target, and the target server must have loaded its symbols from the local library copy. (The icon representing the library should have an “S” on it, and the symbols should be reported as loaded.)
Breakpoints can be set from the console or from the source code view. To set a source code breakpoint, right-click on the left bar of the view and select “Add Global Line Breakpoint.”
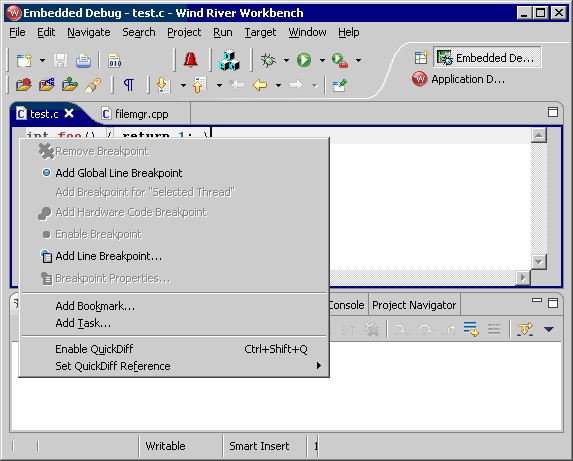
The target console will report when a breakpoint is hit. To debug at the breakpoint location, locate the stopped task in the Process tree of the target server connection, right-click it, and select Attach to Process.
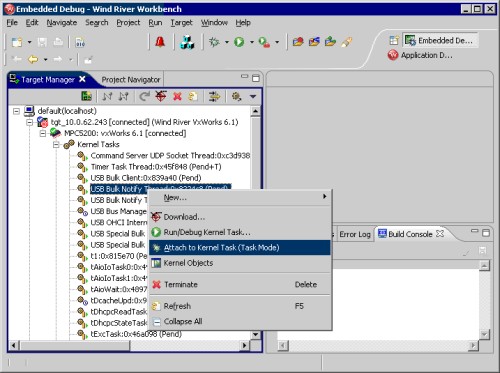
The Debug menu is now populated with a full set of debugging commands.
For additional information, refer to the Wind River Workbench User’s Guide.