Software Installation Order
For this tutorial we have installed LabVIEW FPGA to be able to show the FPGA target in the LabVIEW FPGA project. We have also installed the compatible CompactRIO driver that provides support for the cRIO-904x and have left the default option of installing NI-DAQmx installed. See below for the installation order:
- LabVIEW 2017 SP1 or later
- LabVIEW Real-Time Module 2017 or later
- LabVIEW FPGA Module 2017 SP1 or later
- CompactRIO 17.6 or later
Finding an NI-DAQmx Shipping Example
Once a compatible version of NI-DAQmx is installed, the NI-DAQmx shipping examples will be installed on your system and you can locate them through the NI Example Finder.
- After you have launched LabVIEW click on Help>> Find Examples… on the LabVIEW Getting Started toolbar. <image>
- The NI Example Finder will open in a new window. The Example Finder has hundreds of examples to help you get started with your application. You can browse the examples by task, or use the search tool to find examples that have been tagged with your keywords.
Remain on the default Browse tab and browse according to Task. Navigate to Hardware Input and Output>> DAQmx>> Analog Input. Select the "Voltage - Continuous Input.vi" to open the VI and view. Note there are many other NI-DAQmx examples available that can be leveraged to quickly create a new cRIO-904x DAQmx application.
Note that there are some cRIO-904x shipping examples Hardware Input and Output>> CompactRIO>> Chassis Specific>> cRIO-904x that can be used as a guide.
Converting into a CompactRIO LabVIEW Project
Begin by creating a new project in LabVIEW, where you will manage your code and hardware resources.
- Create a new project in LabVIEW by selecting File » New Project
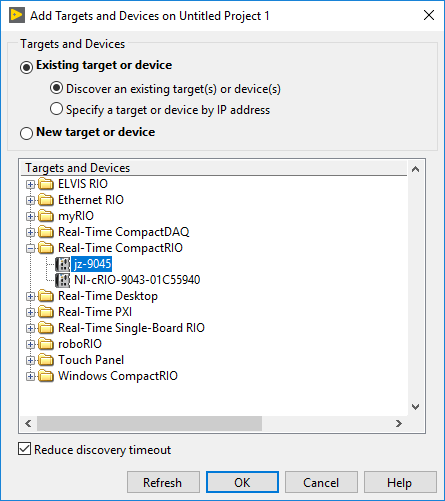
- To add your CompactRIO system to the project, right-click on the Project item at the top of the tree and select New » Targets and Devices…
- This dialog allows you to discover systems on your network or add offline systems. Expand the Real-Time CompactRIO folder, select your cRIO-904x system, and click OK. Note: If your system is not listed, LabVIEW could not detect it on the network. Ensure that your system is properly configured with a valid IP address in Measurement & Automation Explorer. If your system is on a remote subnet, you can also select to manually enter the IP address.
- To add the Voltage - Continuous Input.vi to the LabVIEW project, right-click the cRIO-904x target and select Add>> File... which will open the file explorer.
NI-DAQmx examples will install by default to and can be found here:
C:\Program Files (x86)\National Instruments\LabVIEW <xxxx>\examples\DAQmx
(on x32 OS the default file path will be C:\Program Files\National Instruments\LabVIEW <xxxx>\examples\DAQmx).
- Ensure that the modules configured to be used in the NI-DAQmx task of the Voltage - Continuous Input.vi are in Real-Time (NI-DAQmx) mode by moving them under the Real-Time Resources project item. Also ensure that any changes in programming mode are deployed to the target.
- Open the VI and configure your physical channel controls/ constants for the appropriate module and channels.
- Configure any other settings and run your VI.