Creating a Custom Workspace Object
To create a custom workspace object, you must create or edit a VI file in LabVIEW software and then place a copy of this VI in the C:\Users\Public\Documents\National Instruments\NI VeriStand 20xx\Display Templates directory. Once the VI is in the Display Templates folder, it will appear on the Workspace Controls palette.
The filename of your VI defines the category and name of the object on the Workspace Controls palette in NI VeriStand. The naming convention works as follows:
- The words before the dash in the file name determines the category under which the control appears, such as Boolean Control or Boolean Indicator.
- The words after the dash represent the name of the control.
Take, for example, the Numeric Indicator with Meter. This control is named Numeric Indicator – Meter. The following image illustrates how the control appears in the Workspace Controls palette.
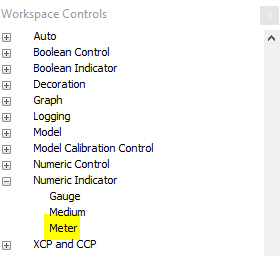
There are three common methods for developing a custom workspace object. Choose the method that best suits the level of customization your workspace object requires:
- Changing the Appearance of an Existing Workspace Control - Use to implement small, cosmetic changes to the appearance of a control that already exists.
- Creating a Lossless Data Display - Use to create a lossless display, such as a graph indicator.
- Creating a Custom NI VeriStand Object From the Free Label VI - Use the architecture of the Free Label VI to create a brand new control if you cannot meet your needs by customizing an existing control.
Changing the Appearance of an Existing Workspace Control
To make small changes to the appearance of a control that already exists, complete the following the steps:
- Open the existing file and save a copy with a new name in a new location on disk.
- Make the desired changes to the appearance of the control and save it.
- Copy the new file into the Display Templates folder.
- From NI VeriStand, open the Workspace window. Find the new control on the Workspace Controls palette and drag it onto the workspace.
- Verify that the object works as expected.
For more information, refer to the example Configurable Control Reference on the NI VeriStand add-ons page.
Creating a Lossless Data Display
For performance, NI VeriStand often decimates the data that it sends to the workspace. However, you can create a lossless data display by completing the following steps:
- In the Display Templates folder, open Graph - Simple.vi. Save a copy with a new name in a new location.
- Extract the Y values from this waveform using the Get Waveform Components VI. Note that the waveform data inside the While Loop is buffered so no channel information is lost.
- Manipulate the Y values to fit the form of the display you want to create.
- Hide the original graph outside of the frame of the front panel. To prevent it from showing when the panel is resized, right-click the graph and select Scale object with pane. Do not delete the original graph, as the subVIs require it to function.
- (Optional) If you want to use the Hide Legend and Autoscaling buttons, wire them to the property nodes of your new display. You can only modify the code in the top-level VI.
For more information, refer to the example Multi-Y Graph on the NI VeriStand add-ons page.
Creating a Custom Workspace Object From the Free Label VI
To create a new workspace object, you can customize Decoration - Free Label.vi located in the C:\Users\Public\Documents\National Instruments\NI VeriStand 20xx\Display Templates directory. This VI contains a pre-populated block diagram that you can easily configure to meet the needs of your control.
This topic contains the following steps to help you create a custom workspace object from the Free Label VI:
- Planning the Custom Workspace Object
- Understanding the Free Label VI
- Setting-up the LabVIEW Project for the Custom Workspace Object
- Naming the Workspace Object
- Customizing the Appearance of the Workspace Object
- Creating the Configuration Page of the Workspace Object
- Customizing the Functionality of the Workspace Object
I. Planning the Custom Workspace Object
Before you develop your custom workspace object, plan the following components:
| Detail | Options |
| Type | Control, Indicator or Multifunction |
| Number of VS Channels In | Single or Multiple |
| Number of VS Channels Out | Single or Multiple |
| Controls | What Type, How Many |
| Object Size | Fixed or Resizable |
| Properties of controls | Fixed or User Specified |
| Functionality | Control/Indicator or Custom |
For this tutorial, you will create a Multifunction control with one VS channel in, one VS channel out, one Dial control, one Meter indicator and a fixed size.
II. Understanding the Free Label VI
Before getting started, familiarize yourself with the parts of the Free Label VI and how they interact with NI VeriStand. The following image shows the block diagram of the VI, followed by an explanation of its major components:
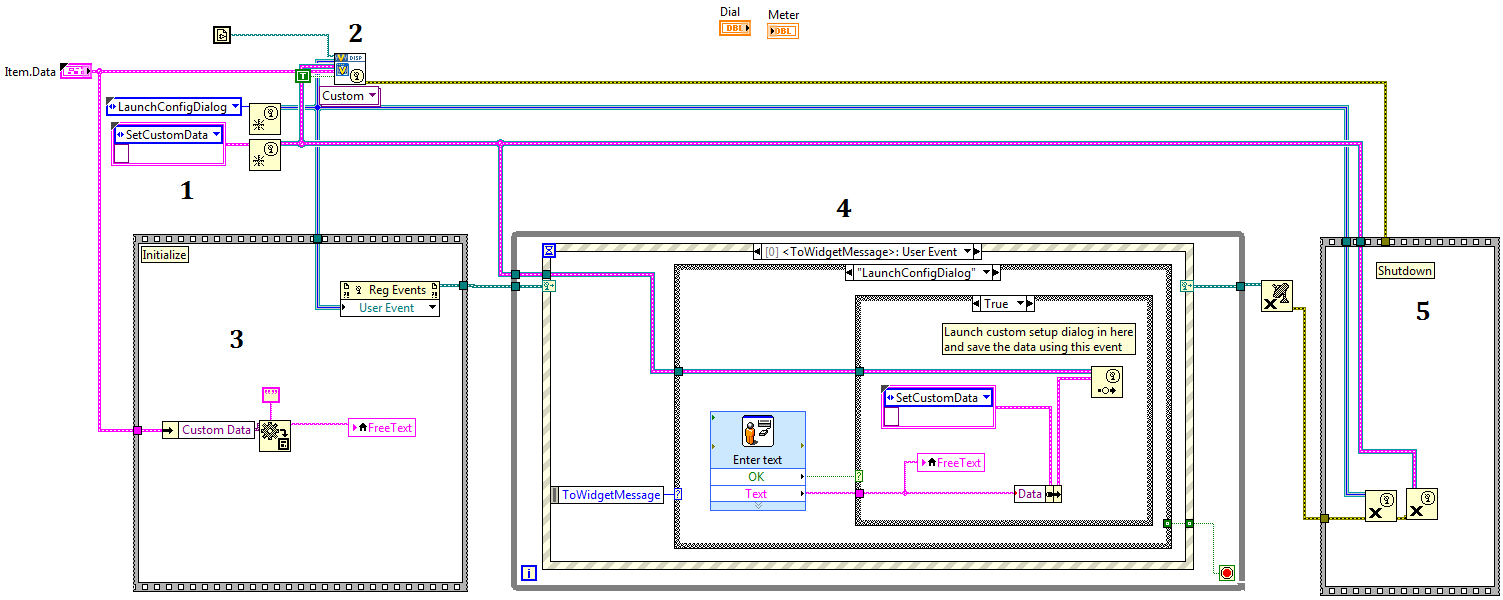
- This section of code creates two user events. The first event handles the NI VeriStand widget events that allow NI VeriStand to pass commands to your custom workspace object. The first event, LaunchConfigDialog, triggers when the user right-clicks on a workspace object and it launches a configuration dialog box. The second one, Stop, in this Create User Event VI, signals the workspace object to stop handling events and close open references.
The event, SetCustomData, stores data from the workspace object in the Custom Data field in NI VeriStand. - The sub_Display Template - Polymorphic VI passes events and data types to NI VeriStand for configuration.
- The Initialize sequence structure reads the values stored in the Custom Data variant and loads them into your workspace object as default values. It also registers the NI VeriStand user event case for use with the event structure in section four.
- The main while loop houses an event structure. The event structure handles events generated by NI VeriStand user events. It also handles the events generated when a user manipulates the controls and indicators of your workspace object.
- This sequence structure closes any open references when the user exits the workspace object.
III. Setting-up the LabVIEW Project for the Custom Workspace Object
- Download the custom_workspace_project.zip from the Downloads section of this tutorial. Unzip the file to a location on disk.
- Open Custom Control.lvproj. This LabVIEW project contains pre-made VIs you can use to create your custom control.
- Copy the Decoration - Free Label.vi from C:\Users\Public\Documents\National Instruments\NI VeriStand 20xx\Display Templates and place the copy in the same folder as the LabVIEW Project.
- Add the Decoration - Free Label.vi to your project. To do this, right-click My Computer in the Project Explorer window and select Add>>File.
- Your project should now look similar to the following image.
IV. Naming the Workspace Object
- In the Project Explorer window, right-click on Decoration- Free Label.vi and select Rename.
- Enter Multifunction – Numeric IO as the new filename and save your changes.
V. Customizing the Appearance of the Workspace Object
These steps will walk you through configuring how your workspace object will appear in NI VeriStand Workspace window.
- Open the Multifunction - Numeric IO.vi from the Project Explorer window. The front panel of the VI should look similar to the following image:
Note: the size of the front panel window represents what users will see when they add the workspace object to the NI VeriStand Workspace window.
- Right-click the string indicator and deselect Scale Object with Pane. This allows you to resize the front panel to show a larger area.
- Add a Dial control and a Meter indicator to the front panel.
- Resize the string indicator and place the Dial control and Meter indicator as shown in the following image:
- Move the controls to the top right corner of the front panel and resize the front panel to fit around the controls. The front panel should look like the following image:
- Adjust the properties of the VI so it displays correctly in the Workspace window.
- Navigate to File>>VI Properties.
- Choose the Window Size page from the Category dropdown menu. Click Set to Current Panel Size. This sets the window size to the size current visible area of the front panel.
- Select Scale all objects on the front panel as the windows resizes. This ensures that when the control is modified in NI VeriStand, the front panel objects are modified as well.
- Click OK and save your VI.
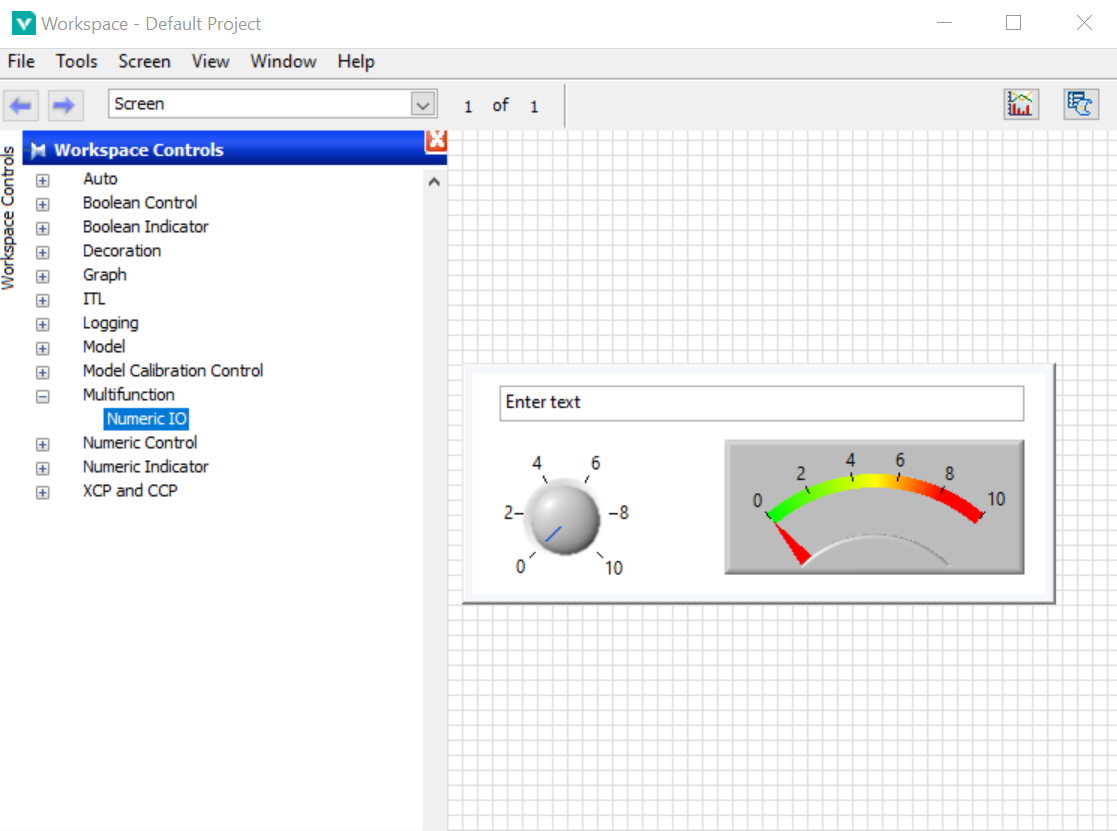
- (Optional) Test the appearance of the VI. First, place a copy of your VI in the Display Templates folder. Run a NI VeriStand project and open the workspace. On the Workspace Controls palette, locate the Numeric IO control under the Multifunction category. Place the control on the workspace. The control should look similar to the following image.
VI. Creating the Workspace Object's Configuration Dialog
When you right-click a workspace object in the Workspace window, the configuration dialog for that object launches. When creating a custom workspace object, you must also create its configuration dialog. This LabVIEW project for this workspace object contains Configuration Dialog.vi, which you will use as the configuration dialog for this object. The following steps walk you through the important components of the Configuration Dialog VI.
- From the Project Explorer window, open Configuration Dialog.vi.
- The front panel consists of a tab control with three tabs. The Channels tab allows you to select a channel for the Meter and Dial controls. These channels are filtered for just the User Channels in NI VeriStand, if you want to add other channels refer the to the steps in Accessing Other Channels than User Channels in a VeriStand Custom Workspace Object. The Label tab allows you to enter text for the label of your object. The Unconfigured tab is unused in this tutorial.
- Open the block diagram of the Configuration Dialog VI. The following image and list explain the important components of the block diagram.
- The block diagram updates the controls and indicators in the Configuration Dialog box with the control's current values.
- The main loop waits for a user to update the controls and press the OK or Cancel button.
- If a user presses either Select button on the Channels page, the control launches the Channel Select VI, which allows the user to select a channel from the available channels in the system definition.
- When a user presses OK, the control returns and saves the new values. If a user presses Cancel, the controls returns and saves the previous values. Note that the channel configuration data is organized into a cluster, which makes keeping track of the data between VIs easier.
VII. Configuring the Functionality of the Workspace Object
- Configure the Initialize Flat Sequence structure. Here you define the type of custom data you want NI VeriStand to save and open the references you will use later in the custom control.
- To setup the Custom Data variant, create a cluster that contains the three following elements: a string constant and two double-precision, floating point number constants named Label, Dial Value, and Meter Value respectively.
- Populate your controls and indicators with the data stored in the Custom Data variant.
- Create a string control and change the label of the control to Gateway IP Address. The Gateway IP Address control is one of the optional inputs from NI VeriStand, and NI VeriStand populates this control with the IP address of the target controller.
- Open a reference to the NI VeriStand Workspace Manager using the Open Workspace Manager Reference VI.
- Pass the Workspace Manager reference and the Gateway IP Address string to the main while loop.
- Configure the main while loop of the custom object. The main while loop consists of an event structure that handles the events generated by NI VeriStand and the controls and indicators on the custom workspace object.
- In the <ToWidgetMessage>:User Event event case, configure the "LaunchConfigDialog" case to use the Configuration Dialog VI discussed earlier in this tutorial. You can find the VI in your LabVIEW project.
- Once the dialog finishes, store the updated data in the NI VeriStand Data variant. For this tutorial, you must update the Label indicator. Note that to store data between while loop iterations, you use the same cluster used in the Configuration Dialog VI.
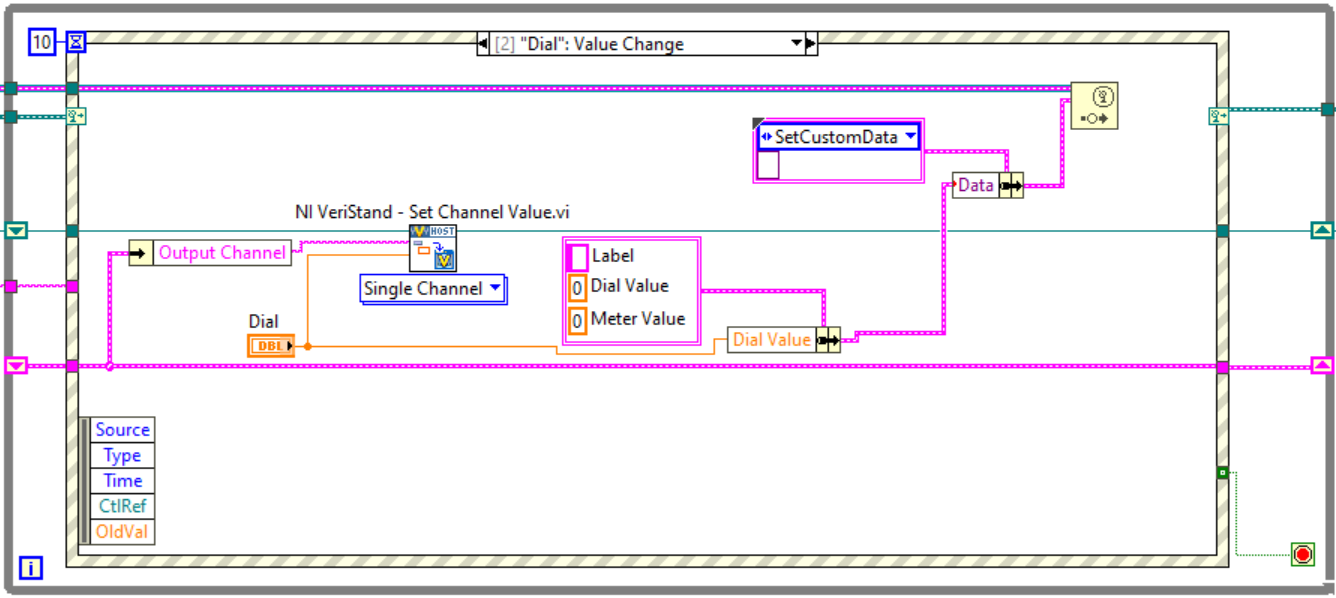
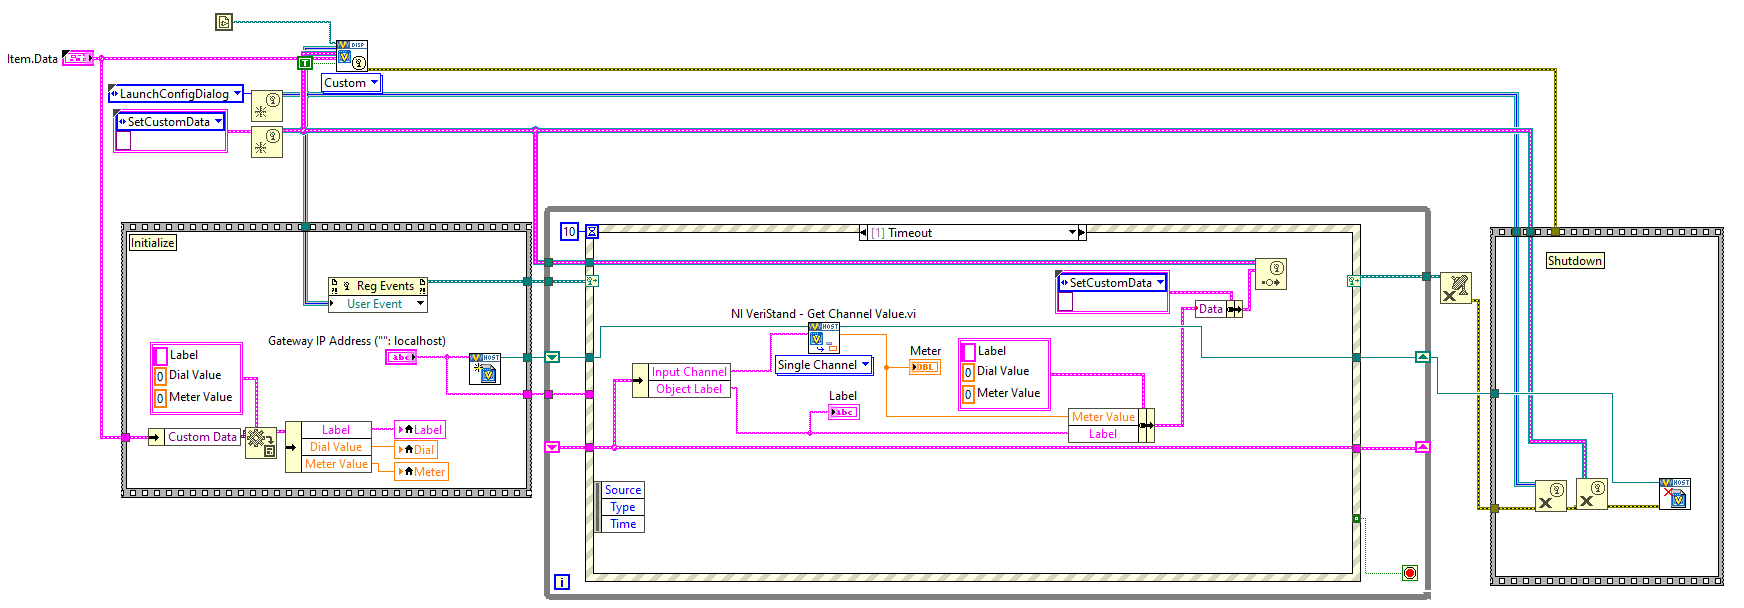
- Add the event case “Dial”: Value Change to handle the event generated when a user turns the Dial control. Use the Set Single Channel Value VI to set the NI VeriStand channel value to the value set by the Dial control. Your block diagram should match the following image.
- Add a Timeout event case. Use the Get Single Channel Value VI to read the value of the Input Channel saved in the cluster. Write the channel value to the Meter indicator.
- Change the Label control to an indicator and move it to the Timeout case. Write the Object Label value to the Label indicator. Your block diagram should match the following image.
- Delete the “Label”: Value Change case as Label now updates in the Timeout case.
- Close the NI VeriStand Workspace Manager reference using the Close Workspace Manager Reference VI.
- Your block diagram should now match the following image.
Building Custom Workspace Objects into Source Distributions
For accessing custom workspace objects from the workspace, you must place all the necessary files in the Display Templates folder. To ensure all of the necessary files are saved to the right location, generate a source distribution from your LabVIEW project.
- Organize the LabVIEW project for your custom control so the workspace object VI is at the top level of the hierarchy. On the same level, create a folder to hold all of your subVIs. For an example, see the following image.
- Right-click Build Specifications and select New>>Source Distribution. This will launch the Source Distribution Properties window.
- In the Category menu, select the Information Section. Enter a Build specification name and select the Display Templates directory as the Destination directory.
- Select Source Files from the Category menu. Select Multifunction - Numeric IO.vi and the Supporting files folder containing the subVIs and move them to the Always Included list.
- For VeriStand 2020 and before. Select Destinations from the Category menu. Select the Add button to create a new destination. Name this destination the same name as your workspace object or Multifunction - Numeric IO. Under Destination type, select LLB.
For VeriStand 2021 and later. Select Destinations from the Category menu. Select the Add button to create a new destination. Name this destination the same name as your workspace object or Multifunction - Numeric IO. Under Destination type, choose LLB and select Add files to new project library.
- Select Source Files Settings from the Category menu. Select the Supporting files folder and check the Set destination for all contained items checkbox. From the dropdown menu, select the destination you created in the previous step. Next, select Dependencies, and configure its settings just as you did for Supporting files. Leave your workspace object VI with its default settings.
- Select Additional Exclusions from the Category menu. Uncheck Exclude file from vi.lib, Exclude files from instr.lib and Exclude files from user.lib and check the Embed compiled code in all source files option. Your configurations should match the following image.
- Click Build. When the build finishes, you will see two files in Display Templates directory: your workspace object VI and your LLB. To test your custom workspace object, open an NI VeriStand project and add the object to the workspace.
Conclusion
You can use custom NI VeriStand workspace objects to meet unique application needs. After you complete a custom workspace object and place it in the Display Templates folder, the object is natively integrated into NI VeriStand like the packaged interfaces.