Modify Cells and Create White Space
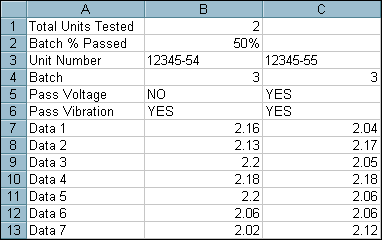
Figure 1 shows the original worksheet you created at the end of the first part of this tutorial. You can compare this example to the final report after you finish this part of the tutorial.

Figure 1: Original Worksheet from Part 1
The Lesson 3 VI represents the code developed in the first three parts of the tutorial, which teach you how to add data, manipulate data, and create a graph.

Figure 2. Inserting and Merging Cells in an Excel Worksheet
To finish the report, add a title and some text with descriptive information like the data and the name of the operator monitoring the test station. Before you add these elements to the report, you must create space at the top of the report to avoid overwriting any existing cells. Use the Excel Insert Cells VI to add space at the top of the report for a title and introductory text. For the title to span the length of the report across multiple columns, you also can merge those cells together using the Excel Merge Cells VI.
Add a Title and Text
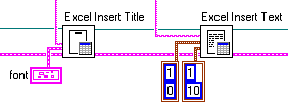
After you create the space, add the text and title with the Excel Easy Title and Excel Easy Text VIs. You can use the same VIs to customize fonts and cell ranges of the text and title so the text is more prominent and stands out from the test data.

Figure 3. Inserting a Title and Text in an Excel Worksheet
Customize Cell Properties
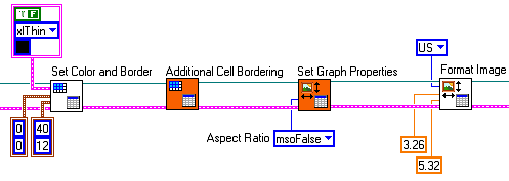
At this point, all the data and information you want in the report is included. To improve report layout, you can add borders and reposition objects, including graphs. Use the Excel Set Cell Color and Border VI to customize cell properties, and use the Excel Image Format VI to customize the graph size.

Figure 4. Customizing Cell Properties in an Excel Worksheet
Present Final Report
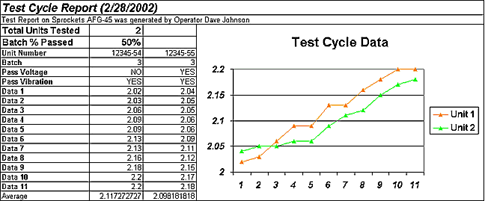
Figure 5 shows the added white space, title, and customized cells. You have created a report that greatly improves the original layout you generated in Figure 1. You now can save or distribute the final product. You can use the toolkit to e-mail, print, or save the report in Excel format. Doing so removes the need for the operator to manually adjust the report, which can save test time and ensure report quality.

Figure 5. Final Test Cycle Report in an Excel Worksheet
Conclusion
This tutorial taught you how to insert and manipulate data, customize cells, create graphs, and combine all the elements to create and distribute a report similar to the previous example. You created the Excel report using a basic structure of first opening a report in LabVIEW and adding data to a worksheet. You then manipulated data using VIs that execute macros and functions in Excel. You demonstrated the results by creating graphs and formatting cells and objects for presentation. Finally, you saved and printed the report. You can use the tools provided in the LabVIEW Report Generation Toolkit for Microsoft Office to build a VI to communicate with Excel to transfer data, perform formatting, and build a professional report for final presentation.