Setting Up CompactRIO Software
To install the proper software on CompactRIO hardware, you must first install it on the host PC. The two necessary components are NI Vision 9.0 or later and NI-IMAQdx 3.4 or later driver software. You can verify this software in Measurement & Automation Explorer (MAX) by expanding the software tab under My System.
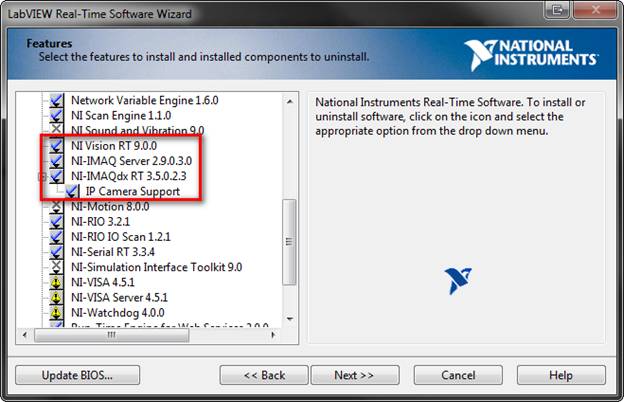
Once you have verified that the host PC has the correct software, you need to install that software on your CompactRIO controller so you can acquire from an IP camera. The CompactRIO controller should appear in MAX under the Remote Systems tab. Expand the target and then right-click on Software and select Add/Remove Software. This opens the LabVIEW Real-Time Software Wizard. Select Custom software installation and click Next. Select Yes to continue with the manual installation. The two required pieces of software are NI Vision RT 9.0.0 or later and IP Camera Support. Find IP Camera Support under NI-IMAQdx RT. Once you have selected both of these to install, click Next to begin the installation.

Choosing an IP Camera
As of NI-IMAQdx 4.0, only Basler IP and Axis IP cameras are officially supported on CompactRIO. NI does sell several Basler IP cameras that are officially supported by IMAQdx. It is best to choose a lower resolution camera when using the second Ethernet port of the CompactRIO because of the limited bandwidth available. Cameras with a resolution higher than 1MP will experience significantly slower frame rates than expected.
Camera IP Settings
It is important to set the proper IP address for the camera to work with the CompactRIO. The easiest setup is to place both the CompactRIO and the IP camera on the same subnetwork. If both devices have an IP address on the same subnet you should be able to use the camera and CompactRIO in the same project. This is especially useful (and necessary) if the CompactRIO controller only has one Ethernet port.
It is also possible to use the camera on the second Ethernet port of the CompactRIO. For this setup, the camera and the second Ethernet port must again have an IP address on the same subnet. However, both devices must be set up for a static IP address that is on a different subnet than the primary CompactRIO port. Configuring the IP setting of the camera can differ depending upon the manufacturer and model. A software tool provided by the manufacturer is almost always needed to configure the IP setting of the camera. Descriptions of setting the IP address for a Basler IP or Axis IP camera are described below.
Basler IP Camera Settings
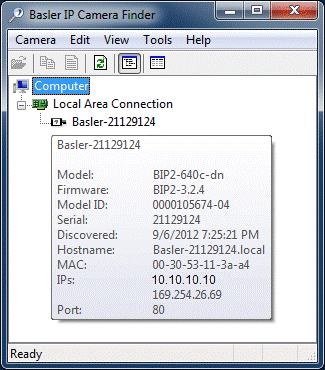
To configure the IP setting of a Basler IP Camera, the Basler BIP Finder software is required. This can be download from Basler’s website. To configure the camera, it must be located on the same subnet as the computer running the Basler IP Finder software. By default, the Basler camera will already have an IP address and mask assigned as seen in the figure below.

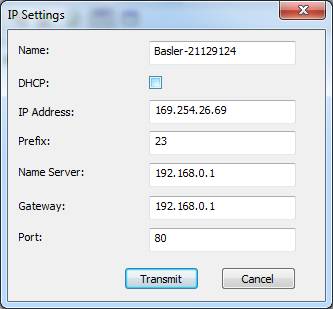
However, to have the camera recognized on the second port of the CompactRIO controller the camera must also have a static IP setting. To make this change, select the camera and then select Edit»IP Settings. Now you will have the option to enter a static IP into the IP Address field as seen in the image below.

Keep in mind that this IP address must be on the same subnet that you will later set for the secondary Ethernet port of the CompactRIO controller. This IP must also be on a different subnet than the primary port of the controller. The screenshot below shows an example of the final IP settings for the Basler camera. This particular Basler camera can maintain two different IP address, one static (which will be used for the CompactRIO controller) and one dynamic (used for the IP configuration process just described).

Axis IP Camera Settings
To configure the IP settings of an Axis IP camera the Axis IP Utility must be used. This software is available on the Axis website. To configure the camera using this utility, the camera must be on the same subnet as the computer running this software. The image below shows the proper recognition of an Axis camera.

As described above for Basler cameras, the Axis camera must have a static IP assigned for it to work on the secondary port of the CompactRIO controller. To change the IP Address, select the camera and then select the button Assign new IP address to selected device. This will open the IP configuration window seen below.

Remember that this new static IP address much be on the same subnet as the secondary port of the compactRIO controller that we will set later. Also, the IP address must be different than the primary Ethernet port of the controller. However, using the Axis IP Utility it is not possible to set a static IP address that has a different subnet than the computer. Unlike Basler IP cameras, Axis IP cameras can only have one IP setting at a time. Therefore, it is not possible to properly configure the Axis camera for the secondary port of the CompactRIO if the camera, computer, and CompactRIO all reside on the same subnet.
One easy solution to this problem is to connect the camera directly to the Ethernet port of the computer. This will typically assign a link local address to the camera. You can then set a static IP for the camera that has a link local address and, therefore, an IP on a different subnet than the primary port of the CompactRIO controller. A sample configuration using this method is shown below.

CompactRIO IP Settings
When you have finished installing the required software and configured the camera IP address, click on CompactRIO under Remote Systems to open the Network Settings. By default, the secondary Ethernet port on the CompactRIO controller is not enabled. To enable this port to work with an IP camera, select Advanced Ethernet Settings. Once the Settings window is open, click on the secondary MAC address listed under Ethernet Devices, change the mode to TCP/IP, and set the Subnet Mask to 255.255.255.0. Then, select an IP address that matches the static IP address you set for your camera except for the last number. When these settings are similar the screen shot below, click OK and Yes when prompted to reboot the system.

Setting Up the Camera
Now that you have enabled the CompactRIO controller to use the secondary Ethernet port, the IP camera appears along with MAX, which you use to configure the camera properly. Plug the camera into the secondary port on the CompactRIO controller. If the Ethernet port lights up, you have configured it properly, and the network should detect the camera.
Under the CompactRIO module in MAX, expand Devices and Interfaces and then expand NI-IMAQdx Devices, and you should see the IP camera named as camX where X is a value assigned to your camera by the driver.

At the top of the menu bar, you should be able to click Snap to obtain one still image or Grab to obtain a video from the camera.

This is also the screen where you can change the Acquisition Attributes and Camera Attributes by selecting the tabs at the bottom.
When you can see the camera in MAX and acquire an image, you can close MAX. Keep in mind the name of the IP camera to use it in LabVIEW (for example, cam1).
Setting Up LabVIEW
Now that the CompactRIO controller and the IP camera are configured properly, you need to set up the LabVIEW VI to use both pieces of hardware.
To do this, open a new project in LabVIEW by going to File»New… Then expand Project and select Empty Project. LabVIEW then creates a project named Untitled Project 1. Rename this project to Vision by selecting File»Save As and typing "Vision" into the filename.
Then right-click Project:Vision.lvproj and select New»Targets and Devices…

Expand Real-Time CompactRIO. The name of the CompactRIO controller that is using the IP camera should be listed. Select it and click OK. Select Continue — scan interface is acceptable for this application because it is not necessary to use the CompactRIO FPGA for IP cameras.
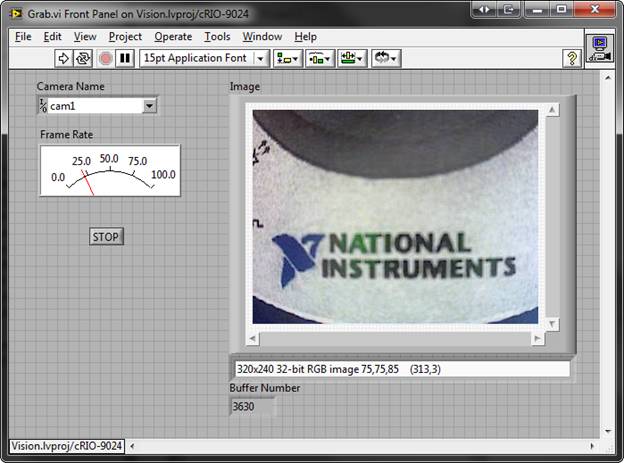
The CompactRIO controller is now listed as a target in the Vision project. To acquire from the IP camera, use an example program called Grab.vi. To add this VI to the target, right-click the CompactRIO option in the project and select Add»File… Then select the root drive where NIs software is installed and navigate to C:\Program Files\National Instruments\LabVIEW 2009\examples\IMAQ\IMAQdx Examples.llb\Grab.vi and click Select. Double-click on Grab.vi in the project and the front panel opens. Select the down arrow under Camera Name and choose the name that corresponds to the IP camera that was configured in MAX (for example, cam1). Clicking the Run Arrow should show a video acquired from the IP camera.
