このコンテンツは設定された言語で表示できません。

このコンテンツは表示可能な別の言語で表示されています。 お使いのブラウザに翻訳機能がある場合はご利用ください。

Creating a Report in Microsoft Excel Using the LabVIEW Report Generation Toolkit: Part 1

Updated Nov 2, 2023

Environment

Software

  • LabVIEW Report Generation Toolkit
  • LabVIEW

Other

Microsoft Excel

This tutorial teaches you how to load data into a Microsoft Excel worksheet. This is the first of a four-part tutorial on creating professional reports in Microsoft Excel using LabVIEW and the LabVIEW Report Generation Toolkit for Microsoft Office, which is included with LabVIEW Professional 2014 and later.

The toolkit adds VIs to an Excel subpalette of the Report Generation palette and modifies the existing report generation VIs to handle Excel-specific functionality. For example, the toolkit modifies the Save Report to File VI to save reports formatted for Excel and Word in addition to the original format choice of HTML.

To create a report, follow the basic structure of opening a worksheet in Excel, adding and manipulating data, and creating graphs and formatting the final results. This part of the tutorial teaches you how to open Excel, add and rename worksheets, and add data from LabVIEW to an Excel worksheet.

Open Microsoft Excel and Change Worksheets

First create a new report reference using the New Report VI and specify the type of report, which is Excel. When opening a new report, you can use a template from an existing Excel file. Then rename the first worksheet to Sprockets - 2-28-2002 using the Excel Rename Worksheet VI, as shown in the following example.

Figure 1. Opening an Excel File and Creating Worksheets

Add a second worksheet to the report to track widget production using the Excel Add Worksheet VI, and repeat the renaming process. These four VIs run Excel, load a new Excel file, and rename the worksheets, as shown in the following example.

Figure 2. Microsoft Excel File with Worksheets
 

Add Data to Microsoft Excel

Use the Excel Get Worksheet VI to navigate between different worksheets. In the previous example, the last worksheet you created is active and you can use this VI to return to the worksheet Sprockets - 2-28-2002. You can add the results of a UUT test to the worksheet using the Append Table to Report VI. You can use this to enter the data as a 2D text array. In this format, numeric and text data is entered simultaneously, and Microsoft Office-specific formatting information passes to Excel.

Figure 3. Adding Test Data to a Worksheet in Microsoft Excel

By opening Excel, renaming and adding a worksheet, and appending a table of data to an Excel worksheet, you can create a report of test data similar to the following example.
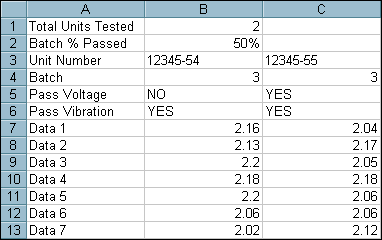
Figure 4. Test Data Written to an Excel Worksheet

Download Example Code

Download the tutorial VIs. Requires LabVIEW 6.0 or later, the LabVIEW Report Generation Toolkit, and Microsoft Office.

Next Steps

The test data in Figure 4 might not be processed or formatted sufficiently for a professional report or presentation. In the next part of this tutorial , you learn how to manipulate the data in Excel, including sorting data and averaging data sets, and format the layout of the results table.