Example Overview
This example will demonstrate how C and LVRT applications can share scanned single point data from hardware I/O of NI Linux RT CompactRIO (cRIO) hardware using Linux shared memory. The example LabVIEW Real-Time (LVRT) application will use NI Scan Engine on NI CompactRIO (cRIO) for scanned hardware I/O data access, and create Linux shared memory as the interface to other processes. The LVRT application will use the Distributed Control and Automation Framework (DCAF), and implement a semaphore Linux IPC mechanism as a timing signal to enable synchronous execution of a complimenting example C application.
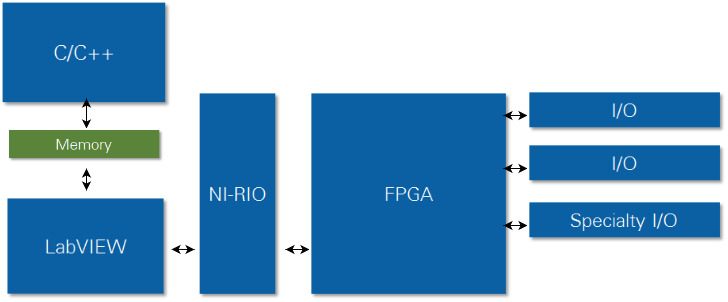 Figure 1
. Linux Shared Memory Data communication diagram.
System Requirements
Linux OS distributions (i.e. NI Linux RT) natively support Linux IPC mechanisms. NI Linux RT hardware includes: NI CompactDAQ (cDAQ), NI CompactRIO (cRIO), and NI Single-Board RIO (sbRIO) Real-Time targets.
Software
LabVIEW libraries, DCAF, and selected DCAF Modules are required to run the example LVRT code and view or modify the application configuration. Additional NI software components and dependencies will be automatically downloaded and installed from the example package, but are listed for completeness. Optionally, a C integrated development environment (IDE) may be installed to modify, recompile, and deploy example C code.
- LabVIEW 2014 or later
- LabVIEW RT
- NI-RIO 16.0
- Additional NI Software Components (LabVIEW Tools Network*):
- NI Linux RT Inter-Process Communication
Dependencies:
- NI Linux RT Utilities
- NI Linux RT Errno
- DCAF Core
- DCAF Shared Memory Module
*note: Software components available on the LabVIEW Tools Network can be downloaded using the JKI VI Package Manager.
Hardware
- NI cRIO controller (906x, 903x)
- 9-30Vdc power supply
- C Series modules* (Scan Engine supported):
- AO
- AI
- DO
- DI
*note: It is recommended to select modules with a sampling rate of at least 1kS/s to keep up with the software scanned I/O sampling rate.
 Figure 2
. NI cRIO-9068 with a single channel “loopback” configuration (Slots 1-4: AO, AI, DO, and DI).
Linux Shared Memory
Linux inter-process communication (IPC) mechanisms enable data communication between software processes. Linux shared memory is one of these mechanisms. Shared memory is access is the lowest latency Linux IPC mechanism, and is implemented as pointer-based direct memory access to volatile random access memory (RAM) storage. Allocated memory is represented as files in a dedicated Linux filesystem directory location (/dev/shm). Memory location pointers, as well as stored data size, can be shared between application processes to communicate data, enable signaling, and synchronization. However, shared memory files will not persist in memory after a reboot of NI Linux RT hardware targets.
Creating Shared Memory
Shared memory can be created by a user application during runtime, and opened by other applications that want to share the same memory as the original application. The shared memory used in this example is the POSIX implementation, which assigns memory spaces a string name to make accessing the same memory from different applications an easy process. As long as an application knows the name of the shared memory that it would like to attach to, it can do so (assuming permissions allow).
The “master” application, which will be responsible for initializing the shared memory, provides the name, as a string, that it would like the shared memory space to have. Upon doing so, the operating system will create a file with the provided name in the default location
/dev/shm. By default, the shared memory occupies zero bytes in memory, but it can be resized to whatever size the application requires.
At this point, any number of “slave” processes can open a reference to the same shared memory file and will be able to use the shared memory as if it were their own. Anything written to this memory will be seen by all other applications that are also tied to this memory.
Pointers to Shared Memory
Accessing an existing shared memory file requires that it be “mapped” to your application’s memory. The mapping process returns a pointer to the memory, which can be used to read and write the shared memory. However, because it is just memory, there is not any inherent structure. An application can choose to put whatever it wants in this space and, as such, it is important that all applications using the memory understand how the data it contains is formatted. Using a structure (C/C++) or cluster (LabVIEW) can be a good way to define what exists in the memory, and helps ensure all applications have shared understanding of what the memory contains.
Defining Memory for Tag Data Sets
Shared memory allocation in shared memory is a mapping of data to RAM, and the application that creates the memory will determine the configuration of that memory. There are performance benefits from grouping tag (“latest value”) data in shared memory by data type and access permissions (read/write), but this is not a requirement. The memory pointer for the start of the file establishes the “zero” location of data for a shared memory file. Tags within the file can be located by pointer offsets based on the known data allocated in preceding memory location within the file.
Tag Data Communication Using Shared Memory
Shared memory provides a mechanism for low latency tag data transfer between application processes, and it is programming language agnostic (i.e. LabVIEW, C, etc.). A memory mapping configuration will need to be shared between all processes which need access to shared memory. It is important that the software design incorporate a means of managing memory access to prevent “race conditions,” or unpredictable access operation sequence when processes compete for the same resource. A simple design approach can be to ensure a single-writer for each Linux shared memory file.
Linux RT Inter-Process Communication Library
This library provides a LabVIEW wrapper for Linux shared memory and POSIX threads creation, access, and deletion. Shared memory is created by LabVIEW, and is accessed by name. POSIX threads (“pthreads”) can be created in shared memory, with user defined priority respected in the Linux OS. The
Linux RT Inter-Process Communication Library is an open source collaboration.
C and LabVIEW IPC
Any application process with an interface to Linux shared memory can share data between them by using shared memory as a communication interface. In this example, a C application reads and writes tag data in shared memory which is I/O tag data scanned by a LVRT application that has an interface to cRIO hardware channels. In order to prevent race conditions in access to shared memory, a shared memory file is created for each data type and direction. Using this implementation, only one writer is permitted for any file, and by association the tag data it contains.
DCAF Shared Memory Module
The plug-in based Distributed Control and Automation Framework (DCAF) provides a reliable, scalable and high performance framework embedded monitoring and control applications that use tag data. DCAF Module plug-ins exist for many tag data functions (I/O access, data communication, processing, logging, etc.), and this allows a user to take advantage of “out of box” features by configuring DCAF applications from a standard configuration editor.
DCAF is an open source collaboration located on
External Link: GitHub.
The DCAF Shared Memory Module uses the Linux RT IPC Library and maps its configuration to DCAF to provide a configuration based workflow for interfacing LV to shared memory. Users add a module (i.e. shared memory) to an existing DCAF configuration, then add “channels” to the module and map them to DCAF tags, which can be shared between modules. The DCAF Shared Memory Module is an open source collaboration located
External Link: GitHub.
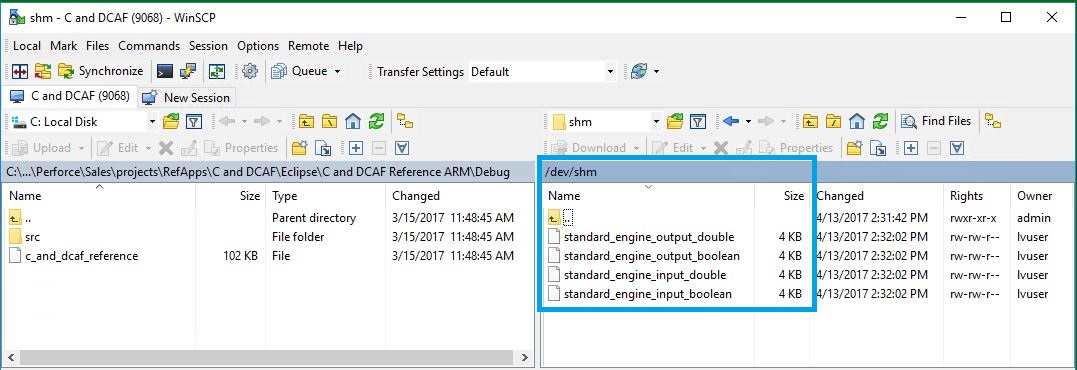 Figure 3
. DCAF Shared Memory Module generated input and output files.
Defining Memory Structure Using a C Header File
A C header file is one way to provide an abstraction between the shared memory structure and a C application. The Shared Memory Library for Linux RT can be used to generate a C header file from an existing memory configuration, made in LabVIEW.
Reading and Writing Scanned I/O Tag Data to Shared Memory with DCAF and NI Scan Engine
In the example scanned I/O is published to shared memory by a DCAF based LVRT application. I/O hardware channel read and write access is enabled for a cRIO in “Scan Mode” by the NI Scan Engine. NI Scan Engine is a process on NI Linux RT which maintains an updated tag I/O data table by periodic scanning of a pre-compiled FPGA I/O interface. The DCAF Scan Engine Module provides access to I/O hardware, and the DCAF Shared Memory Module allows the mapping of the I/O data to shared memory.
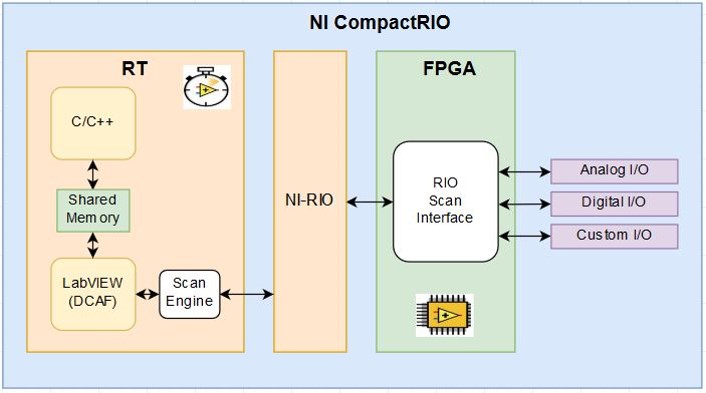 Figure 4
. DCAF scan interface to NI CompactRIO hardware I/O using NI Scan Engine.
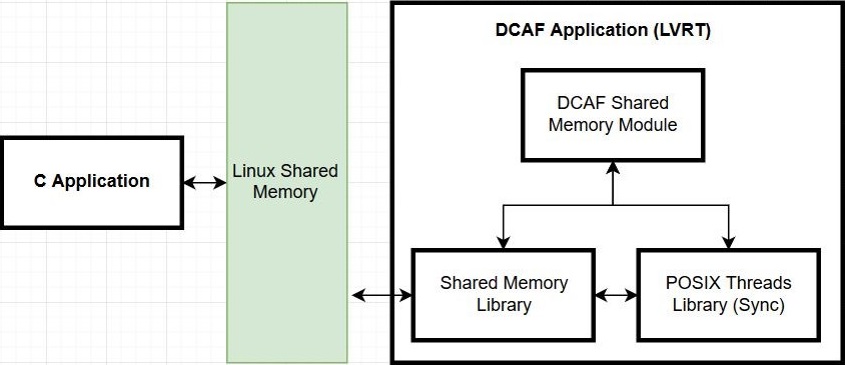 Figure 5
. DCAF based LVRT application components and data communication.
Semaphore Signaling in Shared Memory for Synchronous Process Execution
Synchronous execution of C and LV can be achieved by the sharing signals from a LV timing source (example: NI Scan Engine). An optional feature of the DCAF Shared Memory Module is the sharing of LV process timing information and the generation of semaphores for C application processes that signal when I/O data is ready.
Linux Shared Memory and DCAF Example
The attached LVRT example will use NI Scan Engine on cRIO for scanned hardware I/O data access, and create Linux shared memory as the interface to a complimenting example C application. The LVRT application will use the DCAF framework, and implement a semaphore based timing mechanism to enable synchronization of C to the NI Scan Engine. This example is maintained as an open source project on
External Link: GitHub.
A common “loopback” test will be used to demonstrate data read and write access between C and LabVIEW application processes using Linux shared memory. The test configuration will use tags in created shared memory as the C interface to the DCAF based LVRT application, which can read and write to hardware I/O.
Getting Started
The example LVRT code provided is intended for deployment on NI cRIO hardware, and requires the installation and setup of software tools and system hardware.
Hardware Installation
- Install C Series modules:
1.1. AO – slot 1
1.2. AI – slot 2
1.3. DO – slot 3
1.4. DI – slot 4
- Connect at least one loopback wire per AIO/DIO pair (example: AO0 to AI0, DO0 to DI0).
Software Installation
- Launch JKI VI Package Manager.
3.1. Select and install Linux Shared Memory and DCAF Example
- Copy the example C code into the IDE workspace directory.
- Open the example C code (<UserDesktop>\C).Copy all .c and .h files into the relevant directory and create a C/C++ project.
Launching the Examples
- Create a new LabVIEW Project.
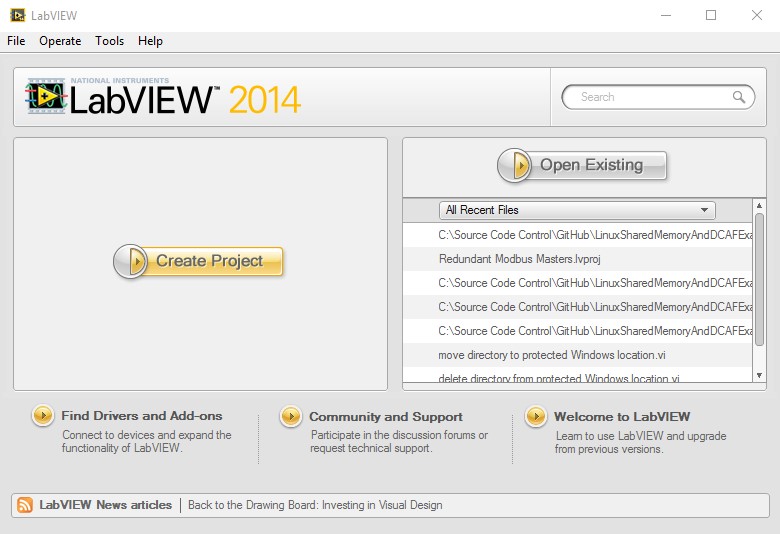 Figure 6.
 LabVIEW Getting Started Window.
- Select Example (LabVIEW Create Project Window).
7.1. Sample Projects >> CompactRIO >> Linux Shared Memory and DCAF Example
7.2. Click “Next.”
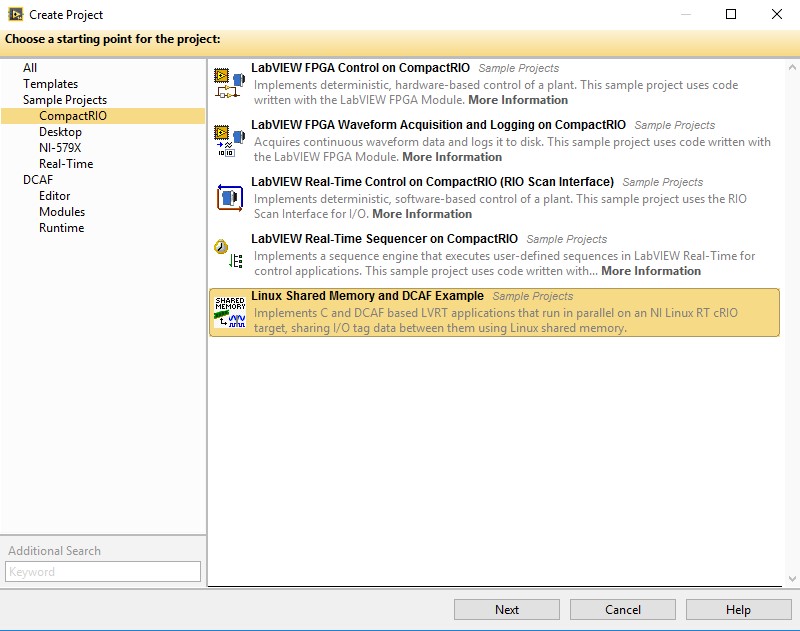 Figure 7
. LabVIEW Create Project Window.
- Update Hardware Configuration (LV Project Explorer Window).
8.1. RT CompactRIO Target IP address.
8.1.1. Right-click, Properties >> General
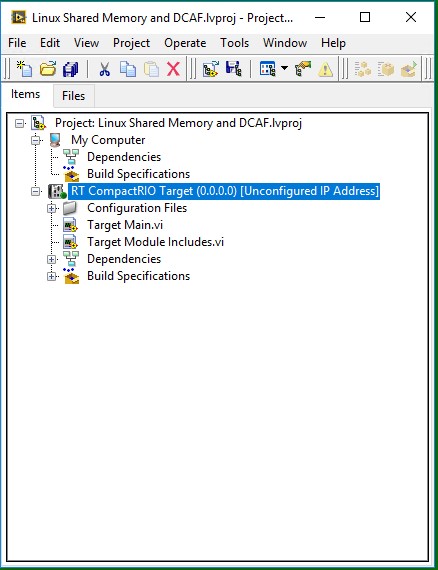 Figure 8
. Example LV Project prior to chassis detection (LV Project Explorer Window).
8.2 Detect chassis and modules.
8.2.1. Right-click, New >> Targets and Devices…
8.2.2. Select “Existing target or device”
8.2.3. Expand “CompactRIO Chassis” folder
8.2.4. Select cRIO chassis
8.2.5. Click “OK.”
8.2.6. Leave Programming Mode set to “Scan Interface”
8.2.7. Click “Continue.”
8.2.8. Click “OK.”
- Save LV project, and leave it open.
- Modify DCAF Configuration (DCAF Editor Window).
10.1. Launch the DCAF Standard Editor.
10.1.1. Tools >> DCAF >> Launch Standard Configuration Editor…
- Update the example configuration.
11.1. File >> Open >> \<ProjectDirectory>\DCAFshm.pcfg
11.2. cRIO >> Configuration
11.3. Modify IP address.
11.4. Select Target Type (906x = “Linux RT ARM”, 903x = “Linux RT x64”).
11.5. Update “Includes file path” (<ProjectDirectory>\Target Module Includes.vi).
11.6. Save configuration file.
- Deploy configuration file (DCAF Editor Window).
12.1 Tools >> Deploy Tool
12.2. Select configuration file.
12.3. Click “OK.”
12.4. Type NI Auth password.
12.5. Click “Deploy.”
12.6. Minimize or close the DCAF Editor (File >> Exit).
- Build DCAF Startup LVRT Application (LV Project Explorer).
13.1. Expand “Build Specifications,” under the RT target.
13.2. Left double-click, “RT Startup Application.”
13.3. Choose “Local destination directory” on the PC for the application (example: “<ProjectDirectory>\builds”).
13.4. Click “Build” (this will take several minutes).
13.5. Run LVRT application as startup.
13.5.1. Right-click “RT Startup Application” (Set as startup).
13.5.2. Right-click “RT Startup Application” (Run as startup).
13.5.3. Click “Yes” to proceed with reboot.
13.5.4. Enter NI Auth login credentials, click “OK.” (it will take a few minutes to reboot the cRIO).
- Run C application.
14.1. Launch PuTTY.
14.2. Enter target IP address, click “Open.”
14.3. Log in (yolinllu will be in the “/home/admin” directory).
14.4. Maximize PuTTY window.
14.5. Type: “ls” to see directory contents.
14.6. Type: “./c_and_dcaf_reference” to launch the C example application.
 Figure 9
. Log in and launch of example C application (PuTTY).
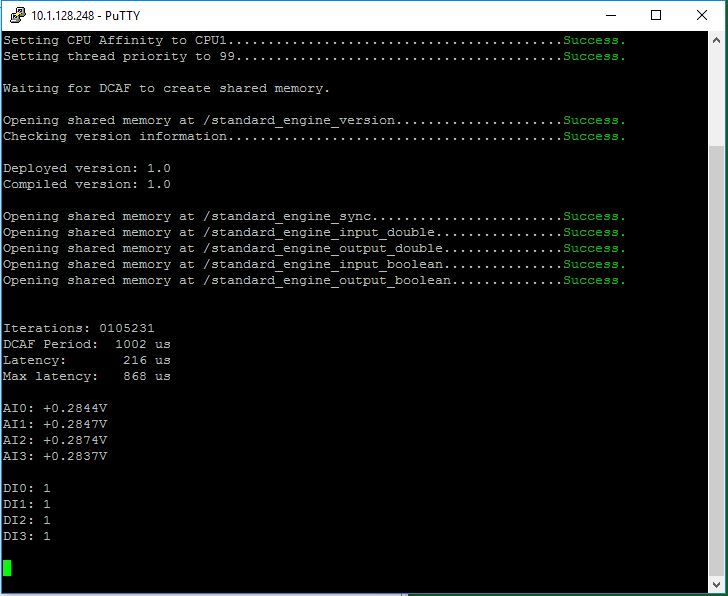 Figure 10
. C application example command line execution (PuTTY).
Modifying the I/O Configuration
The hardware I/O configuration used in the examples can be modified using the DCAF Standard Editor (Tools >> DCAF >> DCAF Standard Editor) in LabVIEW. DCAF performs the functions of: 1) accessing NI Scan Engine, 2) creating shared memory and tag data structures in that memory, and 3) creating semaphores in shared memory for system timing. The configuration parameters relating to these features are managed in the DCAF Editor through user modification of the configuration (default name: “System”), Target (“cRIO”), DCAF Engine (default name: “Standard Engine”), and the channels and mappings of the DCAF Scan Engine and Shared Memory Modules.
- Modify the example configuration (DCAF Editor Window).
15.1. Add, delete or modify the Scan Engine Module Channels.
15.2. Click “Generate Tags, Select “All.”
15.3. Map tags to Shared Memory Module.
15.4. Save configuration file.
Note: If configuration file name is changed, Target Main.vi will need to be updated to use a new file path (set as default), and the LVRT EXE will need to be rebuilt.
15.5. Modify C header file location.
15.5.1. Generate C header file (Click “Generate” button).
15.6. Deploy configuration (Tools>> Deploy Tool).
15.7. Reboot target.
- Modify C code if necessary (example: displaying more I/O channels).
16.1. Rebuild C project – updates the C header file dependency.
16.2. Deploy new C EXE from the IDE.
- Run C code from PuTTY (Step 14).
Performance
Shared memory is one of the fastest inter-process communication mechanisms available in Linux. Due to it only using memory reads and writes, it allows for very fast data transfer between parallel applications. The tradeoff to this raw speed is the fact that shared memory has no form of event signaling (i.e. telling another process that there is new data available in shared memory). Applications using shared memory must use some other mechanism (e.g. semaphores) to cover this signaling functionality, if needed.
The following diagram illustrates the approximate execution time for writing an array of data to shared memory on a CompactRIO-9034 from a LabVIEW RT application.
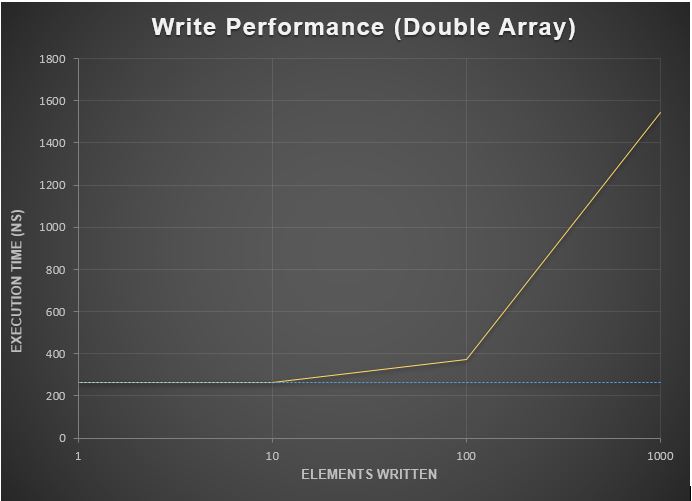 Figure 11
. Shared Memory Performance
At an array size of 1 and 10 elements, the write takes roughly the same amount of time (250 ns). This is largely due to the time required to access the system’s RAM being the limiting factor. At 100 elements, we see a duration of ~370 ns, or roughly 250 ns for the RAM access time plus another 120 ns for the sequential transfer. Lastly, at 1000 elements written, the transfer time starts to becomes the main driver for the overall execution time, rather than the access time for the RAM itself.