What Is MIMO?
With MIMO, you can increase wireless system performance without increasing power consumption. When you use multiple antennas, the transmitted signal progresses through different wireless channels (from the transmitter antennas to the receiver antennas) and creates a capacity gain by exploiting channel diversity.
Implementing a 2 × 2 MIMO System
The MIMO system described here uses Alamouti space-time block coding on the transmitter side and MRC on the receiver side. The combination of the two techniques exploits the full diversity available to a 2 × 2 MIMO system.
At the transmitter, symbols are encoded with the Alamouti scheme. The first two symbols (s1 and s2) are converted into a 2 × 2 matrix.

The rows represent the different transmit antennas, and the columns represent consecutive time slots. This matrix repeats for every consecutive pair of transmit symbols. Refer to External Link: Alamouti code for more information about the Alamouti scheme.
2 × 2 MIMO System: Hardware Configuration
NI recommends the following configuration:
- One PC with a free gigabit Ethernet port.
- One gigabit Ethernet switch connected to the PC.
- Two transceivers configured as transmitters. Connect the first transceiver directly to the switch using Ethernet and connect the second transceiver to the first using the MIMO cable.
- Two transceivers configured as receivers. Connect the third transceiver directly to the switch using Ethernet and connect the fourth transceiver to the third using the MIMO cable.
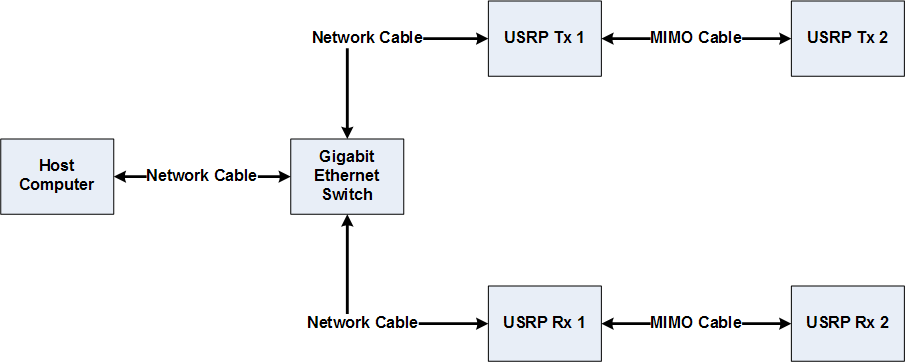
Figure 1. 2 × 2 MIMO Hardware Setup Diagram
Figure 1 shows the configuration you can use to synchronize the Reference Clock sources between both transmitters and the Reference Clock sources between both receivers. Each transceiver has one antenna connected to either port (NI recommends RX1/TX1 for simplicity). To allow the MIMO system to fully exploit the diversity of the separate channels, space the transmitters apart by at least half a wavelength of the carrier frequency used. For the same reason, space the receivers apart the same way.
2 × 2 MIMO System: Software Configuration
This 2 × 2 MIMO example is a LabVIEW application that requires the following software components:
- NI LabVIEW Version 2011 (or later) system design software—Full, Professional
- NI-USRP Version 1.1 (or later)
- NI LabVIEW Modulation Toolkit Version 4.3.1 (or later)
- 2 × 2 MIMO Example VIs
Working With the Example
Unzip the associated .zip file to a new folder and open 2x2QAMAlamouti with BER.vi in LabVIEW.
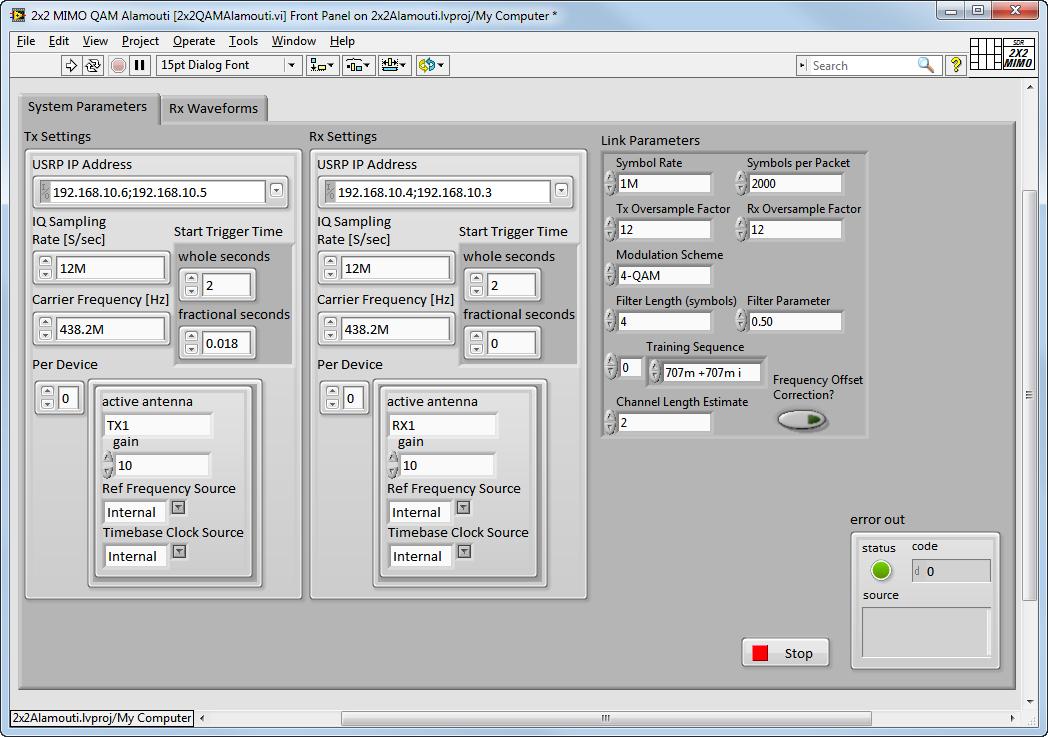
Figure 2. The System Parameters Tab on the Front Panel of the 2x2QAMAlamouti VI
On the front panel of the example (Figure 2), click the System Parameters tab. The Tx Settings and Rx Settings sections contain the parameters for the Tx and Rx pairs of NI USRP transceivers, respectively. Set the controls in these sections and those found in the Link Parameters section with the following guidelines in mind:
-
USRP IP Address
Enter the two IP addresses associated with the NI USRP transceivers in each of the Tx and Rx pairs. Use a semicolon to separate the entries—for example, 192.168.10.6; 192.168.10.5.
-
I/Q Sampling Rate, Symbol Rate, Tx Oversample Factor, and Rx Oversample Factor
For the I/Q Sampling Rate, enter the sample rate, in samples per second, for the baseband I/Q signal samples for both the Tx and Rx pairs. Enter values for the Symbol Rate, Tx Oversample Factor, and Rx Oversample Factor so that the I/Q Sampling Rate is an even multiple of the desired Symbol Rate. Enter an even-valued Oversample Factor that corresponds to the multiple. In other words, ensure the relationship between the I/Q Sampling Rate, Symbol Rate, and Oversample Factor parameters is as follows:
I/Q Sampling Rate = Symbol Rate × Oversample Factor
-
Carrier Frequency
Enter a common Carrier Frequency, in Hz, for both the Tx and Rx pairs. It is your responsibility to choose a frequency that conforms to your local regulations.
-
Start Trigger Time
Specify a Start Trigger Time in whole seconds and fractional seconds to ensure that your receivers start receiving just before your transmitters begin to transmit.
-
Per Device
Each element of the Per Device array corresponds to one of the NI USRP transceivers in the Tx or Rx pair. Element 0 corresponds to the first NI USRP transceiver in the USRP IP Address and element 1 corresponds to the second NI USRP transceiver in the USRP IP Address. Configure the Tx and Rx pairs of the NI USRP transceivers to share a common source for their Reference Frequency and Timebase Clock. You can set one NI USRP transceiver (“primary”) of each pair to supply the other transceiver(“secondary”) through the MIMO cable connection. For this configuration, specify the elements of the Per Device array as follows:
Element 0:
Ref Frequency Source: Internal
Timebase Clock Source: Internal
Element 1:
Ref Frequency Source: MIMO
Timebase Clock Source: MIMO
With the parameters set appropriately, you can run the VI. When you run the VI, the Tx pair transmits a burst that is received by the Rx pair. Figure 3 shows the resulting waveforms that exhibit a successful reconstruction.
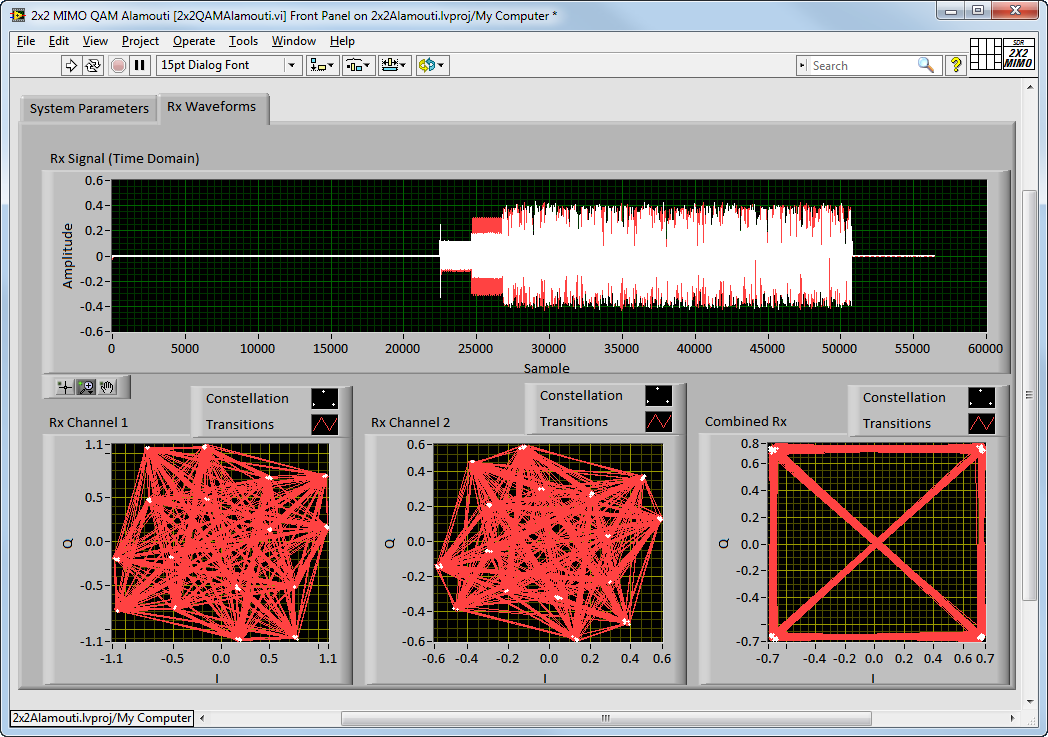
Figure 3. Successful Reconstruction of a 4QAM
The large upper plot of this successful reconstruction of a 4QAM in your 2 × 2 system shows the received time domain signal samples for the I/Q components of both receive antennas (four signals all together). The constellation plots on the bottom left show the signals received by the two Rx NI USRP transceivers. The lower right constellation plot shows the reconstructed constellation.
Building a 2 × 2 MIMO System in LabVIEW
Figure 4 shows the block diagram (the LabVIEW graphical program) that implements this example. The block diagram comments describe some of the key areas of the application.
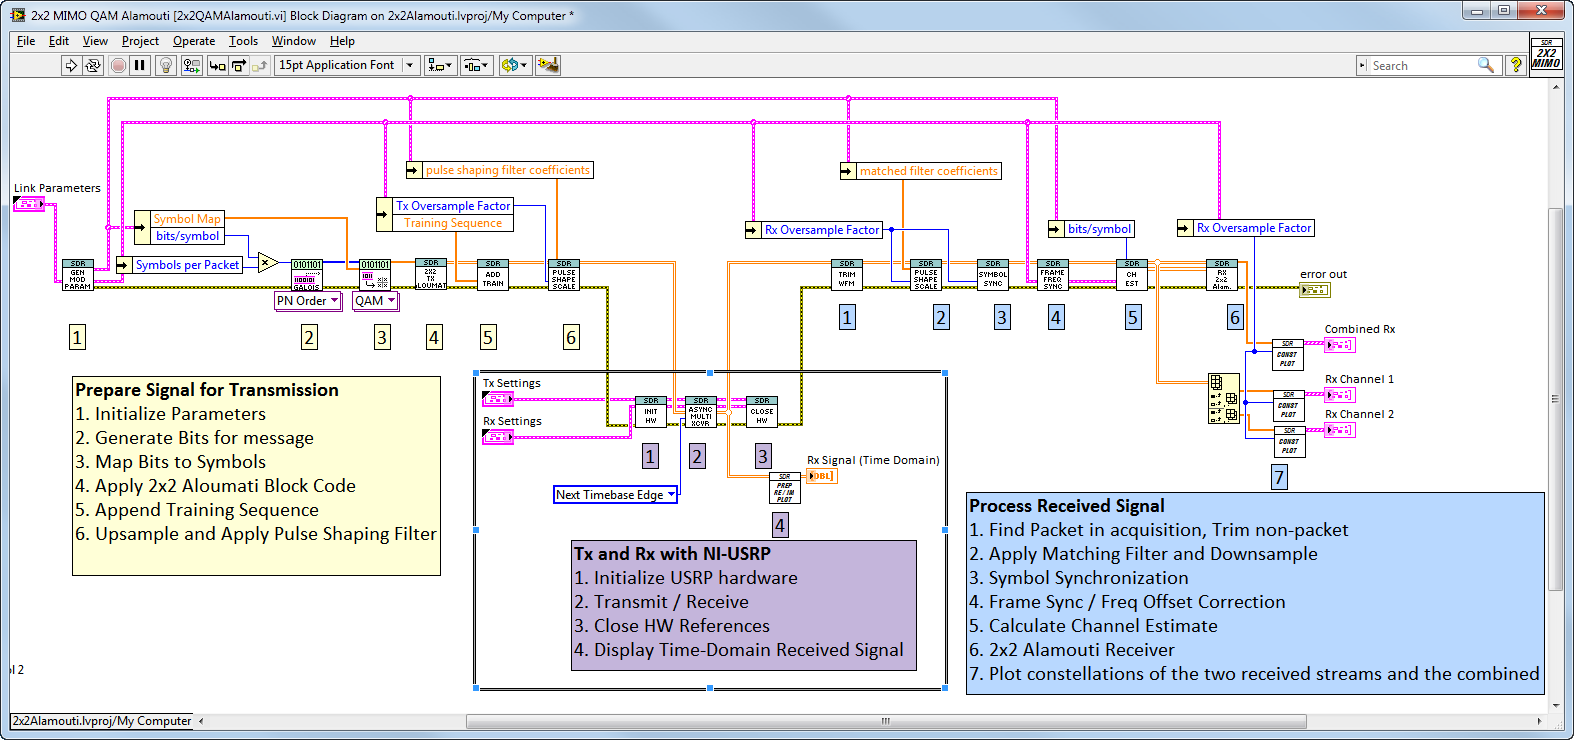
Figure 4. LabVIEW Block Diagram for the 2x2QAMAlamouti VI
The LabVIEW block diagram for the 2x2QAMAlamouti VI is organized into three sections. The upper left section of code synthesizes a signal for transmission. The code in the middle lower portion of the diagram initiates the Tx/Rx operations with the NI USRP hardware. The upper right section of code processes the received signal and displays the received waveforms.
Preparing a Signal for Transmission
The first several steps in preparing a signal for transmission consist of calls to subVIs (subroutines) from the LabVIEW Modulation Toolkit. A call to the MT Generate Bits VI generates a PN sequence that acts as message bits. These bits are mapped to symbols by a subsequent call to the MT Map Bits to Symbols VI.
Next, apply the Alamouti encoding scheme to the symbols generated in the previous step. The result is a 2D array of symbols with two streams, one for each transmitter. Figure 5 shows an example on the block diagram.
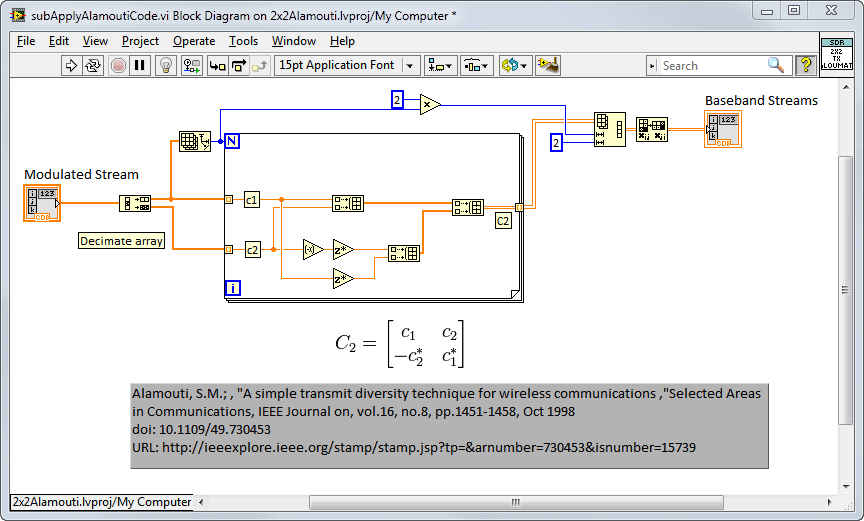
Figure 5. Block Diagram for the subApplyAlamoutiCode VI
The block diagram for subApplyAlamoutiCode.vi, the subVI that applies the Alamouti coding, shows that the operation is straightforward in that it requires a few array manipulations to produce the desired 2D array of symbols.
After encoding the symbols, the application prepends a training symbol sequence to each stream. The receiver uses the training sequence for synchronization and to estimate the channel.
The training sequence addition operation prepends the same sequence to each stream and arranges the data so that the sequence is transmitted by one of the two Tx NI USRP transceivers and then the other. For example, one of the two Tx NI USRP transceivers transmits the sequence while the other is silent. The other transceiver then transmits the same sequence while the other is silent.
The final step in signal synthesis prior to the transmit/ receive operations involves upsampling the incoming symbol spaced samples to the rate specified in the Tx Oversample control and then applying a pulse shaping filter to the upsampled signal.
Signal Recovery
On the receiver side, the USRP Fetch Rx Data VI returns a 2D array of the received signal with each row representing a stream of received signal samples from an antenna.
For the first signal recovery step, extract the received packet from the received frames of data. Use an energy detection algorithm to determine the start of the packet and discard the remaining non-packet portion of the frame.
Next, apply a matching filter to each stream and determine the stream with the stronger signal by comparing the energy between the two rows of the 2D received array. Then apply symbol synchronization to the row with the stronger signal and apply the calculated offset to both rows.

Figure 6. Received Waveforms
The graph shows the four received waveforms—the I and Q waveforms from each of the two Rx antennas. You can see the training sequences from each of the two Tx antennas by zooming in on the initial portion of the received packet.
Frame synchronization is trickier and depends on the structure of the two training sequences on the transmitter side. In this case, both transmitters use the same training sequence but are offset from one another in time. When they are overlapped, they appear as one continuous training sequence that is twice the length. The application exploits this overlapping for frame synchronization by searching for the portion of the received signal where the two consecutive sets of T symbols (where each training sequence is of length T) are the most highly correlated. Apply the calculated frame offset to both rows of the received 2D array.
For channel estimation, consider four different channels. Each row of the 2D array contains two training sequences (one from each transmitter). Thus, perform the channel estimation on each training sequence in each row then determine the four channel estimates.
These estimates are important for the next step where you convert the 2D array of symbols into the proper 1D array of symbols by decoding the Alamouti coding scheme and then performing MRC. You can implement this using two separate operations or, as with this application, using a single matrix multiplication. The single matrix multiplication technique scales more easily to larger MIMO systems. For details about how to perform these last decoding steps, refer to one of the many online references.
Results
Figure 3 shows the two Rx signal constellation plots from a test run of the 2 × 2 MIMO system running on four NI USRP transceivers. On the far right is the final signal constellation plot after performing Alamouti decoding, MRC, and channel equalization. This image shows that the MIMO system works properly.