Development System vs. Deployment System: What’s Different
Typical TestStand development systems have a TestStand Development license which includes the TestStand Sequence Editor to write test sequences in, as well as the LabVIEW development environment to develop code modules with.
When deploying a test system, the Deployment Systems (the computers that you are deploying to) typically will not have the LabVIEW development environment installed. In order to run LabVIEW VIs (code modules) from TestStand on these machines, you need to have the LabVIEW Run-Time Engine installed. With the LabVIEW Run-Time Engine installed, TestStand is capable of running LabVIEW VIs without having the LabVIEW development environment installed.
In addition, the deployment system typically has a TestStand Deployment license which only includes the TestStand Engine and not the Sequence Editor. Test sequences are executed from an Operator Interface, which is basically a TestStand User Interface.
TestStand ships with several example Operator Interfaces written in a variety of languages. Operator Interfaces can be written in any language that can interface with .NET or ActiveX in order to communicate with TestStand.
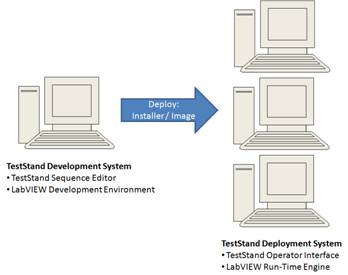
LabVIEW Development Environment vs. LabVIEW Run-Time Engine
Typical TestStand Deployment Systems use the LabVIEW Run-Time Engine to execute VIs and do not have the LabVIEW Development Environment installed. This means that you must configure TestStand to use the LabVIEW Run-Time Engine instead of the LabVIEW Development Environment on the Deployment System. Refer to the section titled 'Configuring Adapter Settings: LabVIEW Run-Time Engine' for more details.
If you are running VIs with the Run-Time Engine, you should keep a few extra considerations in mind. The LabVIEW Development Environment allows you to create, edit, and debug VIs. The LabVIEW Development Environment is also backwards compatible, meaning that it can open and run VIs written in previous versions of LabVIEW.
The LabVIEW Run-Time Engine can only execute VIs that were saved in the same version of the LabVIEW Development Environment. It is neither forwards nor backwards compatible. This means that if you have code modules written in multiple versions of LabVIEW, you should specify in the LabVIEW Adapter Settings to 'Auto detect using VI Version' in the Run-Time Engine selection. You should then include the TestExec.ini file in your deployment. Sections 1 and 2 detail how this is done. you should Mass Compile them to the latest version of LabVIEW. See the section titled 'Managing LabVIEW Code Modules Written In Multiple Versions of LabVIEW' for more details.
Creating a TestStand Deployment Installer
In order to create an installer for a TestStand Deployment, there are a couple of steps that must be completed. The steps are listed briefly below and detailed in the sections that follow.
- Configure Adapter Settings: Configure the Adapter Settings on the Development System that you want to deploy
- Include Test Sequences, Configurations, Code Modules and Dependencies: Create a workspace containing the test sequence, TestStand configurations, and code modules you want to deploy along with their dependencies
- Maintain a File Hierarchy: You can optionally configure the files in the workspace to maintain a file hierarchy
- Include Additional Installers: Include additional installers as part of the deployment, such as the TestStand Engine and LabVIEW Run-Time Engine
Note: This section describes these steps specifically for deploying LabVIEW Code Modules as part of a TestStand Deployment. For a general introduction to creating a TestStand Deployment, refer to the Deploying TestStand Systems in the NI TestStand Help.
Configure Adapter Settings
TestStand stores its adapter settings as part of a TestStand configuration file, TestExec.ini. When you deploy your system, it is recommended that you deploy TestExec.ini as part of your deployment because it contains various additional settings like your Station Options and Search Directories.
If the Deployment System does not have the LabVIEW Development Environment, you must configure TestStand to use the LabVIEW Run-Time Engine on the Deployment System. You have three options to do this:
- Configure the Development System to use the LabVIEW Run-Time Engine prior to deployment (Recommended):
- Open the TestStand Sequence Editor
Start»Programs»National Instruments»TestStand x.x»Sequence Editor - Click on the Configure menu and select Adapters
- In the Adapter Configuration dialog, select LabVIEW and click the Configure button
- Select the LabVIEW Run-Time Engine radio button from the Select or Type Which LabVIEW Server to Use
- Pick the version of the Run-Time Engine you want to use or choose Auto detect using VI version from the dropdown list.
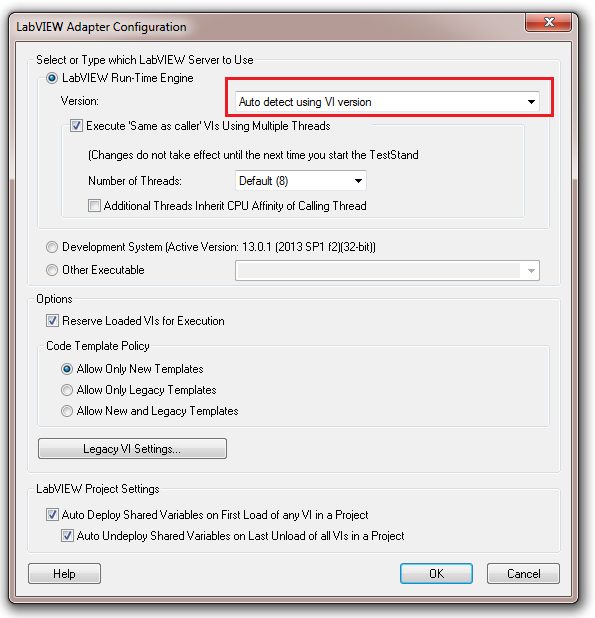
- Select the Help button in the bottom left corner for more information about properly configuring the LabVIEW adapter
- Click OK. This will save the configuration to TestExec.ini. Now when you create your deployment, include TestExec.ini in your workspace, and your Deployment System will be configured to use the LabVIEW Run-Time Engine.
Note: Once the Development System is configured to use the LabVIEW Run-Time Engine, it is worth taking the time to build a deployment image using the TestStand Deployment Utility and execute the test sequence from the image to make sure that the code modules execute properly using the LabVIEW Run-Time Engine prior to deploying the test system to the Deployment System.
- Configure the Adapter configuration directly on the Deployment System:
This requires you to manually update each deployment system and therefore isn’t the recommended approach. However, if you already have a deployment system and don’t want to re-deploy, this is a viable approach. - Use the TestStand default adapter settings:
By default, when you first launch TestStand, if you don’t have the LabVIEW Development System installed and didn’t deploy TestExec.ini, TestStand will default its LabVIEW Adapter configuration to use the latest version of the Run-Time Engine installed. However, this requires you to not deploy TestExec.ini, so this option is only viable if you don’t want to migrate other configurations as well, such as your Tracing options and Search Directories. For more information on what settings TestExec.ini as well as other configuration files store, refer to the NI TestStand Help: Configuration Files.
Include Test Sequences, Configurations, Code Modules and Dependencies
The TestStand workspace file forms the basis of your deployment in regards to file distribution. In order to successfully deploy and run test sequences that contain code modules, your workspace file should contain:
- Test Sequences:
Include the sequence files that contain the test sequences you want to deploy in your workspace file. When you build a deployment, all the LabVIEW code modules that are called by your sequences, as well as their subVIs, are automatically included as part of your deployment. - TestStand Configuration Files:
If you want to migrate your TestStand settings to the Deployment System, include the configuration file that contains the respective setting. For a descriptive list of configuration files and what they contain, refer to the Configuration Files section of the NI TestStand Help. If you intend to run your LabVIEW code modules using the LabVIEW Run-Time Engine, you should typically include the TestExec.ini configuration file in your workspace file. - Dependencies:
The TestStand Deployment Utility cannot find and deploy certain types of components automatically. You must follow special instructions in order to deploy these components with your TestStand deployment:
- Dynamic dependencies, such as dynamically called DLLs and VIs, must be manually included in your workspace if you want to deploy them.
- LabVIEW Project components like shared variables must either be deployed separately as part of a LabVIEW distribution or deployed from TestStand using a LabVIEW Utility Deploy Library step.
Please refer to the section titled Deploying Variables of the Effectively Using LabVIEW with TestStand chapter in the Archived: Using LabVIEW and LabWindows/CVI with TestStand manual for more details.
Maintain a File Hierarchy
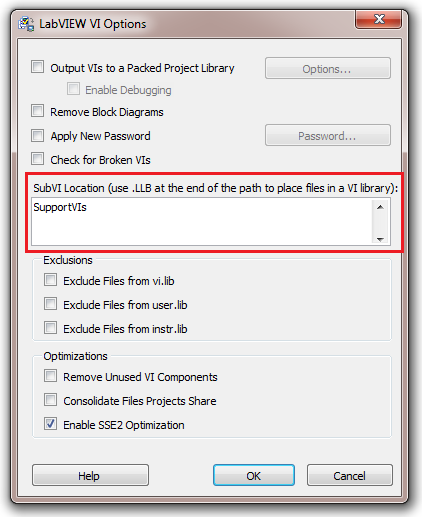
The TestStand Deployment Utility automatically puts all the subVIs that your code modules call in a folder called “SupportVIs”. You can modify the name of the folder where the TestStand Deployment Utility places these subVIs through the LabVIEW Options dialog box of the Deployment Utility.
The TestStand Deployment Utility allows you to individually modify where the top-level code modules (as well as any other file listed on the Distributed Files tab, including dependent sequence files and files included in the workspace) are placed through the Installation Destination and Installation Destination Subdirectory options on the Distributed Files tab.
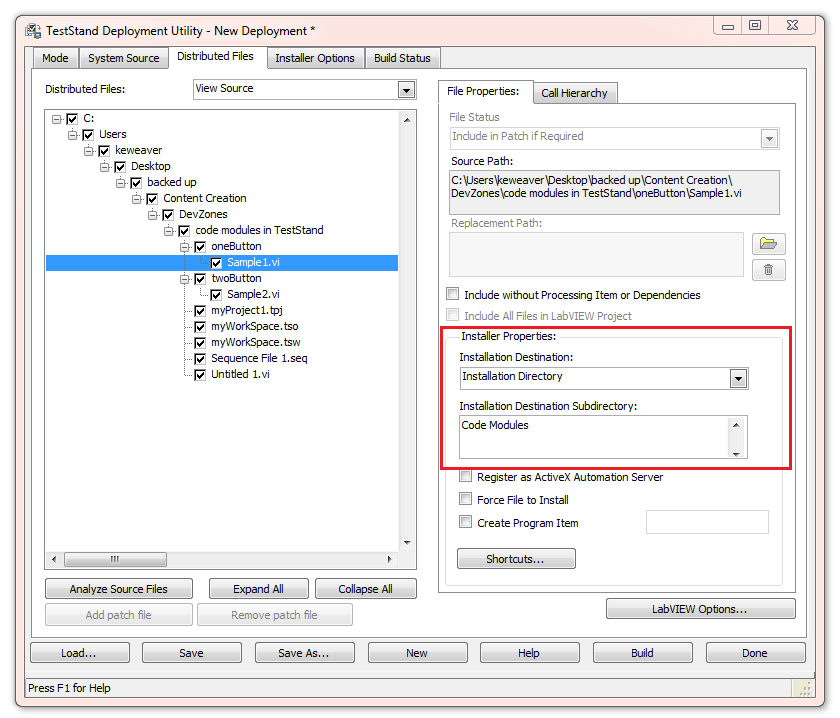
This level of granularity is sufficient for most deployments. However, there are situations where you might want to have a directory hierarchy for your subVIs rather than placing them all in a flat hierarchy in a single folder.
In order to do this, you must add these subVIs to your workspace. This will then allow you to specify the destination path for each of these files on the Distributed Files tab of the TestStand Deployment Utility.
Include Additional Installers
The Deployment System requires the TestStand Engine in order to execute test sequences. Follow the steps below in order to include the TestStand Engine as part of the deployment installer.
- In the Deployment Utility, switch to the Installer Options tab
- Check the Install TestStand Engine checkbox
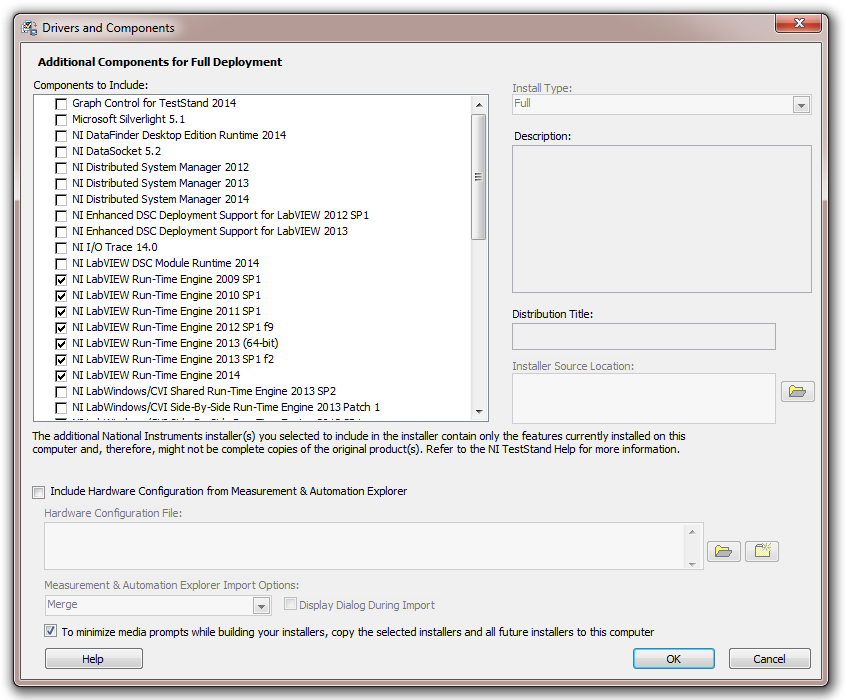
- Click Drivers and Components… to configure optional features to include with the TestStand Engine. (Note: in TestStand 2014 and previous, click the Engine Options button)
The Deployment System requires the LabVIEW Development Environment or the correct version of LabVIEW Run-Time Engine in order to execute LabVIEW code modules. If the Deployment System does not already have either of these, you can include the LabVIEW Run-Time Engine as part of the deployment installer:
- In the Deployment Utility, switch to the Installer Options tab
- Click the Drivers and Components… button
- Select the versions of the LabVIEW Runtime Engine you want to include as part of your deployment from the Components to Include list (Note: in TestStand 2014 SP1 and later, you can use the Automatically Include Required Installers option to allow TestStand Deployment Utility to choose necessary LabVIEW Runtime Engines based on the VIs in the deployment.)
Updating LabVIEW Code Modules on Deployed Systems
In order to reflect any updates or changes made in the code modules on the deployment system, these VIs must be re-deployed to the deployment systems by creating a new TestStand deployment. It is not possible to simply copy over the new VI from the Development System and overwrite the VI on the Deployment Systems.
Managing LabVIEW Code Modules Written in Multiple Versions of LabVIEW
It is common to work with VIs written in multiple versions of LabVIEW and call code modules written in multiple versions of LabVIEW from TestStand. On a development computer, this will typically work fine because the LabVIEW Development System is backwards compatible and can run VIs written in previous versions of LabVIEW.
When you run a sequence that calls such a LabVIEW code module, what the TestStand Engine typically does under the hood is:
- Load the currently active version of the LabVIEW Development Environment
- Open and up-convert the code module VI to the current LabVIEW version
- If the VI was built in a version that isn’t the current active version of LabVIEW, it will re-link built-in VIs (such as those in vi.lib) to the VIs installed with the current LabVIEW version
- Prompt you for any dependencies it cannot find
TestStand now supports automatic selection of the appropriate LabVIEW Run-Time Engine depending on the VI properties of the VI executed in the code module. You can configure the sequence to use the appropriate version of the LabVIEW Run-Time Engine in the Adapter Settings (see Section 1. Configure Adapter Settings). Select Auto detect using VI Version to achieve this.
Additional Resources
The NI TestStand Help has a section devoted to in general. Navigate to the help which includes hyperlinks to specific deployment subtopics.