General characteristics of XControls:
-
They are represented on the block diagram by a single icon and hence dramatically reduce code size
-
They are re-usable. They can be created on one computer and used on another with full functionality.
-
User functionality can also be easily added to an XControl. By simply adding an additional component to the XControl front panel and programming the new component in the XControl block diagram, the new functionality can be directly ported to all dependent VIs.
-
They are packaged into one library and hence all related VIs are grouped together for ease of portability.
-
They can be used in the project they are created in or added to the control palette and used by another VI that may not be part of any project.
The Structure of an XControl
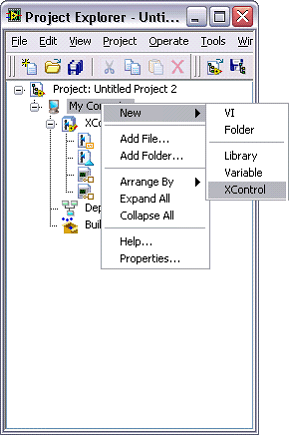
To create an X Control, right click on My Computer in the Project Explorer menu and select New>>XControl.
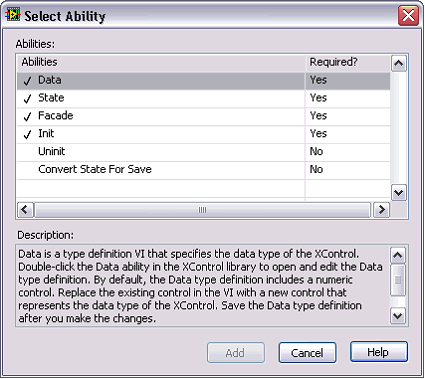
X Controls are comprised of four required components and other optional/user-defined components. The required components are also known as abilities:
These abilities are actually just VIs and controls (.ctls) that define the XControl’s functionality. There are two optional abilities that can be added. They are the following:
- Convert State For Save
- UnInit
To add either of the optional abilities, right-click on the XControl from the project menu and select Abilities. A screen will display which abilities are currently associated with the XControl. From there select the desired abilities.
Every XControl has its Data and State associated with it. Data is the type of data represented by the XControl (scalar, array, etc) and the State is the current state of the XControl (visible, control, indicator, etc). You define the data type and various state of your XControl.
The Façade VI manages the different states the XControl can get into and how it responds to user events. Hence this is a giant event handler VI that is called by LabVIEW only when there is an event pending for it to handle. Whenever the Façade is called, LabVIEW passes in the current data and state of the XControl as inputs. The Façade VI then handles the event and updates the data and state and returns them to LabVIEW to be stored with the control.
How to Build an XControl
To demonstrate how you create an XControl, we will build the Dual Mode Thermometer (DMT) example program that ships with LabVIEW 8. This example program can be found at the following location or via the Example Finder utility.
<LabVIEW 8.0>\examples\general\xcontrols\Dual Mode Thermometer
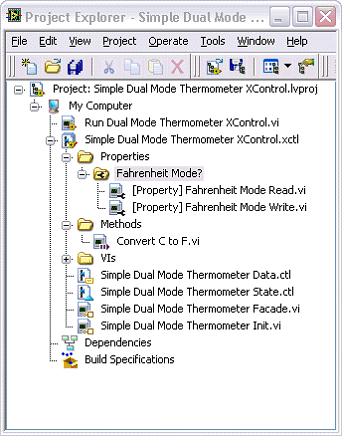
Upon opening the LabVIEW Simple Dual Mode Thermometer project, the following files appear in the Project Explorer Window.
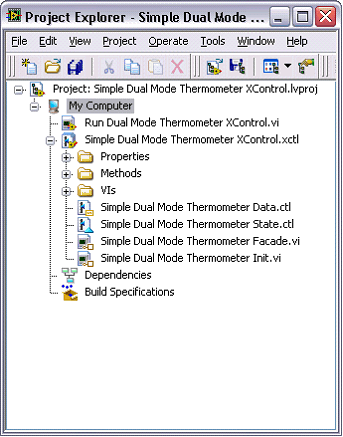
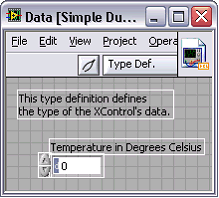
The Data ability – Simple Dual Mode Thermometer Data.ctl
The Data ability is a type definition control that specifies which type of data LabVIEW will pass into and receive from the XControl. This can only be one data type; however, more complex types such as Clusters, Waveforms, etc. may be used as the type definition.
For the purpose of this example, the data type is a double.
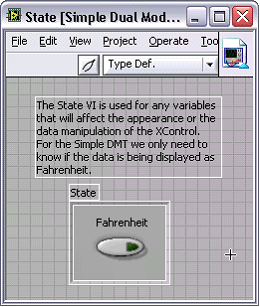
The State ability – Simple Dual Mode Thermometer State.ctl
The State ability is a type definition cluster that contains variables used to control the appearance and/or behavior of the X Control. It is here that a user can define all algorithms that must be applied to the data.
For the Dual Mode Thermometer example, the state has a Boolean that identifies whether or not the temperature will be displayed in Fahrenheit mode. The user can change the mode by selecting a checkbox which is part of the XControl’s facade. By default, the Fahrenheit mode is disabled.
The Init ability – Simple Dual Mode Thermometer Init.vi
This ability is used to initialize the control. It has three inputs and one output. The inputs are:
- Previous version
- Previous display
- Container state
The one output is:
Using information gained from the three inputs, a current state is output. LabVIEW calls the Init ability when the XControl is first placed on a front panel or when a VI containing that XControl is loaded into memory. The Init ability also updates previous versions of the XControl to the latest version. When a VI containing an XControl is loaded into memory, LabVIEW calls Init and checks if the version has changed since the last time the VI was saved.
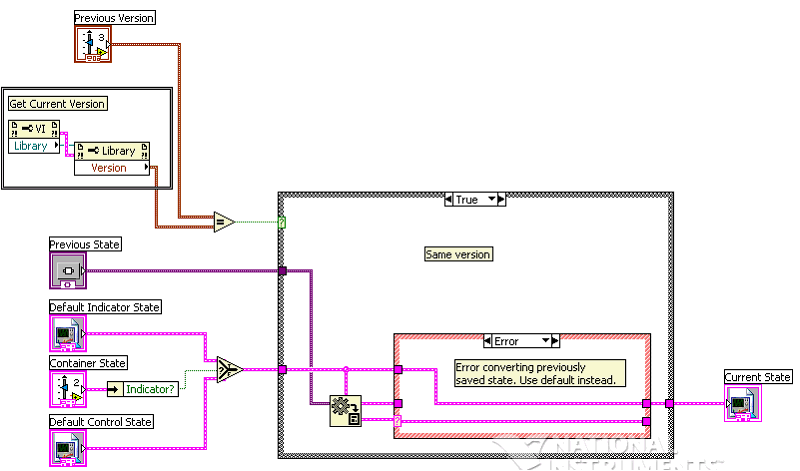
Init includes Previous Version and Previous State controls and a Current State indicator. When the version changes, Init converts the value of Previous State, which is passed in as a variant, to the new state format. The new state is passed to the Current State indicator.
The Facade ability – Simple Dual Mode Thermometer Facade.vi
The Façade ability defines the appearance and behavior of the X-Control. You create the XControl’s appearance by adding controls and indicators to the front panel of the Façade. These can then be controlled by the events in the block diagram. When making an XControl that will function as both a control and indicator, overlapping the controls and the indicators on the Front Panel is needed as their visibility will be determined by the container state.
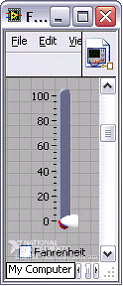
The façade VI is called when the user interacts with the XControl and these user events need to be handled. The events can be either on the façade VI’s front panel or they can be caused by certain user actions on the X-control.
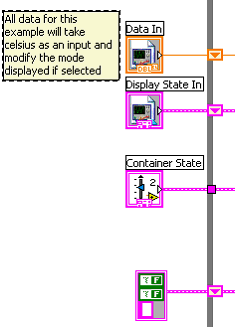
The façade VI has three inputs and three outputs.
The inputs are:
- Data In: The current value of the XControl.
- Display State In: The current state of display that is used to manipulate the Façade’s appearance.
- Container State: This input state passes the information that tells whether the control is a control or an indicator, whether it is in edit or run mode, and provides a ref num to the container
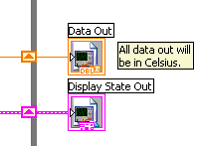
The outputs include:
- Data Out: The data that is passed to the Data State for use as the Data In during the next iteration
- Display State Out: The data that is passed to the Display State to indicate the current state of the XControl
- Action: This indicates what action has taken place on the current iteration of the Façade. This is particularly useful when using undo and redo actions in LabVIEW.
All calls to the X-Control’s façade VI are made by LabVIEW. LabVIEW calls the façade VI only when there is an event pending for it to handle. There are four mandatory events for all façade VIs and other custom events that can be added by the programmer.
The four mandatory events are:
-
Data Change: This occurs when data is passed into a Front Panel Terminal, Local, or Property Value of the particular XControl. This event will be used in conjunction with the display state to update the current values of the controls on the Façade’s panel.
-
Direction Change: This occurs when the user changes the direction of the XControl from an indicator to a control and vice versa. This event will be used with the container state to update the appearance of the XControl.
-
Exec State Change: This occurs whenever the VI owning the XControl changes from edit mode to run mode or vice versa. This event will be used to disable the ability to change an indicator during runtime.
-
Display State Change: This occurs when the display state changes in response to a user invoking a property or method on the XControl.
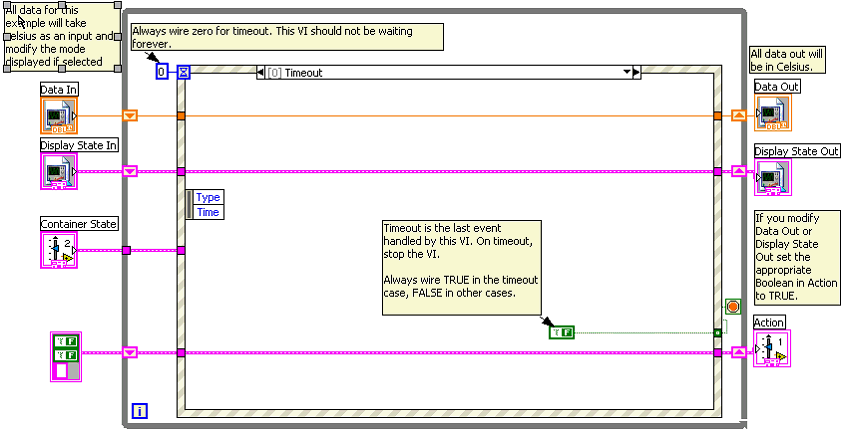
In our Dual Mode Thermometer example, the Event Structure handles the following mandatory events:
[0] Timeout:
Timeout occurs when the VI needs to be stopped. Always wire TRUE to the stop condition in the timeout case and FALSE in all other cases.
[1] Data Change:
LabVIEW calls the Facade VI with the Data Change event whenever data is written to the thermometer’s terminal or local or value property.
When the data value is changed, our XControl does the following:
-
Checks if the DMT is in Fahrenheit mode or not
-
Sets the thermometer and slide to the appropriate value

[2] Display State Change:
LabVIEW calls the Facade VI with Display State Change event whenever LabVIEW needs to update the appearance of the XControl.
The code does the following:
-
Checks if the DMT is in Fahrenheit mode or not
-
Sets the thermometer and slide to the appropriate value

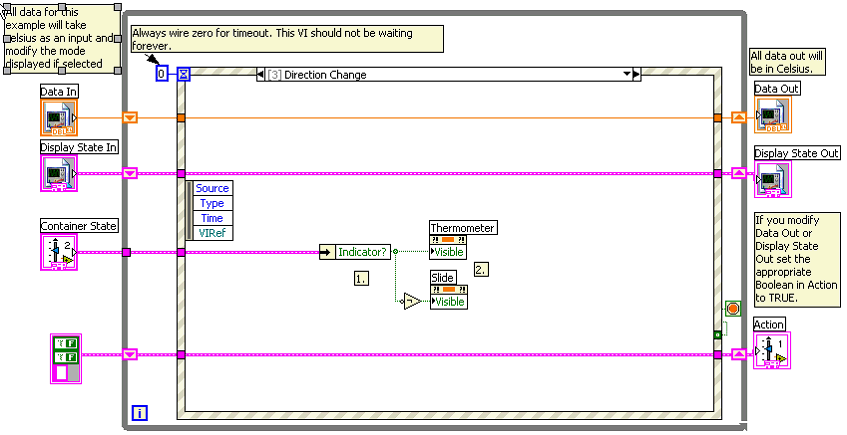
[3] Direction Change
LabVIEW calls the Facade VI with the Direction Change event whenever the XControl changes from a control to indicator and vice-versa.
In the example, the slide is the control and the thermometer is the indicator. When the event occurs:
-
Checks to see if the XControl is currently an indicator
-
Sets the visibility of the thermometer and slide accordingly
[6] Exec State Change
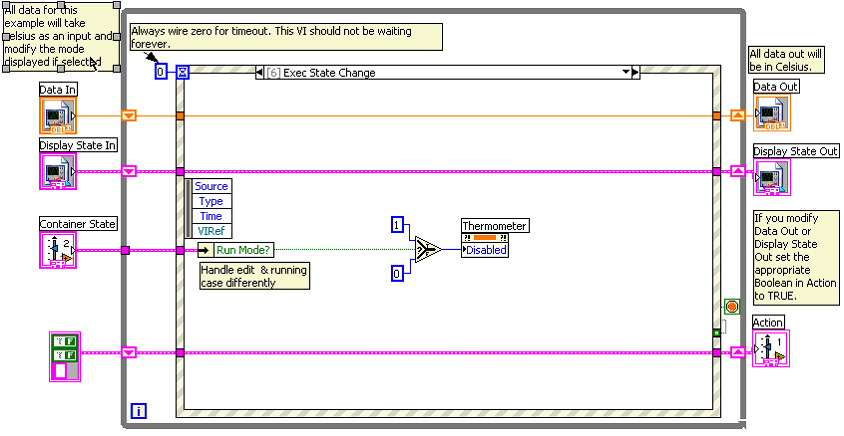
LabVIEW calls the Facade VI with Exec State Change event whenever the VI containing the XControl switches from idle mode to run mode and vice versa.
In this example, it is important that the user not be able to change the value of the temperature scale while in run time mode. Therefore, we disable the scale while it is running and enable it while it is not.
In the Dual Mode Thermometer example, a custom event occurs when the user manually changes the display state by enabling or disabling a control, e.g. selecting the Fahrenheit check box.
Note: There is a difference between the events generated by LabVIEW and events generated by a user. LabVIEW generates events when data is passed into the control either by a wire, property node, or a local variable. However, if the user changes anything on the XControl, then new events must be created to handle these situations. In the case of the Dual Mode Thermometer example that would be value changes on the thermometer, slide, and Fahrenheit controls.
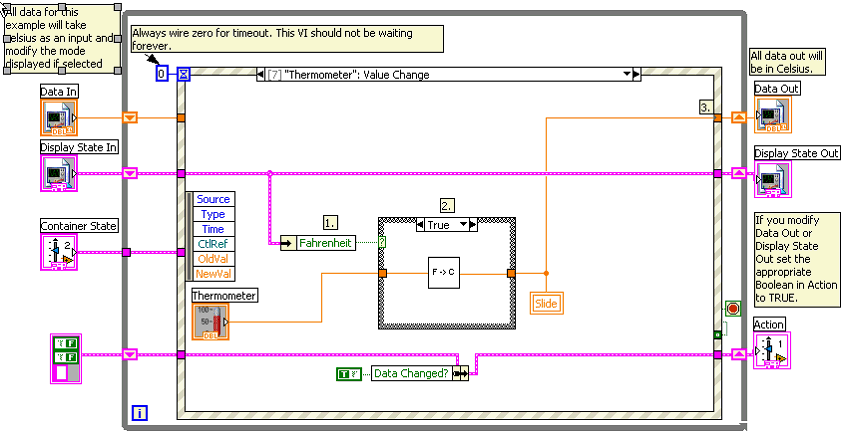
[7] Thermometer: Value Change
LabVIEW calls the Facade VI with the Thermometer Value Change Event when the user changes the value of the Thermometer.
When data is changed the code does the following:
-
Checks to see if the XControl is in Fahrenheit mode
-
Sets the values of the slide accordingly
-
Updates the Data Out with the new value created after the code is executed
-
Informs LabVIEW that value changed by setting the Data Changed? boolean to TRUE.
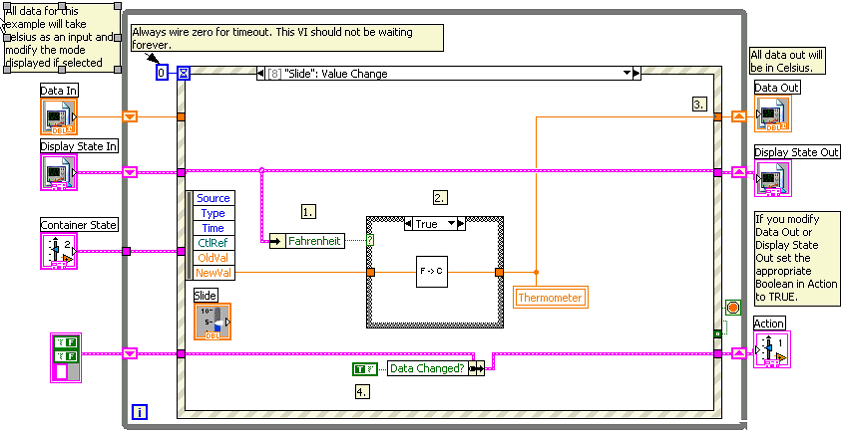
[8] Slide: Value Change
Similarly when the value on the slide changes, the appropriate event is triggered and the changes are updated on the state VI.
[9] Fahrenheit: Value Change
LabVIEW calls the Facade VI with Fahrenheit Value Change Event when the user changes the value of the Fahrenheit mode.
When data is changed the code does the following:
-
Checks to see if the XControl is in Fahrenheit mode.
-
Sets the values of the thermometer and slide based on the mode selected.
-
Update the Display State with the new value.
-
Inform LabVIEW that value changed by setting the State Changed? boolean to TRUE.

Custom Properties for XControls
A user can programmatically create and configure an XControl’s properties. XControls use property nodes to get and set properties (just like many other built in VIs in LabVIEW). When a property needs to be retrieved or set, LabVIEW calls on the façade VI. If the user changes the display state with a property, the façade VI in turn updates the display VI so that the XControl reflects the change visually. When this happens, a Display State Change event is generated on the Façade VI.
As we saw earlier, an XControl is essentially a library of VIs. In the XControl library, each of the XControl’s property is represented by one or more VIs depending on if the property is read only, write only or read/write.
To add a property to the XControl library, do the following:
-
Right click the XControl and select New>>Property from the shortcut menu to display the Create Property dialog box. Add a property to the library from this box.
-
LabVIEW will now create a folder within the XControl library that has the same name as the property.
-
A read/write property folder will contain two VIs while a read-only or a write-only property will create one VI. It is important to note that the property folder for any property within the XControl cannot contain more than two VIs.
-
To edit the property, open the VI that is represented by that property and edit its functionality.
-
When editing any read property VI in the XControl, it is important to replace the Value indicator with an indicator matching the data type of the property.
-
When editing any write property VI in the XControl, it is important to replace the Value control with a control matching the data type of the property.
In the DMT example, there are two property VIs as seen here.
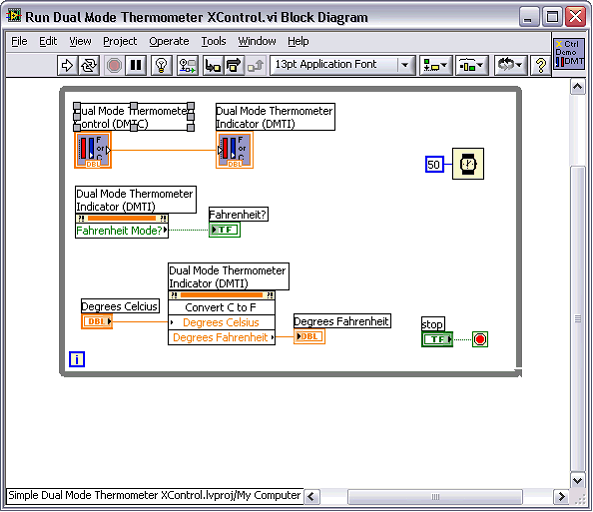
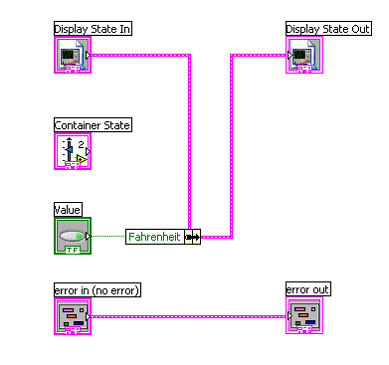
The Fahrenheit Mode? write property will set whether the display state is in Fahrenheit mode or not. For this a bundle by name function is used to set the state of the display.
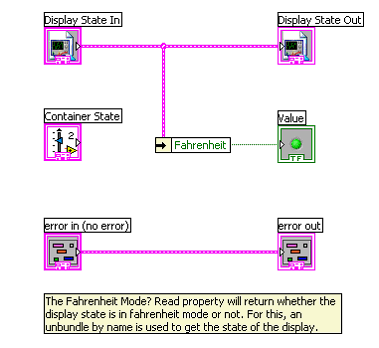
The Fahrenheit Mode? read property will return whether the display state is in Fahrenheit mode or not. For this, we use the Unbundle By Name function to get the state of the display.
Custom Methods for XControls
You can also programmatically create and configure an XControl’s methods. An XControl user would use the LabVIEW invoke nodes to execute the XControl’s methods. LabVIEW calls the Façade VI after the user calls a XControl’s method. If the particular method happens to make changes to the display state, the Façade VI will update the display state so that the XControl can update its appearance. For this reason, a Display State Change event is called every time the method is called.
Similar to the XControl Properties, each XControl method is represented by one or more VIs within the XControl library.
Complete the following steps to add a method to the XControl library:
-
Right-click the XControl library and select New»Method from the shortcut menu to add a new method to the XControl library.
-
LabVIEW creates a new method in the XControl library
-
Double-click the method in the XControl library to add the controls and indicators that represent the parameters of the method.
-
The method VI contains a display state control and display state, container state and error indicators. It is very important not to delete any of these controls or indicators because LabVIEW uses them to pass in essential information.
-
Add controls or indicators to represent the parameters of the method. Parameters can be input, output, or input/output parameters. Each control or indicator that you add to the VI can be part of only one parameter. LabVIEW uses the name of the control or indicator as the name of the parameter.
-
If the parameter is an input/output parameter, you must use a control/indicator pair to represent the parameter. The control/indicator pair must be of the same data type.
-
Wire the controls or indicators to the connector pane. Right-click the method and select Configure Method from the shortcut menu to display the Configure Method dialog box. Use this dialog box to configure the parameters you added to the method.
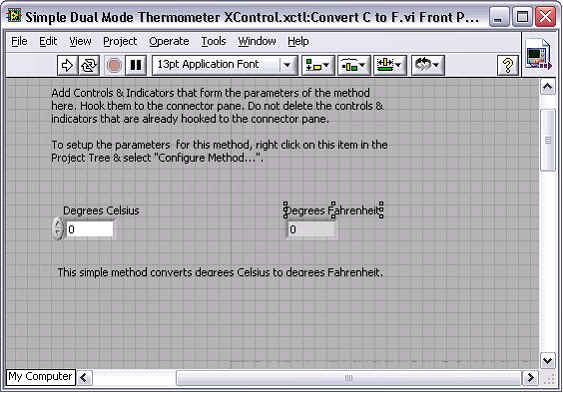
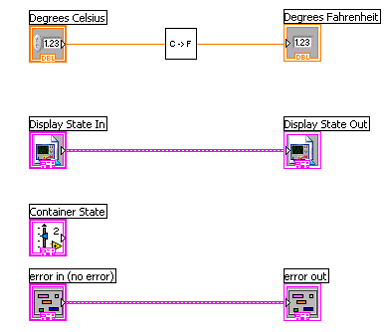
The Simple Dual Mode Thermometer example has one custom method that converts temperature in Celsius to Fahrenheit. The method has one input for temperature in Celsius and returns the temperature in Fahrenheit as output.
XControl Run-Time Shortcut Menus
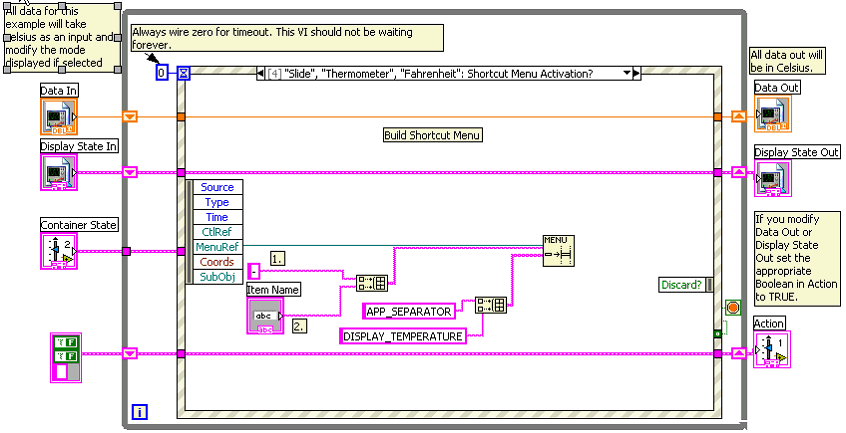
You can customize an XControl’s run-time shortcut menu. To do this, you use the Register for Shortcut Menu Activation event for building the custom popup menu.
In the DMT example, LabVIEW calls the Facade VI with the Shortcut Menu Activation? Event when the user right clicks on the Slide, Thermometer or Fahrenheit controls.
The code does the following:
-
Inserts a new separator Shortcut menu item.
-
Inserts a new Shortcut menu item to display the temperature.
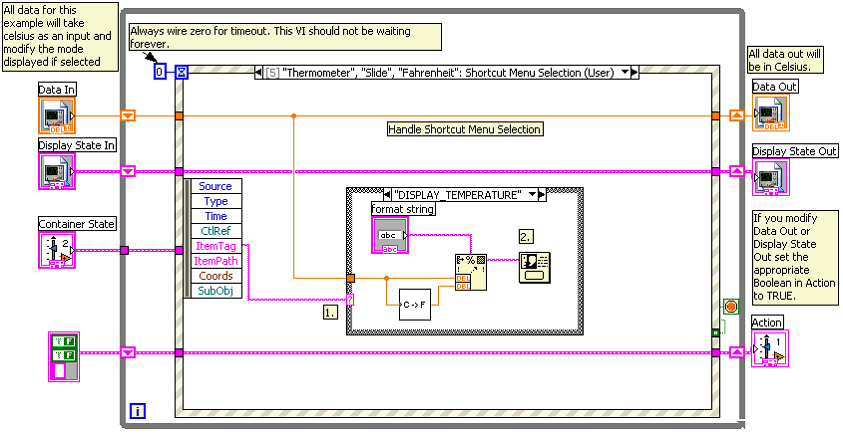
LabVIEW calls the Facade VI with Shortcut Menu Selection (User) Event when the user right clicks on the Slide, Thermometer or Fahrenheit controls and selects a user item.
The code does the following:
-
Checks to see which user item was selected
-
If "DISPLAY_TEMPERATURE" is selected, put up a dialog displaying temperatures in both scales - Celsius and Fahrenheit.

XControl Sizing:
XControls can be sized in two ways:
-
Enable front panel scaling on the Façade VI. This will automatically grow the controls on the Façade VI when the XControl is resized.
-
Register for Panel Resize event on the Façade VI. Size the controls programmatically by setting size properties in response to the event
Debugging an XControl:
An XControl runs in private context. This means that the XControl cannot be debugged when in use by another block diagram.
The façade VI can be debugged using the following steps:
-
Right click the XControl instance
-
Select Advanced>>Show Diagram
The property, method and ability VIs can be debugged using breakpoints.
When an XControl is in use, all its components are reserved and cannot be edited. To edit the XControl in use, right click the library and select the Unlock Library for Editing. This will cause all VIs using that XControl to break. After editing, once again right click the library and select Apply Changes to Instances. The advantage of this is that all instances of that XControl will be updated.
Running the XControl
The XControl can be placed on a VI either within the same LabVIEW project or on any VI that may need to use it.
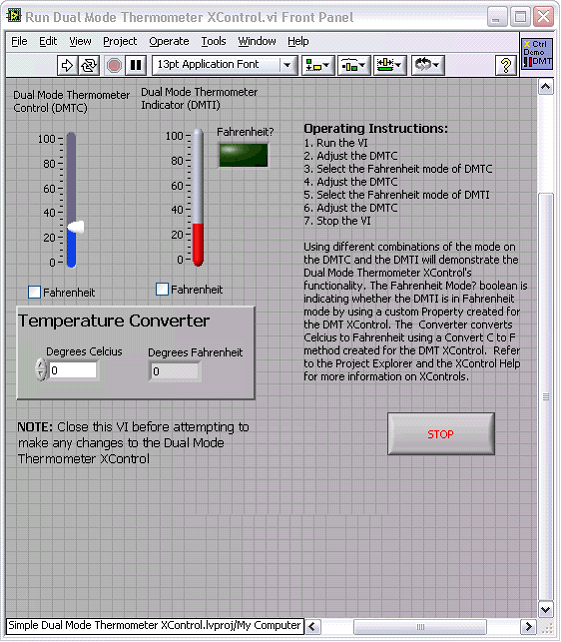
In the DMT example, the Run Dual Mode Thermometer XControl.vi uses the XControl. It reflects changes made to the DMT control on the DMT indicator using all the abilities, properties and methods discussed above.
