IVI Driver Architecture Overview
Interchangeability using IVI drivers is achieved through generic instrument class drivers. A class driver is a set of functions and attributes for controlling an instrument within a specified class, such as an oscilloscope, DMM, or function generator. The IVI Compliance Package has twelve classes – oscilloscope, digital multimeter (DMM), arbitrary waveform/function generator, switch, power supply, spectrum analyzer, power meter, RF signal generator, counter, digitizer, downconverter, and upconverter. Each of these generic class drivers makes calls to specific instrument drivers to control the actual instruments. The specific instrument drivers contain the information for controlling a particular model of an instrument, including the command strings, parsing code, and valid ranges of each setting for that particular instrument. From your test program, you make calls to the class drivers, which in turn communicate through the specific drivers for your instruments. You can change the specific instrument drivers (and corresponding instruments) in your system underneath the class driver without affecting your test code.
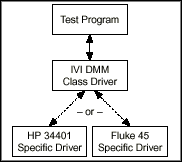
Figure 1. IVI Driver Architecture – The class driver contains generic functions for controlling a DMM. The specific drivers contain information for controlling a specific instrument, such as command strings, parsing code, and valid ranges for instrument settings.
Three Types of Simulation
Before discussing the technical details of how simulation works, it is important that you have a clear understanding of the various levels of simulation possible with instruments. There are three different levels of simulation:
Instrument driver calls
The simplest form of simulation is the ability to make calls to an instrument driver when the instrument is not connected to the computer. Today, using current instrument driver technology, you cannot make a single instrument driver call from your program if the instrument is not connected. Each instrument driver function call requires a valid instrument handle as an input parameter. The only way to get one of these handles is from the instrument Initialize function (which only succeeds if the instrument is connected).
Therefore, the first step in instrument simulation is simply being able to make function calls from your test program to an instrument driver without each function returning an error. IVI-specific drivers have a special initialization function, InitWithOptions. With it, you can pass a string that presets a number of driver attributes. One of these attributes is simulation. When you pass simulation with a value of 1, that alerts the driver that the instrument is not connected to the computer. In this “simulation mode,” the driver will not try to communicate with the instrument, but will return a valid instrument handle so you can pass it to other functions in the driver. The end result is that you can make instrument driver function calls from your program and you will not get run-time errors because of invalid instrument handles.
Note: You can use this capability with any IVI instrument-specific driver. You do not need to use the class drivers to get this level of simulation.
When you are using the class driver, you can enable simulation through a configuration utility. Therefore, you can enable and disable simulation without changing your program.
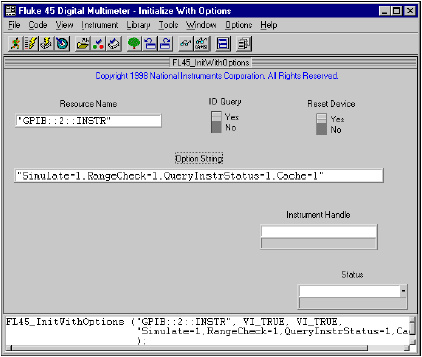
Figure 2. Fluke 45 InitWithOptions Function – By setting values in the Init string, you can programmatically enable simulation for your instrument driver. You can also enable simulation through a configuration file without changing your program source code.
Range Checking
One of the key responsibilities of the IVI instrument-specific drivers is range checking. Every time you try to send a value to the instrument to configure a particular setting, the driver will first ensure that this value is valid (within range) for that particular setting on that particular instrument model. This range-checking operation happens completely in software in the specific driver. Therefore, you do not have to have the instrument connected to the computer to perform range checking. This is the second level of simulation that you can use with IVI drivers.
When you write test code without the instrument connected, the IVI driver still automatically ensures that each value you are attempting to send to the instrument is valid, even if it does not send the values to the instrument.
This range-checking capability is one way you can “test drive” new instruments in your test systems. Before buying a new instrument, you can install the IVI-specific driver for that particular instrument and run your test program. Even though no commands will be sent to the instrument and no actual data will be acquired, your test program will still go through all of the configuration functions required to set up the instrument. If the new instrument cannot handle any of the settings required by the program, the specific driver (in simulation mode) will catch this incompatibility with an out-of-range error.
For example, imagine that your program currently uses Oscilloscope A to make a measurement with a sampling rate of 100 MS/s. If you would like to use Oscilloscope B instead, you can install the driver for Oscilloscope B and reconfigure your system to use this new oscilloscope in simulation mode. If Oscilloscope B cannot make the 100 MS/s measurement, the driver will assert an error on execution of your program code that configures the instrument for this measurement.
Note: Range Checking occurs in the instrument-specific driver. You can use this simulation capability with or without the class drivers.
Simulated data/errors
As you know, instruments are used to acquire data. Whenever a discussion about simulating an instrument occurs, most users immediately think of simulating the data returned from an instrument. The IVI architecture generates simulated data in two different ways. Every IVI instrument-specific driver has basic built-in simulated data generation algorithms.
For example, when you use a DMM driver in simulation mode, the Measure function will return a random number within the valid range of the current mode of the DMM. Or, when you are using an oscilloscope driver in simulation mode, the ReadWaveform function will return an array of random numbers within valid ranges for the scope. This simple data generation process will return data values to the program variables so subsequent function calls do not fail for lack of data. However, as you can imagine, random data is not very meaningful for your program or your units under test (UUTs).
In addition to generating data, you can use simulation drivers to inject simulated errors into your program. Using this technique, you can test your program to make sure it handles errors properly.
Note: The data generation capabilities described above are built into each IVI instrument-specific driver written with the instrument driver development wizard in LabWindows/CVI 5.0. The driver wizard automatically inserts code into the measurement functions for generating random data that is executed whenever the driver is used in simulation mode. Because you have access to this source code, you are free to modify the driver C code to add your own data generation algorithms to generate simulated data that more closely applies to the UUT or the application on which you are working. This code will be useful only for that particular instrument-specific driver. If you change instruments in the future, you will need to re-implement this work for each new instrument added. For customized simulation code, we recommend you use the simulation driver (described in the next section).
Generating Simulated Data with Simulation Drivers
The second mechanism for simulating data in the IVI architecture is using a simulation driver. Simulation drivers are “virtual instruments” that you plug into a class driver for generating data. For example, there are twelve simulation drivers that are included in the IVI Compliance Package – oscilloscope, digital multimeter, arbitrary waveform/function generator, switch, power supply, spectrum analyzer, power meter, RF signal generator, counter, digitizer, downconverter, and upconverter. Each of these simulation drivers plugs into the generic class driver to perform more flexible data generation when drivers are used in simulation mode. Simulation drivers have two modes – interactive and automatic. When used in interactive mode, simulation drivers have pop-up user interface panels so developers can interactively configure the data generated.
For example, when you are using a DMM driver in simulation mode with a simulation driver enabled, a data panel will be displayed whenever the Measure function is called. From the panel, you can select a base measurement value and an offset for the value generated. For example, generate a value of 3.0 V within a range of ±0.05 V. You can also configure the driver to pop up the panel each time the function is called, or automatically generate the data within the specified range every time. When used in automatic mode, the simulation automatically returns data to the program without requiring user interaction.
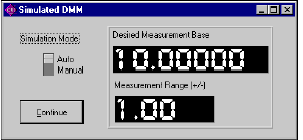
Figure 3. DMM Simulation Driver – When you call the DMM_Measure function with the DMM Simulation Driver enabled, the driver displays the measurement panel above, from which you can enter values to be “acquired” manually or automatically based on a specified range.
Simulation drivers with source code are included in the NI IVI Compliance Package. Therefore, you can develop very robust simulated data generation algorithms for your test systems and plug them into the simulation drivers. Because simulation drivers work with the class drivers, the code you develop can be reused without change when you swap specific instruments. When used in conjunction with a specific driver, the specific driver performs the range-checking level of simulation (ensuring that each value the program is attempting to send to the instrument is within valid limits for that instrument), and the simulation driver performs the data generation operation as described above.
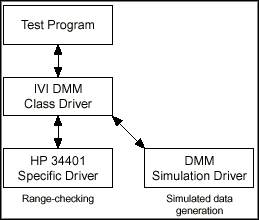
Figure 4. Using a Simulation Driver with an Instrument-Specific Driver – The instrument-specific driver performs a very important role ensuring that the values to be sent to the instrument are within range for that particular instrument (even when the instrument is not connected to the computer). For obvious reasons, this must be performed in the instrument-specific driver. The Simulation Driver, a generic library that performs more flexible data generation operations, is called only when measurement functions in the driver are called.
Conclusion
Simulation is a very powerful, yet often misunderstood capability with regard to instrument drivers and instrument control in general. The IVI architecture has been designed and implemented with the goal of providing some level of simulation for test developers. However, we believe that simulated data is very application specific. Therefore, it is not practical for vendors to develop data simulation tools and supply them with instrument drivers as a general-purpose solution that is always helpful when application-specific data is required.
The IVI technology establishes a standard instrument-driver architecture with built-in mechanisms for enabling simulation and simulated data. The architecture is designed so users can add value with customized plug-in code. The combination of these standard, off-the-shelf instrument drivers and end user custom plug-in code for simulated data not only saves developers significant development time and effort, but also provides a better, more flexible technical solution.
The mark LabWindows is used under a license from Microsoft Corporation. Windows is a registered trademark of Microsoft Corporation in the United States and other countries.