Introduction
Often, commercial-off-the-shelf (COTS) switches are available for your specific application in the topology you are looking for. An example of one of the more flexible switches is the NI PXI-2530 which supports six different topologies with a carry current 400mA and a voltage of 60 VDC or 30Vrms.
· Multiplexer -- 128x1 1-wire, 64x1 2-wire, 32x1 4-wire, and dual 64x1 1 wire
· Matrix -- 4x32 1-wire, 8x16 1-wire, and 4x16 2-wire
However, when you are dealing with RF, high-power or low-current switching, COTS switches are more difficult to find in the topology you need. You might be looking for a 6x1 multiplexer with a bandwidth of 20GHz or the ability to switch 20A with a matrix. When COTS switches are not available in the topology you need, you can design your own switch module using individual relays and a relay driver, or a digital I/O card.
Create a custom topology to organize independent relays in a way that will make it easier to perform a useful function. For example, a multiplexer (MUX) is designed to route a signal from multiple inputs to one single output, or vice versa. For example, a MUX can be used to measure multiple voltages with a single digital multimeter (DMM).
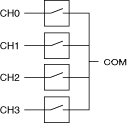
Figure 1: 4x1 Multiplexer using 4 relays
NI Switch Executive (NISE)
NISE is an intelligent switch management and automatic route configuration software. Use NISE to create switch routes on any switch module with an IVI-compliant switch driver. Once NISE has read the channel names from the specific driver, you can configure routes by supplying two endpoint channels. NISE manages all the routes among one or multiple switches. A call can be made using NISE programming interface from NI LabVIEW, LabWindows/CVI, TestStand or your development environment of choice to connect or disconnect the routes.
For more information about NISE, visit What Is NI Switch Executive? For more information about developing an IviSwtch compliant driver, visit this tutorial .
Hardwires
If your NISE virtual device consists of more than one switch module or you are using independent relays, you will have to use hardwires to describe to NISE how your switches or independent relays are physically connected. A hardwire describes a physical connection between switch channels, wiring, analog buses, matrix expansion plugs, etc., and can have any number of channels attached to it. For example, hardwires are used to link the rows (or columns) of two or more matrices to expand the size of the switching system. In Figure 2 below, two 2x4 matrices are linked together by their columns to create a 4x4 matrix. Thus, by integrating two switch modules, you are effectively creating a custom topology.
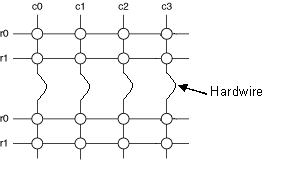
Figure 2: Matrix expansion using two 2x4 switch matrices
Hardwires can also be used to connect two or more individual relays. If you physically connect the COM channels of two SPST relays (Form A), and if you define a hardwire in NISE with these two COM channels, you have effectively created a 2x1 multiplexer, as shown in Figure 3. In NISE, you can create and alias, CH1, for no1, an alias, CH2, for no2, and an alias, COM, for co 1. The hardwire enables NISE to route a signal from CH2 to COM.
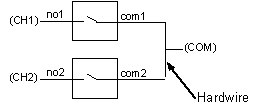
Figure 3: 2x1 multiplexer formed by connecting SPST commons
Reserved For Routing Channels
Another important feature of NISE is the assignment of channels that NISE can use for routing. These channels need to be marked as “Reserved For Routing” and are used by NISE to complete routes within a switch between endpoint channels. For example, for NISE to connect C0 to C2 as illustrated in Figure 4, mark of the rows “Reserved For Routing”.
Figure 4: R0 is used to route C0 to C2
It is also important to note that in larger systems every channel in the path between the two endpoint channels should be reserved for routing. Hardwires are automatically used by NISE when routing.
Creating a Custom Topology in NISE
The key to creating a custom topology in NISE is to identify input and output channels and define the appropriate hardwires that physically connect the channels of your switching system so NISE can appropriately route signals from endpoint channels. First, group the individual relays to form the required topology and identify the endpoint channels. Next, determine all possible routes between your endpoint channels by creating hardwires and mark appropriate channels as “Reserved For Routing.” To illustrate these steps, refer to the following examples.
Example 1: 4x16 1-wire Matrix
In this example, we will use 64 independent SPST electromechanical relays. These relays can be used for a high power application or to switch RF signals and are controlled with the PXI-2567 relay driver. Refer to driving external relays with NI xx67 . Figure 5 illustrates one possible way to connect single coil, non-latching SPDT relays to the PXI-2567. Only two out of eight banks of the PXI-2567 is shown.
Figure 5: 64 independent SPST electromechanical relays controlled by PXI-2567
Step 1: Designing your Custom Topology
First, define the desired topology. The matrix has 4 rows (ROW0 to ROW3) and 16 columns (COL0 to COL15) as shown in Figure 6.
Figure 6: 4x16 matrix
Next, determine how the relays should be connected to form the desired 4x16 matrix as shown in Figure 6. For the purpose of this example, assume that each SPST relay has two channels: “chx” and “comx” as shown in Figure 7.
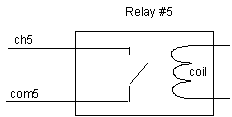
Figure 7: SPST relay channel names
SPST relays can be placed on the crosspoints of the 4x16 matrix as shown in Figure 8. The “ch” channels of all the relays in the same column and the “com” channels in the same row should be physically connected.
With these interconnections any signal connected to any column can be routed to another column using a row as illustrated in Figure 4. Each relay is controlled by the corresponding channel number of the PXI-2567. For example, to connect ROW2 to COL1, ch17 needs to be connected to com17 of the PXI-2567.
Figure 8: Relay layout to form a 4x16 1-wire matrix
Step 2: Naming your Endpoint Channels and Defining Hardwires
Now, we can configure the 4x16 1-wire matrix designed in step 1 in NISE. To do so, we will connect the signals to the columns and use the rows to interconnect the columns. To begin, assign channel names to all the columns. To assign channel names in NISE, type a string in the alias textbox fro each channel as shown in Figure 9.
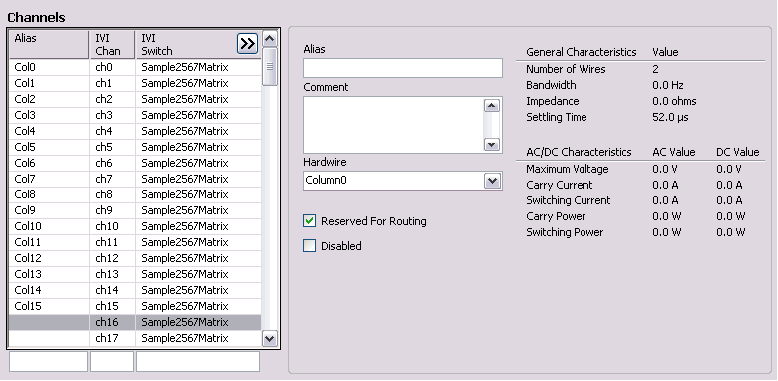
Figure 9: Channel name assignment
To tell NISE that relays are connected to each other, create hardwires for all physical connections. First, create a hardwire for each column that connects all the “ch” channels of the relays in the same column. Refer to Figures 10 and 11 for an example of a hardwire “Column1” that connects ch1, ch17, ch33, and ch49. Similarly, we create a hardwire for each row which connects all the “com” of the relays in the same row. Refer to Figures 10 and 11 for an example of a hardwire “Row0” that connects all the “com” channels in the first row.
Figure 10: Hardwire definition for rows and columns
Figure 11: Hardwire configuration in NISE
Step 3: Identifying your “Reserved For Routing” channels
As stated in step 2, the rows will be used to route signals from one column to another. For NISE to automatically route a signal from one column to another when given columns as endpoints, ensure all the channels in the path are marked “Reserved For Routing.” Channels defined as endpoint channels in step 2 (ch0 to ch15) cannot be marked as “Reserved For Routing.” Refer to Figure 12 for an example of endpoint channels that should be marked “Reserved For Routing.”.
Figure 12: Marking channels as “Reserved For Routing”
Step 4: Create Signal routes and route groups
Once the channel aliases and reserved for routing channels are configured and the hardwires are defined, create routes simply by selecting the two columns as endpoints. For example, to define a route from COL0 to COL9, select these columns as endpoints in the Visual Route Editor in the Routes/Groups tab. NISE will automatically determine the appropriate route. As shown in Figure 13, NISE uses the hardwire Row0 to route a signal from COL0 to COL9.
Figure 13: Route creation in the Visual Route Editor
This route can be saved and named “COL0_To_COL9” and can be used from any application using NISE “connect” or “disconnect” functions or as a switch step in TestStand. When a call to connect this route is made, NISE will connect ch0 to com0 and ch9 to com9 of the PXI-2567 which will actuate the individual relays “0” and “9,” respectively, (as illustrated in Figure 14) creating a route between “COL0 and COL9.”

Figure 14: Route between COL 0 and COL 9
If another route between two other columns is created the same way as described above, NISE will use ROW0. The two routes will not be able to exist at the same time. In order for two different routes to use different rows so they can be connected at the same time, they need to be created in the same route group. In Figure 11 above, we inserted “COL0_To_COL9” in a route group called “Test_Columns.”
When we created the second route “COL1_To_COL5” we also inserted it in the same route group. Since both routes are in the same route group, NISE selects a path for the second route that does not interfere with the first route using Row0. In Figure 13 below, we see that NISE selects hardwire Column1, hardwire Row3 and hardwire Column5 to complete the route between COL1 and COL5. The physical path is illustrated in Figure 14.
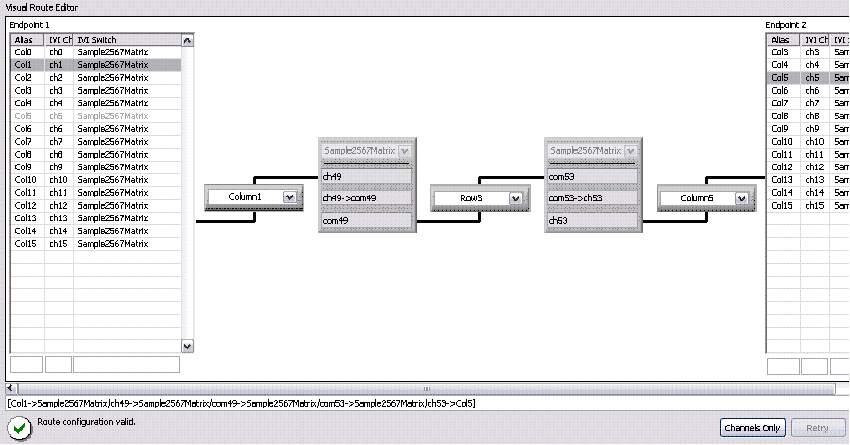
Figure 15: Different row selection in the same route group
When a call to connect this route is made, NISE will connect ch49 to com49 and ch53 to com53 of the PXI-2567 which will actuate the individual relay 49 and 53 respectively (as illustrated in Figure 14) creating a route between COL1 and COL5.
 Figure 16
: Route between COL1 and COL 5
When the NISE configuration is complete, any routes or route groups can be easily connected/disconnected from any ADE or from a TestStand switch step. Figure 15 illustrates the connection between column 0 and column 9 using one of NISE shipping examples: “Getting Started.vi” found in \Program Files\National Instruments\LabVIEW 7.1\examples\SwitchExecutive folder..
Figure 17: Connection of column 0 to column 9 in LabVIEW
Example 2: 8x1 1-wire MUX
In this example we use the NI PXI-2570. The PXI-2570 has 40 SPDT electromechanical armature relays.
Step 1: Designing your Custom Topology
Define the desired topology by grouping relays together to form an 8x1 multiplexer as shown in Figure 16.
Figure 16: 8x1 MUX using seven SPDT relays
Step 2: Naming your Endpoint Channels and Defining Hardwires
Name the NC and NO channels of the relays 0 to 3 “CH0” to “CH3” as shown in Figure 17 and 18. Also, assign COM6 its new multiplexer name, “COM”.
Figure 19: Relay layout to form a 8x1 MUX
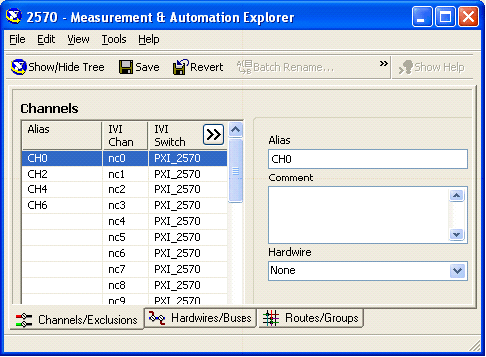
Figure 20: Naming endpoint channels
Next, define hardwires to allow NISE to route signals from one endpoint channel to another. Physical connections are shown in Figure 19, hardwires are configured in NISE as shown in Figure 20.
Figure 21: Defining hardwires
Figure 22: Hardwires configuration in NISE
Step 3: Identifying your “Reserved For Routing” channels
For NISE to automatically route signals from any channel to the common channel of the MUX, ensure all the channels in all possible paths are marked as “Reserved For Routing.” Reserve for routing all the channels that are connected by hardwires as shown in Figure 21.
Figure 23: Defining the “Reserved For Routing” channels
Step 4: Create Signal Routes
Create routes from each channel to the common and name them “CH0” to “CH7” as shown in Figure 22.
Figure 24: Defining routes for each channel of the multiplexer
As you can see in Figure 23, the route named CH7 is a route from CH7 to COM. It connects no3 to com3, uses Hardwire4 from com3 to no5, connects no5 to com5, uses Hardwire 5 from com5 to no6, and finally connects no6 to com6.
Figure 25: Route creation
When creating the routes, you can only see the endpoint channels of the multiplexer by selecting “Hide channels without aliases” in the option menu as shown in Figure 24.
Figure 26: Using the option menu to only see relevant channels
Once the NISE configuration is done, a route can be called from the application development environment (ADE) of your choice. Figure 23 illustrates how to connect CH0 to COM in LabVIEW.
Figure 27: Connecting CH0 to COM in LabVIEW
Documenting your Solution
Although NISE does not provide a graphical representation of your switching system, it provides one-click documentation that describes how each channel is related and how to physically wire your switching system. The documentation will outline which switches or relay drivers are used in your system, which channels are endpoints or reserved for routing, and what their aliases are. It will also outline what hardwires and buses are part of your switching system as well as any channel exclusions, routes, and route groups. Figure 23 illustrates the one-click documentation for Example 2.
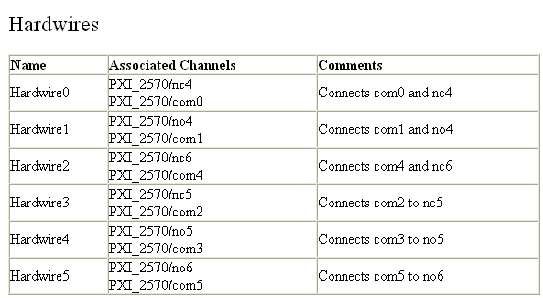
Figure 26: Sample of one-click documentation
Conclusion
Using independent relays or a relay driver in conjunction with NISE enables you to create custom topologies which will greatly simplify your programming. In the examples provided above, you would have had to remember many details of your switching system, including how relays connect to each other and which channels are used as endpoints. If several paths transverse more than one relay, keeping track programming which relay to use for each path would be a very cumbersome task. Programming can even be more difficult. With the NISE solution, you can simply create your routes and route groups and call them explicitly without having to manage any of your relays.
Creating custom topologies with NISE is very flexible and can assist you in building a switching system for various applications involving individual relays such as RF, high-power or low voltage. The possibilities are endless and will decrease your development time for any switching applications.