Introduction
Images are useful for restoring a known, working configuration to a system that has become unstable over time. Also, because an image is a complete archive of the files on a system at a given time, saving periodic images can help track system states over time for quality assurance. Saving an image also makes it possible to install or restore drivers and software from a host Windows machine that does not have any drivers or NI Measurement & Automation Explorer (MAX) configuration software installed.
Using images for cloning can also greatly simplify the process of deploying a particular system configuration to multiple production targets. Once you have configured and tested your development system, you can create an image of that system and apply it to any number of unconfigured, identical systems.
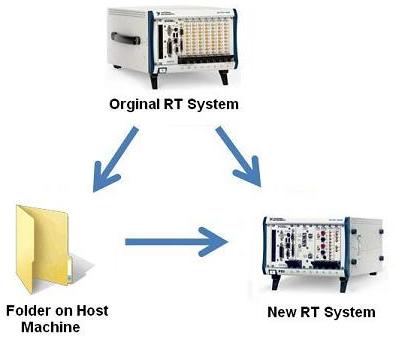
Figure 1. Multiple System Replication Scenarios
You can configure the Source and Destination sections to allow for the following use cases:
-
RT Target » Folder – Backing up a target to a folder on the host machine
-
RT Target » RT Target – Replicating one system to another on the same network
-
Folder » RT Target – Deploying a saved image to a target
It is important to remember that you can deploy images only to identical real-time systems. This is due to the fact that different versions of the operating system, driver files, and databases that maintain hardware identification are deployed based on the type of hardware target. Also note that the following instructions are specific to Phar Lap ETS targets.
Creating and Storing a Real-Time Image
LabWindows/CVI includes the Real-Time System Replication Utility, which you can use to run on a Windows desktop.
Ordinarily, the development process results in a LabWindows/CVI Real-Time target with the necessary set of drivers and a built executable. For later replication to identical systems, the replication executable stores the image of these drivers and, optionally, the rest of the hard drive contents. To copy the contents of the remote hard drive to the local file system, only a few steps are necessary:
-
Select a LabWindows/CVI Real-Time target to be the source as in the screen capture below. Then, press the adjacent Browse… button to choose a LabWindows/CVI Real-Time target to serve as the master. By selecting "Installed Software Only" here, you generate an image that contains only system files and software packages installed from NI MAX. This option is useful for capturing the NI driver/software configuration of a system without including user programs or other data or output files.
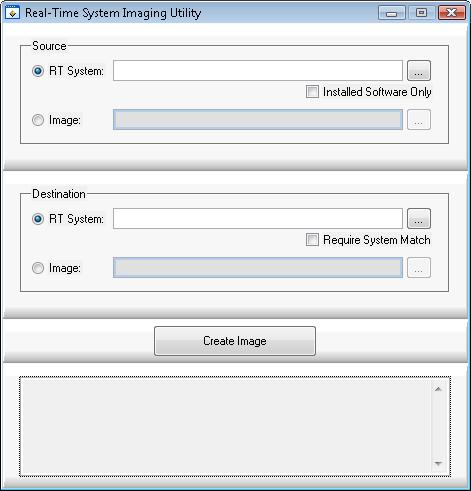
Figure 2. Launch the Real-Time System Imaging Utility
- Pressing the browse button creates a list of LabWindows/CVI Real-Time targets available on the local subnet, as shown below. The IP address is given to help identify the right remote machine. Choose the machine you would like to replicate and press OK.
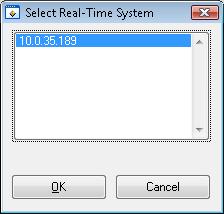
Figure 3. Select a Real-Time System
- Next choose a destination. For this demonstration, use a folder on the local drive. Select the directory in the local file system where you would like to keep the master image. "Require System Match" ensures that the specified image is applied only to the system in which it was created. By default, an image must match only the target system's device code (in other words, hardware model). This option imposes an additional restriction that source and target machines be not only the same model of system but also the same system.
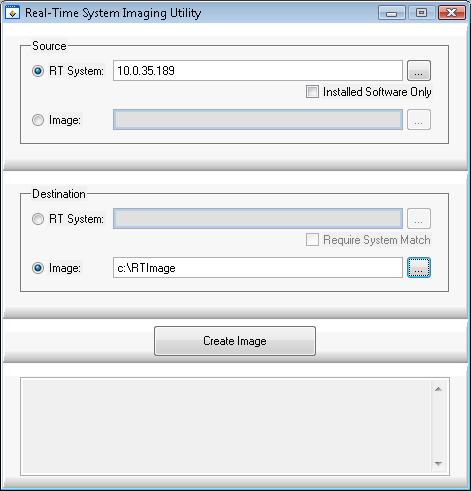
Figure 4. Select the Source and Destination of the Replication
- Press "Create Image" to begin the replication process. At the end of the process, the Messages window should indicate the process is finished with no errors.
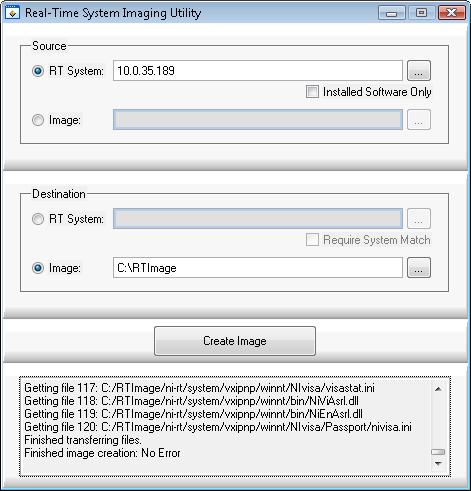
Figure 5. System Replication Completed
Deploying a Stored Real-Time Image
You can deploy the image with a similar process. This program assumes that targets are ready to accept file transfers. This means that they must have valid IP addresses assigned from within MAX, and, for the purposes of this utility, assigned by someone with a copy of MAX and knowledge of setting IP addresses for remote LabWindows/CVI Real-Time targets.
-
Follow the steps above but select Image as the source. Type or browse to the image stored on the local file system.
-
Select RT System as the destination. Either type in the IP address of the desired target or use the Browse… button to interactively select a target.
-
Now press Apply Image to begin the process of copying the previously stored image. Note that you can deploy images only to identical systems.
System Replication Functions
Developers who want to create their own system replication tools with unique customizations should use the following two functions in the System Replication Library shown below. For a description and example for each function, please select the function's hyperlink. For a complete list of the LabWindows/CVI Real-Time System Replication functions, please refer to NI LabWindows/CVI Real-Time Module Help: Real-Time Utility Library Function Tree.
LabWindows/CVI System Query and System Configuration Functions
LabWindows/CVI includes additional real-time System Query and System Configuration functions that you can use with the System Replication Library functions to create custom applications for performing replication, upgrade, or backup operations. Some of the functions included are below. For a description and example of each function, please select the function's hyperlink. For a complete list of the LabWindows/CVI Real-Time System Replication functions, please refer to NI LabWindows/CVI Real-Time Module Help: Real-Time Utility Library Function Tree.
Conclusion
You can create a variety of system replication applications using the system replication functions and the examples provided. This is ideal for system integrators who wish to prevent their users from opening or installing MAX, and for any users who intend to duplicate or back up real-time systems.