NI Relay Driver
The NI PXI-2567 and SCXI-1167 are designed to be 64-channel, multipurpose relay drive modules, capable of driving many types of external relays. High-current, high-voltage, or multipole RF switches all fit into the realm of possibilities. The NI PXI-2567 and NI SCXI-1167 can also drive small DC motors or other inductive relay coils.
Internal and external Power support
The PXI-2567 and SCXI-1167 can provide up to 50 V and 600 mA of drive capacity per channel when connected to an external power supply. Without an external power supply, the PXI-2567 can source up to 1.25 A from the 5 V pin or 500 mA from the 12 V pin provided by the PXI backplane. The SCXI-1167 can supply up to 750 mA at 5 V without an external power source. No one channel can drive more than 600 mA with either an internal or external source, and total module current is limited to 25 A of the simultaneous drive.
Protection circuitry
The eight banks of eight drivers in the PXI-2567 and SCXI-1167 protect against overvoltage and overcurrent conditions. When the condition clears, the channel is automatically reset so no disassembly of the module is required. A zener diode is also included to protect against damage from inductive loads.
Scanning
The PXI-2567 and SCXI-1167 are able to maximize throughput in automated test applications by the use of scanning. Scanning improves throughput by downloading a list of up to 32,000 connections to the switch modules and cycling through the list using
an event (trigger) without any interruption from the host processor. Scanning is most efficiently accomplished by mating the PXI-2567 or SCXI-1167 with an instrument, such as the NI PXI-4070 FlexDMM, that issues a trigger after each measurement.
Software
Like any other NI PXI and SCXI switch module, the PXI-2567 and the SCXI-1167 are shipped with NI-SWITCH, an IVI-compliant driver offering complete functionality for all switch modules. The PXI-2567 and SCXI-1167 can also be programmed using the NI-DAQmx DIO functions. For additional assistance in configuring, programming, and managing higher-channel-count switching systems, NI Switch Executive software offers an easy-to-use intelligent switch management and visual routing environment.
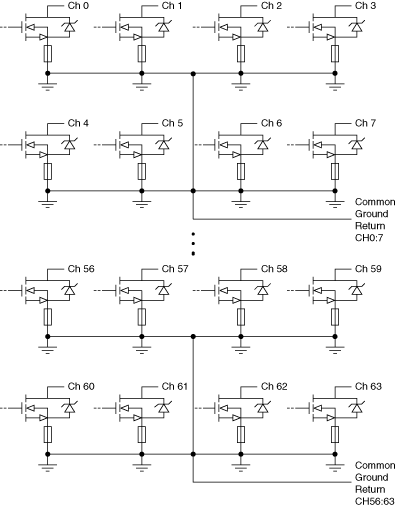
Figure 1: Hardware diagram of PXI-2567 and SCXI-2567
Single Coil Non-latching Relay
To actuate a relay, connect the positive terminal of your voltage source to one side of the relay coil and connect the other terminal of the relay coil to the terminal of a channel of the xx67. Then connect the negative terminal of your voltage source to the common ground return of the channel used. Closing the channel driver on the xx67 completes the circuit, driving your relay. Opening the channel driver will open your external relay. Figure 2 illustrates the connection of the single coil non-latching relay to channel 7 of the xx67.
Figure 2: Connecting single coil non-latching relay
Alternatively, to take advantage of the internal power supply, connect one side of the relay to the 5 V (pin 58) or to the 12V (pin 18 on PXI-2567 only) power supply instead of an external power supply. The other side should be connected to a channel terminal.
Software implementation
In NI-SWITCH, close channel 7, by using niSwitch Connect channels with ch7 and com7. To open channel 7 use niSwitch Disconnect Channels with the same parameters.

Figure 3: Software implementation using NI-SWITCH in LabVIEW
The following code can be implemented in Visual C++ or CVI
//Open a session to the xx67 and set the topology.
niSwitch_InitWithTopology("PXI1Slot2", “NISWITCH_TOPOLOGY_2567_INDEPENDENT",VI_FALSE, VI_TRUE, &switchSession);

//close the external relay by closing channel 7
niSwitch_Connect(switchSession, "ch7", "com7");

//Wait for channel 7 to activate and debounce.
niSwitch_WaitForDebounce(switchSession,5000);

// YOUR PROCESS HERE

//open external relay by opening channel 7
niSwitch_Disconnect (switchSession, "ch7", "com7");

//Wait for channel 7 to activate and debounce.
niSwitch_WaitForDebounce(switchSession,5000);
With NI-DAQmx close and open channel 7 by using DAQmx Switch Connect (Single) and DAQmx Switch Disconnect (single) respectively with /devicename/ch7 and /devicename/com7.

Figure 4: Software implementation using NI-DAQmx in LabVIEW
Two Coil Latching Relay
To drive a two coil relay, simply connect a terminal of each coil to two different channels and the other terminals to a positive terminal of an external power supply. Connect also the negative terminal of the power supply to the common ground return of the 2 channels. To activate (set) the relay, close and open the first channel. To change the relay state (reset), close and open the other channel. Figure 3 illustrates the connection of a two coil latching relay. Channel 6 is the set channel, channel 7 is the reset channel.
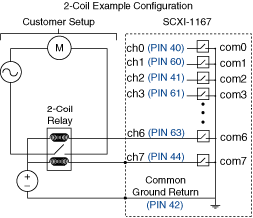
Figure 5: Connecting a two coil relay
As in the single coil relay, the internal power supply can be used by connecting one side of both coils to the 5V (pin 58) or to the 12 V (pin 18 on PXI-2567 only) instead of an external power supply and the other terminal of both coil to 2 different channels.
Note: Allow sufficient time between the operation of channel 6 and channel 7 to let the one coil latching relay settle. If both channels operate at the same time, relay state will not change.
Software implementation
In NI-SWITCH use niSwitch Connect channel and niSwitch Disconnect Channel with ch6 and com6 to close (set) the external relay. Use niSwitch Connect channel and niSwitch Disconnect Channel with ch7 and com7 to open (reset) the external relay.
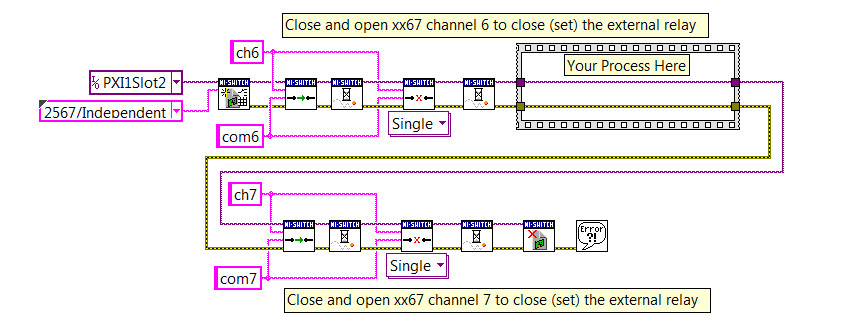
Figure 6: Software implementation using NI-SWITCH in LabVIEW
The following code can be implemented in Visual C++ or CVI
//Open a session to the switch module and set the topology.
niSwitch_InitWithTopology("PXI1Slot2","NISWITCH_TOPOLOGY_2567_INDEPENDENT",VI_FALSE, VI_TRUE, &switchSession));

//close the external relay by closing and opening channel 6
niSwitch_Connect(switchSession, "ch6", "com6");
niSwitch_WaitForDebounce(switchSession,5000);
niSwitch_Disconnect(switchSession, "ch6", "com6");
niSwitch_WaitForDebounce(switchSession,5000);

// YOUR PROCESS HERE

//open the external relay by opening and closing channel 7
niSwitch_Connect(switchSession, "ch7", "com7");
niSwitch_WaitForDebounce(switchSession,5000);
niSwitch_Disconnect(switchSession, "ch7", "com7");
niSwitch_WaitForDebounce(switchSession,5000);
In NI-DAQmx use DAQmx Switch Connect (Single) and nDaqmx Switch Disconnect (Single) with /devicename/ch6 and /devicename/com6 to close (set) the external relay. Use niSwitch Connect channel and niSwitch Disconnect Channel with ch7 and com7 to open (reset) the external relay.
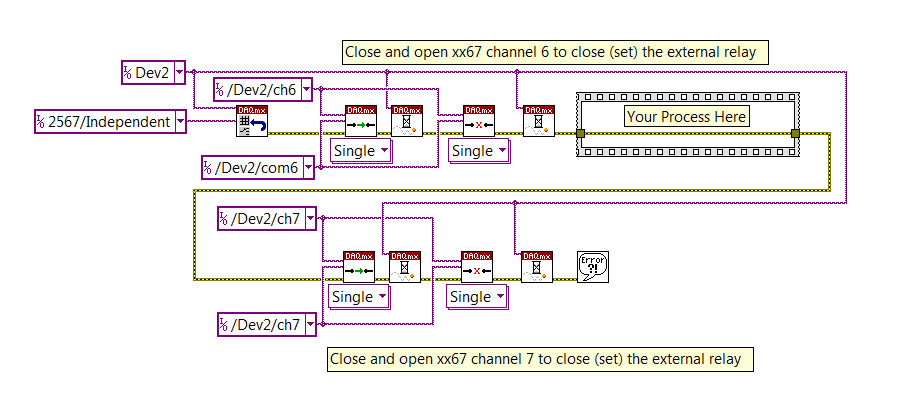 Figure 7:
 Software implementation using NI-DAQmx in LabVIEW
Single Coil Latching Relay
A single coil latching relay actuates (sets) when current flows in the set direction in the coil. Once the current stops the relays stays in position. When the current flows in the coil in the opposite direction the relay actuates (resets). To allow for current reversing in the coil, connect one terminal of the coil to a channel as well as to the positive terminal of a power supply though a resistor (R1). Connect the other terminal of the coil to another channel and also to the positive terminal of the power supply though another resistor (R2) of the same value. The single coil latching relay is connected to channel 6 and 7 in Figure 4.
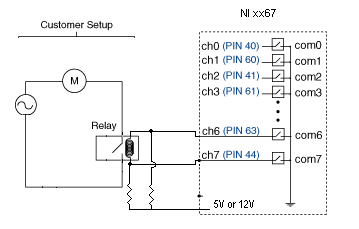 Figure 8:
 Connecting one coil latching relay
To show how this works, refer to Figure 5 which shows the equivalent circuit during operation. The resistance of the relay driver can be neglected compared to the resistance of the relay coil and R1 and R2.
Picture 1: When channel 6 is closed, current will flow from Vcc (power supply connected to the relay coil) though R2, R1, Rc (relay coil) and though channel 6 as indicated in the picture. If the current flowing though Rc is sufficient the relay will actuate (set).
Picture 2: When channel 6 is opened the relay will remain in its position.
Picture 3: When channel 7 is closed, the current will flow though R1 , R2 Rc, and though channel 7 as indicated in the picture but the current will flow though Rc in opposite direction. As in picture 1, if the current through the coil is sufficient, the relay will actuate and change state (reset).
R1 and R2 need to have the same value and be chosen so the current though Rc actuates the relay.
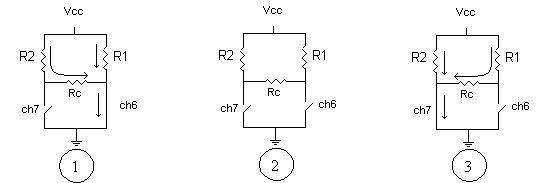 Figure 9:
 Equivalent circuits
Note: Allow sufficient time between the operation of channel 6 and channel 7 to let the one coil latching relay settle. If both channels operate at the same time, relay state will not change.
Software implementation
In NI-SWITCH use niSwitch Connect channel and niSwitch Disconnect Channel with ch6 and com6 to close (set) the external relay. Use niSwitch Connect channel and niSwitch Disconnect Channel with ch7 and com7 to open (reset) the external relay.
Figure 10: Software implementation using NI-SWITCH in LabVIEW
The following code can be implemented in Visual C++ or CVI
//Open a session to the switch module and set the topology.
niSwitch_InitWithTopology("PXI1Slot2","NISWITCH_TOPOLOGY_2567_INDEPENDENT",VI_FALSE, VI_TRUE,&switchSession));

//close the external relay by closing and opening channel 6
niSwitch_Connect(switchSession, "ch6", "com6");
niSwitch_WaitForDebounce(switchSession,5000);
niSwitch_Disconnect(switchSession, "ch6", "com6");
niSwitch_WaitForDebounce(switchSession,5000);

// YOUR PROCESS HERE

//open the external relay by opening and closing channel 7
niSwitch_Connect(switchSession, "ch7", "com7");
niSwitch_WaitForDebounce(switchSession,5000);
niSwitch_Disconnect(switchSession, "ch7", "com7");
niSwitch_WaitForDebounce(switchSession,5000);
In NI-DAQmx use DAQmx Switch Connect (Single) and nDaqmx Switch Disconnect (Single) with /devicename/ch6 and /devicename/com6 to close (set) the external relay. Use niSwitch Connect channel and niSwitch Disconnect Channel with ch7 and com7 to open (reset) the external relay.
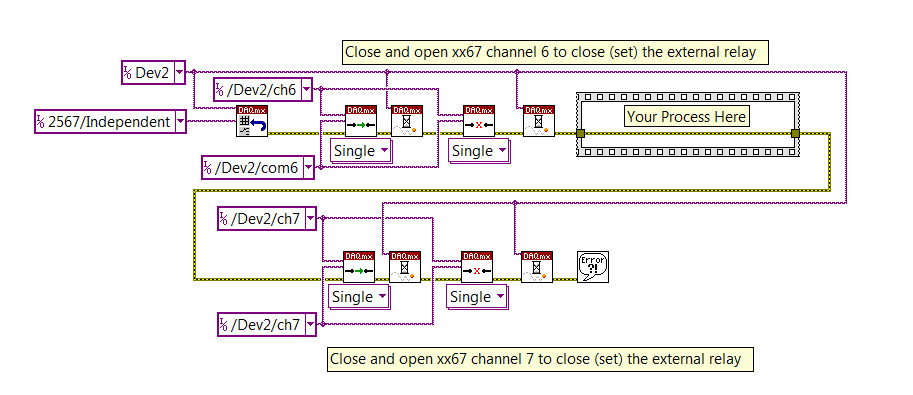 Figure 11:
 Software implementation using NI-DAQmx in LabVIEW
Selection R1 and R2
We can relate the resistance of R1 and R2 to the resistance of the relay coil (Rc) and to the ratio of the relay operating voltage (Vop) and the power supply voltage (Vcc). To choose a value for R1 and R2 simply calculate the ratio Vcc/Vop to find the percentage of Rc.
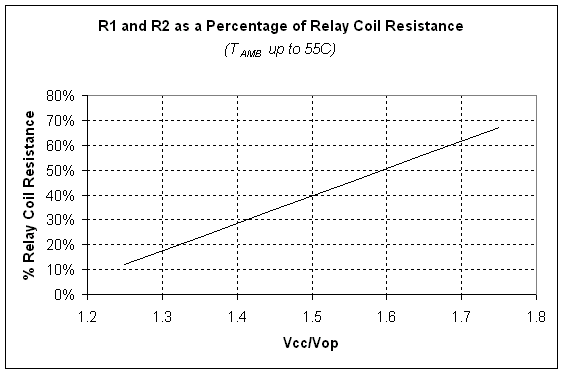 Figure 12:
 R1 and R2 selection graph
Example 1
Let:
Vop = 3.4 V
Vcc = 5 V
Rc = 101 Ω
The ratio Vcc/Vop is 1.47 V which corresponds to 36% of Rc.
A valid selection for R1 and R2 to drive this relay at a temperature up to 55°C would be
36% of 101 ≈ 36 Ω
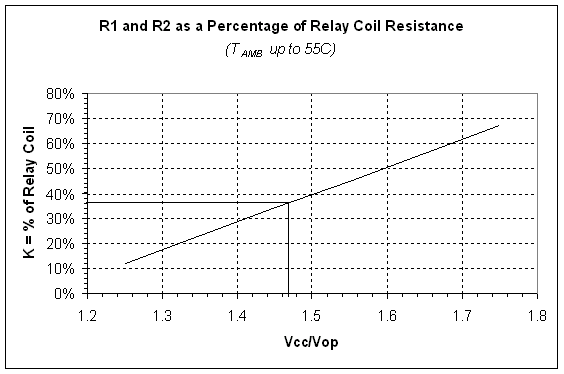 Figure 13:
 R1 and R2 selection example
Once the value has been chosen, we need to verify that the current flowing through the relay driver doesn’t not exceed its rating. The xx67 has a current rating per channel of 0.600 mA.
Using picture 1 of Figure 9:
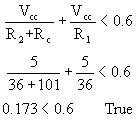 36Ω
36Ω is an appropriate resistance value.
Full Derivation
Using picture 1 of Figure 9:
Vop is the pull-in voltage of the relay.
Imin is the minimum coil current required to actuate the relay.
If we allow 10% error on the relay coil Rc.
The temperature coefficient of copper is 0.004%/°C, the resistance of the relay coil changes with temperature by:
Imin can also be expressed as:
For T= 55°C