Determine the Current Version of the BIOS
Press the Delete key on your keyboard during the start up screen to enter the BIOS. The BIOS version will appear on the top of the screen in the main tab.
Note: Historically, two version numbers will appear: the first one is the Manufacturer's BIOS Version, and the second one is the NI BIOS version. The one that matters to you is the NI BIOS version, which is the one that gets upgraded.
For example, for the NI 8180 family of controllers (PXI-8186, PXI-8187), the NI 8171 family of controllers (PXI-8176, PXI-8175, PXI-8174, PXI-8185, PXI-8184) and the NI VXIpc-870B family of controllers (VXIpc-871B, VXIpc-872B), the BIOS version numbers that appear are:
- PhoenixBIOS version, such as: PhoenixBIOS 4.0 Release 6.0.5
- NI version, such as: NI 8185 Controller BIOS Version 1.70
Updating the BIOS
Note: NI does not recommend that you update your BIOS version unless you require functionality that a new BIOS provides. If you have questions, please contact NI support.
Depending upon the period of time that the controller was released, there are two different ways in which the BIOS is updated. Follow the set of directions applicable to your controller as it is listed in the tables below:
Method 1
- Download the BIOS for your controller. Go to Software and Driver Downloads to search for the BIOS applicable to your controller.
- Unzip the files that you downloaded to your Desktop.
- Insert a USB flash disk into one of your computer's USB slots.
- Allow for the operating system to identify the USB flash disk properly.
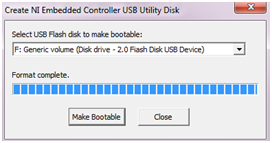
- Run CreateUSBUtilityDisk.exe and select Run. This program will automatically detect all the USB flash disks that are connected to your PC.
- Choose the USB you would like to use from the drop down menu.
- Select Make Bootable. The application will format the USB flash disk with a bootable DOS image FreeDOS and will automatically copy over the BIOS files that you have downloaded. Note: This will delete all information currently on the USB drive. You may need to run in Administrator mode for this step.
- Select Ok to delete all the data that is currently on the USB drive. Close the application when finished by selecting Close.

-
Insert the USB Drive into your controller Boot into your controller's BIOS by pressing Delete and ensure that the BIOS settings are configured correctly:
Ensure that your controller has Legacy USB support Enabled. This allows you to boot from a USB device. This setting is found in the BIOS under Advanced»Integrated Peripherals»Legacy USB Support.
If there is a LV RT tab in the BIOS, ensure that in this tab the Boot Configuration is set to Windows/Other OS. This will ensure that the USB drive will show up as a boot option.
If you are using a PXI-8108, PXIe-8108, PXI-8101, PXIe-8101, PXI-8102, PXIe-8102 or PXI-8110, ensure that you have setup these additional settings:
→ Navigate to Advanced»SATA Configuration»SATA Mode Selection and select IDE
→ Navigate to Advanced»USB Configuration»Mass Storage Devices and select Auto
→ Navigate to Boot»Hard Drive BBS Priorities and move USB to the top of the list (Boot Option #1)
→ Navigate to Boot»Boot Option #1 and make sure USB is at the top of the list
- Reboot and enter the BIOS again.
- Ensure that your USB device is first in the list of bootable devices and reboot again.
- If your USB device is listed with "UEFI***, Partition 1," choosing this will not boot the FreeDOS Operating System. In this case, reboot and press F10 to enter into the Boot menu. Choose the USB without "UEFI***, Partition 1" to boot into FreeDOS Operating System.
- Boot into the FreeDOS Operating System from your USB boot disk where instructions will explain how to update your BIOS. The BIOS Readme also has additional information about performing this update.
Note: Do not interrupt the BIOS flashing process. Doing so can corrupt your BIOS and require an RMA.
Method 2 (Legacy Support)
-
Download the BIOS for your controller.
- Unzip the files that you downloaded to your Desktop.
- Insert a USB flash disk into one of your computer's USB slots.
- Reference the Readme file that will be found in the file that you unzipped in Step 2. In this Readme it will tell you what files to copy over to the USB drive, usually it is all the files that are found in that zip file.
- Insert the USB Drive into your controller
- Boot into your controller's BIOS by pressing Delete and ensure that the BIOS settings are configured correctly:
Ensure that your controller has Legacy USB support enabled. This allows you to boot from a USB device. This setting is found in the BIOS under Advanced»Integrated Peripherals»Legacy USB Support.
If there is a LV RT tab in the BIOS, ensure that in this tab the Boot Configuration is set to Windows/Other OS. This will ensure that the USB drive will show up as a boot option. Ensure that your USB device is first in the list of bootable devices and reboot again
- Reboot and enter the BIOS again.
- Boot into the FreeDOS Operating System from your USB boot disk where instructions will explain how to update your BIOS. The BIOS Readme also has additional information about performing this update.
Note: Do not interrupt the BIOS flashing process. Doing so can corrupt your BIOS and require an RMA