Using NI MAX
To configure a default gateway in NI MAX, the target must be set to use a static IP address:
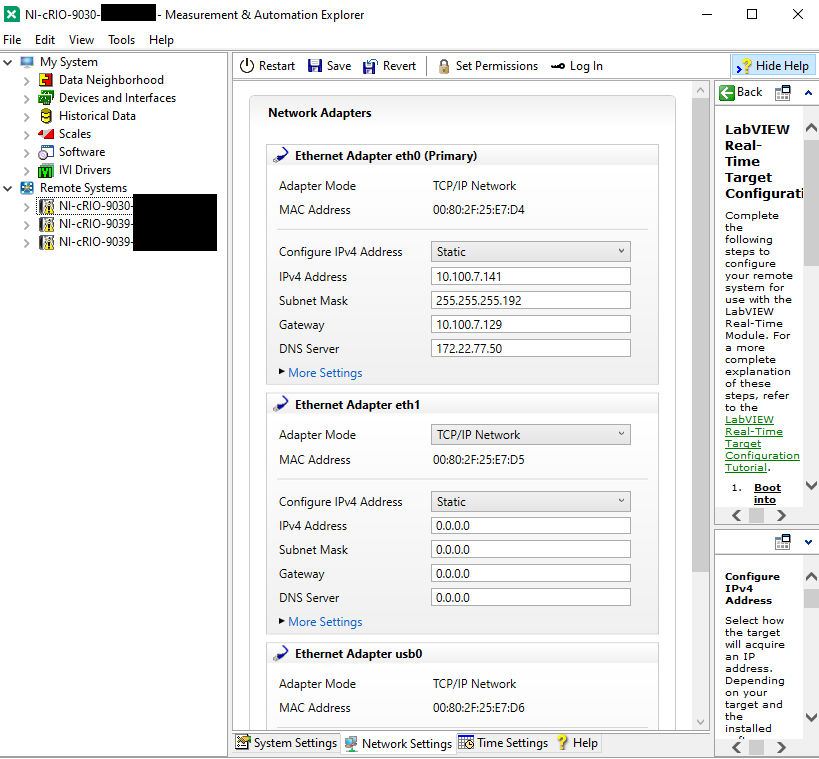
1. In NI MAX, expand the
Remote Systems branch and select the Linux target.
2. From the bottom of the right-hand pane, select the
Network Settings tab.
3. Ensure that
Configure IPv4 Address for the required Ethernet Adapter is set to
Static.
4. The
Gateway field will now be enabled and a default gateway can be configured, as shown below.
Configuration through NI MAX is convenient since it does not require any programming or development. However, it must be completed manually.
Using LabVIEW
The
System Configuration VIs can be used to programmatically retrieve and set the target's IP settings. Refer to
Programmatically Change Network Settings for Linux RT CompactRIO Targets to download example code that demonstrates how to implement this method.
This is advantageous if the configuration should be automated. However it requires that a compatible version of LabVIEW and LabVIEW Real-Time are installed. To check software compatibility, refer to
Software Support for CompactRIO, CompactDAQ, Single-Board RIO, R Series, and EtherCAT.
Using SSH
For demonstration purposes, this article uses
PuTTY as an SSH client. However, any SSH client can be used.
1. Connect to the target over SSH.
- If using PuTTY, enter the Host Name or IP Address while ensuring that Connection type is SSH and Port is 22.
2. When prompted, log in to the target.
- By default, the username is admin and the password is blank.
3. It is advised to first check the current default gateway.
- In the terminal, enter route to print the gateway information.
- The output should appear similar to the following image.

4. Delete the current default gateway.
- This is required because the target cannot have more than one default gateway. Doing so will result in network conflicts.
- Enter route delete default gw [IP Address] [Adapter] where [IP Address] is the gateway address and [Adapter] is the Ethernet adapter to change. For most applications, eth0 will be the required adapter.
5. Set a new default gateway.
- Enter route add default gw [IP Address] [Adapter] where [IP Address] is the new gateway address and [Adapter] is the same as the adapter in step 4.
It should be noted that configuring the gateway using this method is not a permanent change. The target will reset it's configuration after rebooting or reformatting. If a permanent configuration is required, consider making a Linux start-up (
.init) script to run the commands specified in steps 4 and 5. The
.init script will then run each time the target boots up.
For guidance on how to create a start-up script, refer to
Tutorial: Installing Startup Scripts on NI Linux Real-Time.
Additional Information
It should be noted that modifying the
.ini files on the real-time target will not make permanent changes to the IP settings. For example,
ni-rt.ini located in
/etc/natinst/share contains the Default Gateway IP. If this is modified and the controller is rebooted, the Default Gateway will revert to it's original value.