Follow the steps below to create a batch script that deletes specified files/folders and configure a scheduled Windows task to periodically run the script.
Creating a Batch Script
1. Open a standard text editor like Notepad.
2. Enter the line(s) below into the Notepad file.
- The del command deletes files in the specified directory.
- The rmdir command removes a specified folder. Adding the /S and /Q parameters ensures that the deletion executes on sub-directories and runs quietly.
del "<file path>"
rmdir /S /Q "<folder directory>"For example, to delete all cached NI installers:
del "C:\ProgramData\National Instruments\NI Package Manager\packages\*.nipkg"
rmdir /S /Q "C:\ProgramData\National Instruments\MDF\ProductCache"3. Save the file with a
.bat extension.
Running the Batch Script Manually
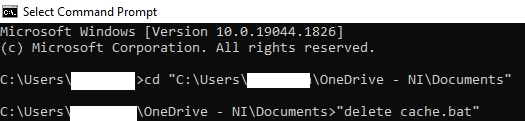
1. Open Command Prompt.
2. Navigate to the directory where the batch script is saved using
cd "<batch script directory>".
3. Run the batch script with
"<batch script name>".
Running the Batch Script Periodically
1. Open Task Scheduler.
2. From the
Actions pane on the right-hand side, select
Create Basic Task...3. In the
Create Basic Task Wizard, specific a
Name for the task and click
Next.
4. Specify a trigger for the frequency at which the task executes. Click
Next.
- If a date/time related trigger is selected, the wizard prompts the user to define a start date and time.
5. Select
Start a program as the type of action to perform. Click
Next.
6. Click
Browse and select the batch script created in the earlier section.
- Leave Add arguments (optional) and Start in (optional) blank, then click Next.
7. Review the scheduled task and select
Finish to save changes.