Build a For Loop
-
Launch LabVIEW and open a new VI. You can open a blank VI by selecting File»New VI.
-
Right-click on the block diagram to display a temporary version of the Functions palette.
- Optional: You can click the thumbtack in the upper left corner of the Functions palette to pin the palette so it is no longer temporary.
- Navigate to Structures and select the For Loop.
- To place the loop on the block diagram, left-click and drag the mouse until the loop is your desired size.
- Right-click on the count terminal and select Create Constant to display a numeric constant.
- The count terminal dictates how many times the subdiagram is executed. Input the number of times you want the loop to execute into the count terminal constant.
- For example, by inserting 100 into the numeric constant, the for loop executes 100 times before stopping.
- Monitor the number of iterations the loop has undergone by right-clicking on the iteration terminal and selecting Create Indicator.
The image below shows a For Loop in LabVIEW. The count terminal is set to 100, so the code will execute 100 times before exiting the loop. In each iteration of the loop, a random number between 0 and 100 is displayed to the user every 500 ms. The iteration terminal increments with each execution of the loop.
Adding a Conditional Terminal to a For Loop
If necessary, you can add a conditional terminal to configure a for loop to stop when a Boolean condition is met or an error occurs. A for loop with a conditional terminal executes until the condition occurs or until all iterations are complete, whichever happens first.
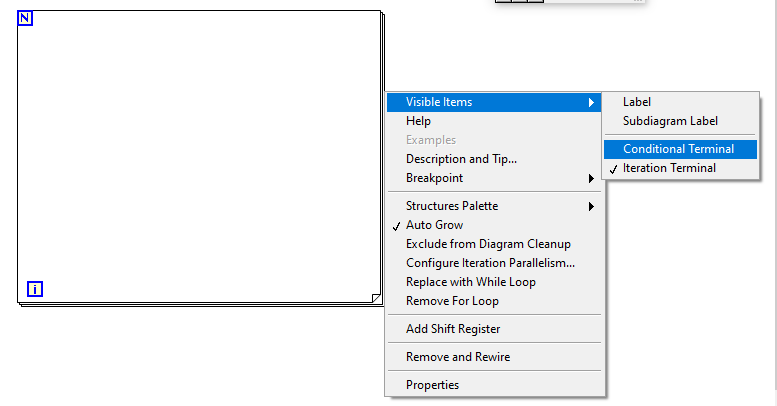
- Right-click on the edge of the for loop and select Conditional Terminal (On LabVIEW 2025 and further, the Conditional Terminal was added within Visible Items option):
- You will notice that count terminal now has a red glyph and a conditional terminal (i.e. stop glyph) was added in the lower right corner.
- Add in the code for which you want the for loop to stop executing:
- This could be based on user input (e.g. a stop button, front panel value change, etc.) or based on programmatic analysis (e.g. input value measurement reaches a threshold, an error occurs, time elapsed, etc.).
The snippet below shows the code as described in the Build a For Loop section above with one exception - a conditional terminal is added. This code stop executing if the random number generated is zero or if the loop has gone through 100 iterations -- whichever comes first.
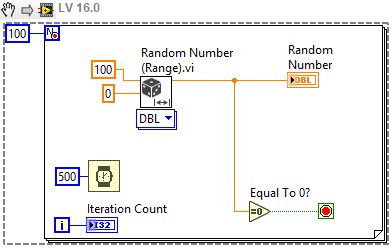 Note: This image is a LabVIEW snippet, which includes LabVIEW code that you can reuse in your project. To use a snippet, right-click the image, save it to your computer, and drag the file onto your LabVIEW diagram.