You can connect to an Arduino via Bluetooth with the LabVIEW Interface for Arduino by completing the following steps. The steps below assume you are using the BlueSMiRF and Windows 7. However, the steps should be similar for most Bluetooth modems and operating systems.
- Make sure that your computer has a working Bluetooth modem installed. Many laptops have built in Bluetooth modems. If your computer does not have a built in Bluetooth modem you can purchase a USB Bluetooth adapter. Make sure that you install any required drivers for your Bluetooth adapter. The setup procedure will vary depending on the specific adapter.
- Make sure that you have an Arduino with the LabVIEW Interface for Arduino firmware installed on it. Attempting to install the firmware while wirelessly connected to the Arduino is not recommended. In addition make sure to disconnect the Bluetooth modem from the Arduino when deploying the firmware via USB or RS-232. When deploying the firmware to the Arduino take note of the DEFAULTBAUDRATE setting as it will be required later in step 7.
- Connect your Bluetooth modem to your Arduino. The TX pin on the Bluetooth modem should connect to the RX pin (D0) on the Arduino. The RX pin on the modem should connect to the TX pin (D1) on the Arduino. Connect the Bluetooth modem's power and ground pins to the Arduino. The required power levels will depend on your Bluetooth modem.
Note: The BlueSMiRF Silver or Gold is recommended since it plugs directly into the Arduino Protoshield and has been confirmed to work well with the LabVIEW Interface for Arduino.
- Connect the power to your Arduino and make sure the Bluetooth modem is powered on. Do not use a USB cable to supply power to the Arduino as it may conflict with the TX RX lines on the Bluetooth modem.
- You have to pair your computer with the Bluetooth modem on the Arduino before the modem will be registered as a COM port by the operating system. Use these sub-steps to pair the devices:
- Open the Bluetooth configuration software on your computer. In Windows 7 this is accomplished by double clicking on the Bluetooth icon in the system tray like shown below. (This icon will only appear once your Bluetooth adapter has been successfully installed on your computer).

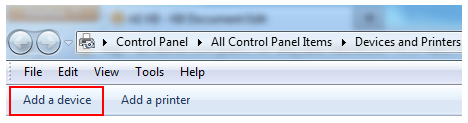
- Click Add Device
- Select the Bluetooth modem connected to your Arduino. The modem will likely be identified with some or all of its serial number like shown in the figure below.
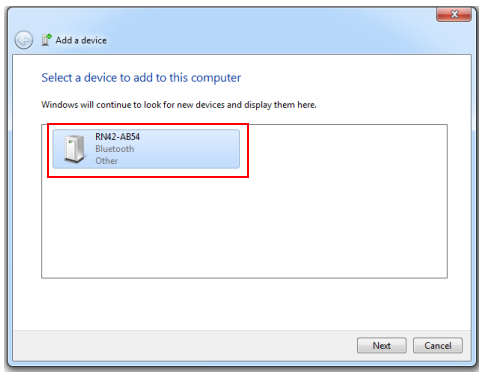
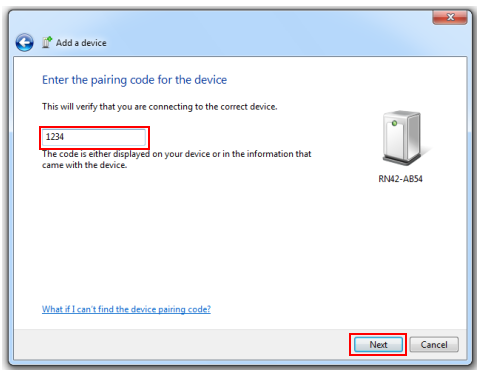
- Click Next » Enter the device's pairing code and enter 1234 for the BlueSMiRF and click Next
- You should get a message confirming that the device was successfully paired with the computer like in the figure below, then click Close.

- The Bluetooth modem should now be listed in your computer's Bluetooth configuration software.
- Determine the COM port assigned to your Bluetooth device. In Windows 7 this is accomplished by clicking Start » Control Panel » Device Manager » Ports (COM & LPT). Bluetooth modems will typically be assigned two COM ports like shown in the figure below. If this is the case try using the lowest numbered port first. This port number will be used in the next step.

- Open your application containing the LabVIEW Interface for Arduino code. Confirm that the Baud Rate input to the Init.vi matches the DEFAULTBAUDRATE in the Arduino Firmware found in step 2. Set the VISA Resource input to the COM port found in step 6 above.
Note: There is also a default baud rate programmed into the firmware of the Bluetooth bridge. In the case of the BlueSmirf Gold, this is 115200. This means that the three baud rates that need to match are: LabVIEW's baud rate, the Bluetooth link's baud rate, and Arduino Firmware's baud rate.
Note: You cannot use the auto connect feature of the Init.vi (leaving the VISA Resource terminal unwired) when using a wireless connection to the Arduino.
- You are now ready to run your application. It may take a few seconds for LabVIEW to synchronize with the Arduino.
Additional Information
If, after following the above steps, you are still having trouble connecting to your Arduino via Bluetooth, consider the following troubleshooting steps:
- Confirm that the correct firmware is deployed to the Arduino.
- Confirm that the Baud rate specified to the Init.vi matches the baud rate specified in the Arduino firmware.
- Connect your Arduino to your computer with a USB cable and run the same code.
- Ensure that your Bluetooth enabled Arduino is within range of your computer.
- Make sure you have specified the correct COM port to the Init.vi.
- Make sure the Bluetooth modem is powered.
Note: The package LabVIEW Interface for Arduino (LIFA) has been replaced with LINX. It is highly recommended to migrate to LINX as there will be no further development for LIFA. See
How To Download Digilent LINX For LabVIEW? for more information.