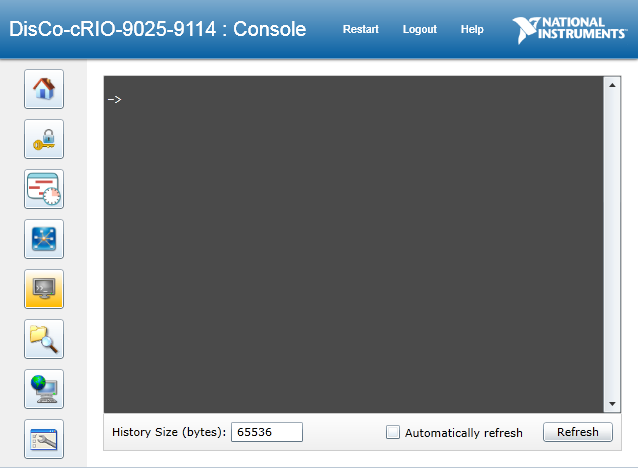
Console Out
The Console Out provides useful diagnostic information from the controller when it is connected to a computer using serial port or if using a network connection. This functionality is particularly useful for troubleshooting systems in the following scenarios:
- Displaying the controller's current firmware version and IP address.
- Diagnosing an unresponsive controller or a controller with errors indicated by the LEDs.
- Troubleshooting a controller that is not showing up in Measurement & Automation Explorer (MAX).
- Assisting an NI Technical Support Engineer with troubleshooting the controller.
View Console Out output
Windows 10 & Web-Based Configuration and MonitoringIf you are using LabVIEW Real-Time 2010 or later, you can view the output from the Console Out using the NI Web-Based Configuration and Monitoring. Note that this feature is not available on targets running the Linux Real-Time operating system. If you are using an earlier version or are having trouble communicating over the network, skip ahead to follow the procedure for your Operating System below.
First ensure that NI Web-Based Configuration and Monitoring is installed on your controller by viewing it in MAX, then follow one of the methods provided in the
LabVIEW Help to access the
Configuration Page. Navigate to the
Console Task, which looks like this:
 Windows 8/7/Vista:
 HyperTerminal is not included with Windows Vista, Windows 7, and Windows 8. Therefore, if you would like to use the Console Out feature of your device, you will need to download and install a 3rd party terminal emulator.
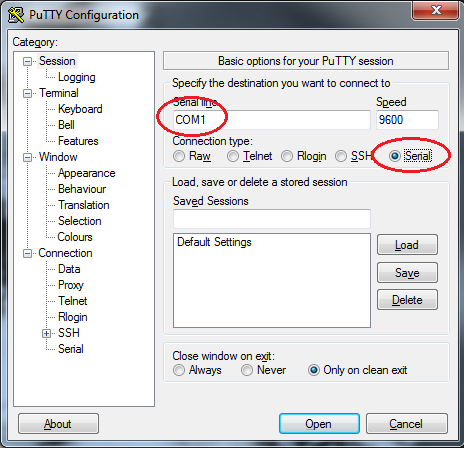
PuTTY is one example that you could use. PuTTY is used for this walkthrough. To view the output from the Console Out through the COM1 serial port, follow the following procedure:
1. Shut down the Real-Time controller.
2. Connect the controller to a PC using a
null modem serial cable.
3. Open your terminal emulator of choice.
a. PuTTY is located in the folder in which you stored the downloaded executable.
4. Select
Serial and the COM port that the cable is attached to on the PC (typically COM1).
5. Set Speed (baud rate) to 9600. See
Additional Note #3 if using cRIO-903x or cRIO-906x.
6. Press
Open.
7. On the controller, flip the
Console Out DIP switch to the
ON position. If your controller does not have DIP switches see
Additional Notes #2.
8. Power on the controller, and observe the output on the PC's terminal window.
9. Flip the
Console Out switch back to
OFF when done troubleshooting.
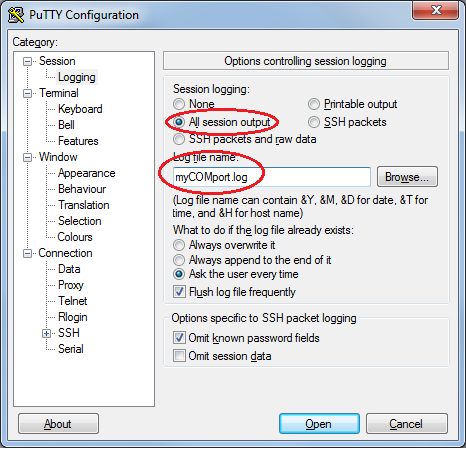
Note: In a troubleshooting situation, it might be useful to copy the information displayed in the terminal window and send that in to technical support. To log this information to disk on your host computer, follow this procedure:
1. Go to
Session » Logging in the PuTTY configuration
2. Choose
All session output3. Give it a filename to save to
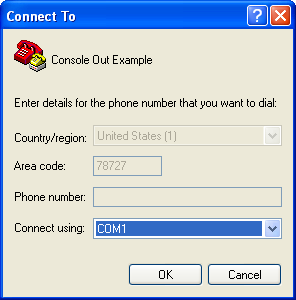
 Windows XP/2000/98/95:
1. Shut down the Real-Time controller in question.
2. Connect the controller to a PC using a
null modem serial cable.
3. Open a terminal program to monitor the output from the controller.
a. Start Hyperterminal, located in
Start»Programs»Accessories»Communications»HyperTerminalb. Fill out the Location Information form if prompted.
c. Create a new connection and enter a name.
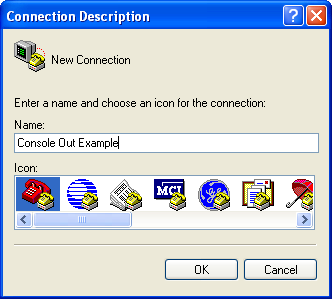
d. Select the COM port that the cable is attached to on the PC (typically COM1).
e. Apply the following serial port settings:
- Bits Per Second: 9600 See Additional Note #3 if using cRIO-903x or cRIO-906x
- Data Bits: 8
- Parity: None
- Stop Bits:1
- Flow Control: None
4. On the controller, flip the
Console Out DIP switch to the
ON position. If your controller does not have DIP switches see
Additional Note #2.
5. Power on the controller, and observe the output on the PC's terminal window.

6. Flip the
Console Out switch back to
OFF when done troubleshooting.
Note: In a troubleshooting situation, it might be useful to copy the information displayed in HyperTerminal and send that in to technical support. To copy and save this information, follow this procedure:
- Go Edit » Select All in HyperTerminal
- Choose Edit » Copy
- Open Notepad and select Edit » Paste
Mac OS/Linux:Unix systems do not have HyperTerminal but do have an in-built terminal. To view the output from the Console Out in Unix, follow the following procedure:
- Open the terminal application (Mac OS: type terminal in Finder)
- Type the following command: screen /dev/tty* 9600 8N1 and a screen will appear monitoring your designated port.
- screen: The screen program
- /dev/tty*: The name of the port you are listening to (Mac OS: type 'ls /dev/tty.*' to see the available ports)
- 9600: This is the connection baud rate. See Additional Note #3 if using cRIO-903x or cRIO-906x
- 8N1: This means 8 data bits, no flow control and 1 stop bit
Other Operating Systems:Most OS's ship with a terminal program capable of monitoring the serial port. Configure it using the settings above.
Additional Information
- The value associated with "Bootrom version" on the Console output is the firmware version for cFP-22xx controllers.
- If your device does not have a Console Out DIP switch you can enable Console Out in NI MAX under Startup Settings. Alternately, Console Out is automatically enabled when a device is in Safe Mode.
- The cRIO-906x and cRIO-903x controllers have a default baud rate of 115200.
- For the cRIO-903x controllers, according to the manual , the port used is the RS-232 port.