You can create an image of a LabVIEW block diagram by:
Manually printing the VI
To print the VI, use the following steps:
- Open the VI you want to generate a block diagram image for.
- Go to File » Print.
- Choose the VI or VIs you want to print.
- If you want just the image of the block diagram, choose Icon, description, panel and diagram. If you want full VI documentation, choose VI documentation. Click Next.
- If you choose VI documentation, ensure Block diagram is checked. If you want images of hidden frames (such as the frames in Case Structures, Event Structures, or Stacked Sequence Structures), ensure Hidden frames is checked. Press Next.
- Select HTML file as the destination. Press Next.
- Select the image format and color depth of the generated images. Press Save.
- Choose a location on disk to save the HTML file. The HTML file will be generated along with an image of the block diagram and separate images of each hidden frame.
Programmatically getting the block diagram image
To programmatically get the block diagram image, use the following steps:
- Open a VI reference to the VI you want to generate a block diagram image for.
- Use the Block Diagram: Get Image Scaled invoke node to obtain an image.
- Write the image data to a file using one of the Graphics Formats VI.
- Close the VI reference.
An example VI that accomplishes this can be seen below:
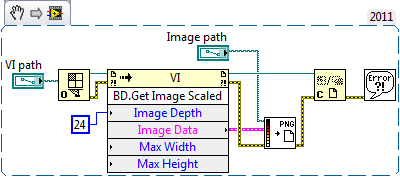
Please note that this method will not generate images for hidden frames.