Send a Message to the MHL
- Launch the LabVIEW Queued Message Handler template and create a Message Handling Loop (MHL) and create a Message Diagram.
- Decide what part of the application will send the message and which MHL will receive the message.
- You can send messages from the EHL or from a message diagram.
- Decide what message diagram will execute when the MHL receives this message. Ensure the message diagram exists and has the same name as the message you want to send.
- If the message diagram does not exist, create it.
- In Main.vi, access the wire that represents the message queue of the receiving MHL. You access this wire by unbundling it from the Message Queues out cluster that is returned from the Create All Message Queues VI. Main.vi already contains the following code that unbundles the UI queue refnum.
- Expand this Unbundle by Name function to access the wires of message queues for all MHLs.

- In the part of the application that will send the message, create the code pictured below.
- Note that Message is the text that matches the message diagram you created, and the message queue refnum is the wire you identified in step 4.
- (Optional) To specify that this message supersedes others already in the queue, wire TRUE to the Priority Message? input of the Enqueue Message VI.
- High-priority messages are typically reserved for emergency stop situations. These messages are placed at the front of the message queue, guaranteeing that the receiving MHL will consume that message next.
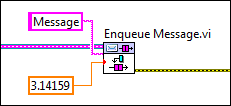
- (Optional) To send data with the message, wire a value to the Message Data input of the Enqueue Message VI. This terminal can accept any data type. For example, the following code sends a double-precision floating-point number along with the message.
 Note
Note: LabVIEW displays a coercion dot on the input terminal because the data type of this terminal is variant.
Create a Control that Triggers Sending a Message to the MHL
- In Main.vi, add a control to the front panel.
- For example, add a push button (like New Button in the image below). When this button is pushed, an event will be triggered
- (Optional) If you want a message diagram to programmatically modify this control, bundle the control refnum into the typedef for that MHL.
- Add an Event case to the Event structure in the Event Handling Loop.
- Configure the event to trigger when the value of this new button changes.
- Once the event is configured, click OK. LabVIEW creates an event case in the Event structure.
- Associate the terminal with the event by dragging the block diagram terminal for the new control inside this event case.
- Add code to this event case that sends a message to an MHL.
Send a Message that Stops the MHL
The QMH template defines one message to stop the MHL; the
Exit message is defined in
Message Queue.lvlib:Dequeue Message.vi.
Because messages are sent as string datatypes, you can create or change a message without modifying a typedef. If you want your MHLs to shut down on a message other than
Exit, change the message in the Dequeue Message VI.

Send a Message that Programmatically Modifies UI Objects
To enable a message sent to the MHL to modify a control programmatically, you should
create a refnum for the control and bundle it into the typedef that stores data for that MHL.
The following procedure uses UI Data.ctl as an example.
- Create the control refnum and move it into the Initialize subdiagram of the MHL.
- Open UI Data.ctl and add space for the refnum to the cluster.
- Select File>>Apply Changes to the update typedef and then Save.
- In the Initialize subdiagram of Main.vi, expand this new terminal on the Bundle by Name function and wire the control refnum to it.
The refnum for this control now is available to any message diagram that has access to UI Data.ctl. For example, the following code shows the Disable Button message diagram, which uses the control refnum to disable and gray out the front panel button: