-
Conceptual Description
The USRP device requires firmware (firmware image) and FPGA image and the version need to be the same to work properly. The former and the later will not be affected by the environment used by the Host: Windows or Linux[1], that is, the device can use the same firmware and FPGA image under Windows LabVIEW and Linux GNU Radio.
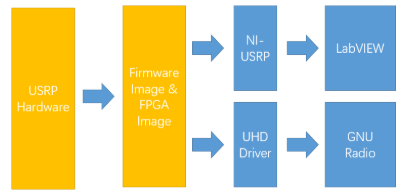
Figure 1: Comparison between Windows and Linux
When operating under Windows, the firmware and FPGA can be written/ updated through the NI-USRP Configuration Utility software, as shown in Figure 2. In this way, the USRP device can communicate with the host computer through the NI-USRP driver.
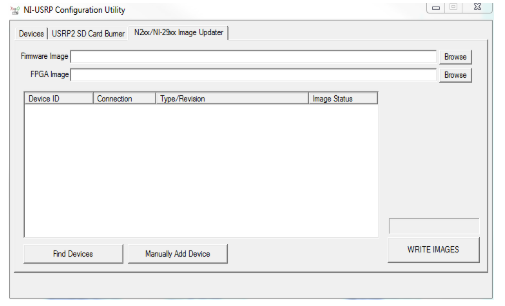
Figure 2: NI-USRP Configuration Utility- N2xx/ NI-29xx Image Updater
Under Linux GNU Radio, the UHD driver replaces the work of NI-USRP driver. You can download the image from the Internet by running uhd_images_downloader, and update the image with uhd_image_loader, which will be described in detail later.
-
Environmental Setup
2.1 Install the Ubuntu System
The computers we normally use are Windows system. There are two ways to run Linux on your computer. The first method is to install a dual system. The second method is to install a virtual machine and install Linux in the virtual machine. Because method 2 does not require additional partitioning, changing the BIOS, etc., it will not crash Windows to crash if it is not working properly. Therefore, method two is preferable.
The common virtual machine software VMWare Workstation is used here. Ubuntu 16.04 can be downloaded from the following link:
https://www.ubuntu.com/downloads/desktop. Ubuntu is a popular distribution for Linux. The downloaded file is the image .iso file of the Ubuntu system. Select File- New Virtual Machine in VMWare. Follows the prompts and click Next. When configuring the VM hardware, number of CPUs and the number of CPU cores are the same as the actual CPU. The memory can be set slightly larger. For example, 8G memory( a total of 16G physical memory), the hard disk set 40G (installed Ubuntu system, after installing all the dependent software of GNU Radio, actually used 8.1G)
Start the virtual machine, follow the first startup wizard to simply configure Ubuntu, enter the desktop and click the icon in the upper left corner to search for the terminal command line tools, as shown in Figure 3.
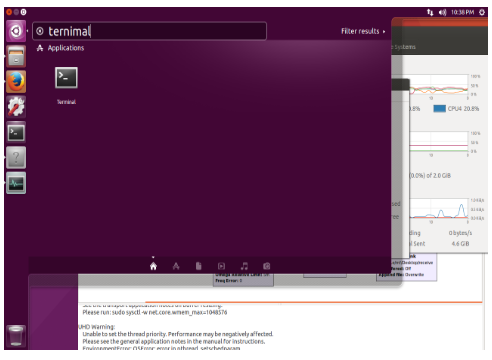
Figure 3: Finding the Ubuntu command line tools
Open the command line tool, enter
sudo password(enter)Set the Supper User password, which is the root password. Before the user sets the password, Ubuntu will generate a random root password each time. Note that when you enter a password, "****" is not displayed, but none characters will be displayed. This is different from our general cognition.
The system prompts you to enter the password again, the second time you enter the password and confirm it, and the password is set successfully after two times. Next input
sudo-apt get update(enter)Update the source, you will be prompted to enter the administrator password you just set and press Enter. After input (or copy and paste, do not use the Ctrl C + V shortcut, but the right mouse button in the command line window- select Paste)
sudo apt-get -y install git swig cmake doxygen build-essential libboost-all-dev libtool libusb-1.0-0 libusb-1.0-0-dev libudev-dev libncurses5-dev libfftw3-bin libfftw3-dev libfftw3-doc libcppunit-1.13-0v5 libcppunit-dev libcppunit-doc ncurses-bin cpufrequtils python-numpy python-numpy-doc python-numpy-dbg python-scipy python-docutils qt4-bin-dbg qt4-default qt4-doc libqt4-dev libqt4-dev-bin python-qt4 python-qt4-dbg python-qt4-dev python-qt4-doc python-qt4-doc libqwt6abi1 libfftw3-bin libfftw3-dev libfftw3-doc ncurses-bin libncurses5 libncurses5-dev libncurses5-dbg libfontconfig1-dev libxrender-dev libpulse-dev swig g++ automake autoconf libtool python-dev libfftw3-dev libcppunit-dev libboost-all-dev libusb-dev libusb-1.0-0-dev fort77 libsdl1.2-dev python-wxgtk3.0 git-core libqt4-dev python-numpy ccache python-opengl libgsl-dev python-cheetah python-mako python-lxml doxygen qt4-default qt4-dev-tools libusb-1.0-0-dev libqwt5-qt4-dev libqwtplot3d-qt4-dev pyqt4-dev-tools python-qwt5-qt4 cmake git-core wget libxi-dev gtk2-engines-pixbuf r-base-dev python-tk liborc-0.4-0 liborc-0.4-dev libasound2-dev python-gtk2 libzmq-dev libzmq1 python-requests python-sphinx libcomedi-dev python-zmq(enter)About 1G dependent library and software will be downloaded. After waiting for the download to complete, download and compile and install the UHD driver.
2.2 Install UHD Driver
UHD drivers are provided in source form. Enter on the command line
git clone https://github.com/EttusResearch/uhd(enter)
Copy the UHD source to the HOME path, go to the path and create a new build directory
cd uhd(enter) cd host(enter)
mkdir build(enter)
cd build(enter)Enter
cmake../(enter)Produce Makefile, enter
make(enter)Compiling the source code, it takes about 10-30 mins, you can greatly shorten the compile time by turning on multi-threaded compile, use
make -j4 instead of
make, it will enable 4 threads to compile at the same time, but not as much as possible, generally the number of computer CPU threads or the number of virtual machine CPU threads can be the same. If the compilation crashes in the middle (the virtual machine may appear, due to insufficient memory), the re-synchronization will continue with the previous compilation progress. After installing the compiled library, enter
make test(enter)
sudo make install(enter) Update shared libraries and environment
sudo ldconfig(enter)
export LD_LIBRARY_PATH=/usr/local/lib(enter)At this point, the UHD driver has been installed and the following code:
uhd_find_devices(enter)can be used to view the version of the driver, if the USRP device is on the same subnet, the information of the USRP device can be viewed, as shown in Figure 4.
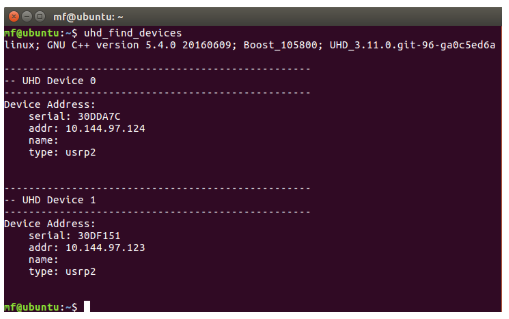
Figure 4: Verify UHD Installation
A little trick: type uhd_fin when typing the last command and press the Tab key to see what happens... autofill! For the input of some long commands, you can reduce spelling errors by auto-filling, saving time and effort.
When the device is found, you can run the following procedure to view the upstream spectrum of the CDMA mobile phone.
uhd_fft -a addr=10.144.97.123 -f 835M -s 10M(enter)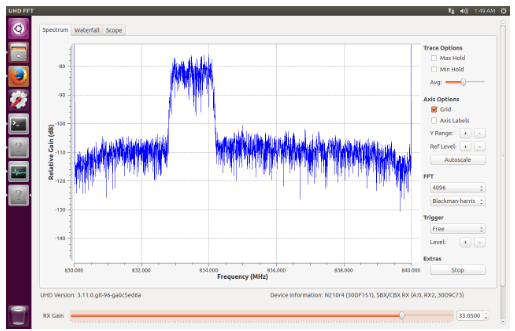
Figure 5: UHD FFT Test program
Note that if the mirror and UHD versions in the USRP do not match, the above test program cannot be run directly. It can be matched by updating the firmware image and FPGA image. See section 3 for the update method.
2.3 Installing GNU Radio
Installing GNU Radio is similiar to installing UHD drivers.
First, return to the home path
cd$HOME(enter) Then, install the GNU Radio source code
git clone -- recursive https://github.com/gnuradio/gnuradio(enter)After the download is completed, create a "Build" directory
cd gnuradio(enter)
mkdir build(enter)
cd build(enter)Generate a Makefile and compile and install
cmake../(enter)
make(enter)
make test(enter)sudo make install(enter)sudo ldconfig(enter) Upon completion, the installation can be verified by entering
gnuradio-companion(enter)The GNU Radio development environment should be able to open correctly. At this point, the environment is completed.
3. Executing a GNU Radio program
3.1 Modify the USRP IP address and connect
The USRP-2922 is used here. The USRP device uses fixed IP. The default IP is 192.168.10.2. Firstly, connect the USRP device directly to the PC through the network cable. Set the ip of the PC to 192.168.10.1 and the subnet mask to 255.255.255.0. You can modify the IP of the USRP device through the NI-USRP Configuration Utility software under Windows. In this verification, more than one USRP is used. It is necessary to communicate with the host computer through the switch and view the IP address of the PC on the PC on the same subnet: windows logo key + R --> input cmd carriage return --> input ipconfig and find the IPv4 address of your local NIC, such as 10.144.97.17, and set the IP of the two USRPs to the same subnet, such as 10.144.97.123 and 10.144.97.124.
Under Linux, you can modify the device IP, cd to /usr/local/lib/utils directory and run
sudo ./usrp2_recovery.py --ifc=eth0 --new-ip=10.144.97.123(enter)
The above method requires the firewall to allow UDP broadcasts. Note that if Linux is run in a virtual machine, you need to configure the virtual machine's network card be directly connected or share the IP with the host.

Figure 6: Virtual Machine NIC Configuration
After setting the IP, the USRP can be pinged, command line input:
ping 10.144.97.123(enter)At this time, the ping information can be seen . Press Ctrl + Z to exit the ping state.
3.2 Updating Firmware Image and FPGA Image
As mentioned in the opening paragraph, these two images are common under Windows and Linux, as long as the version and driver version are the same. The image provided by NI-USRP 15.5 is identical to the image provided by UHD 3.11.0. If your USRP has updated the image under Windows, you can skip this step.
Enter in the Ubuntu command line:
sudo uhd_images_downloader(enter)This will automatically download the appropriate image from the network to your local computer.
Re-enter
uhd_image_loader --args="type=usrp2,addr=<IP address>,reset"(enter)Download the image to the USRP device and restart the device. The image here is the automatically selected version.
3.3 Programming in the GNU Radio
Firstly, enter in the command line:
gnuradio-companion(enter)Run the GNU Radio development environment, which is also programmed using a graphical module. Detailed tutorials can be searched on the web. Here you can write a program to transfer files between two USRP-2922. Use the random self-contained antenna to operate on the 915M ISM band. The two USRP TX/ RX interfaces can also be directly connected via an attennuator. Note: The use of USRP to transmit radio signals is subject to local laws and regulations.

Figure 7: GRC program

Figure 8: Program running interface
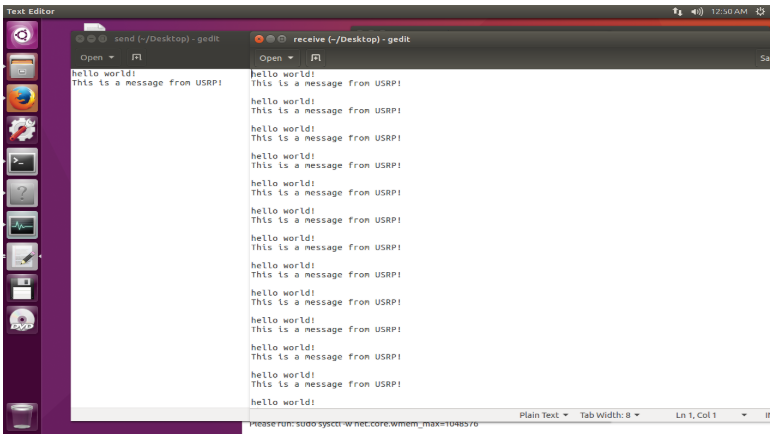
Figure 9: Program running result