在 LabVIEW 8.0 及更新版本中,可以從開發電腦通過網絡連接到 target machine 上對已構建的執行檔進行遠端除錯。以下是有關創建可除錯執行檔並從開發電腦上除錯的說明:
在開發電腦上
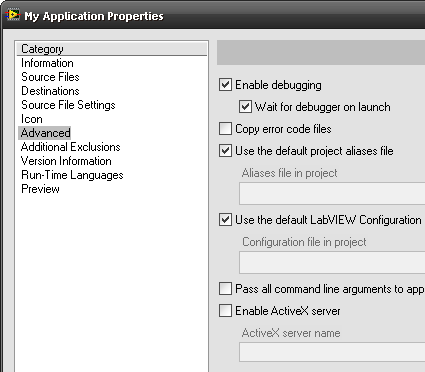
- 在 LabVIEW Application Builder 中創建執行檔時,請檢查 Advanced 選單中的 Enable debugging 選項。
- Enable debugging 選項將 block diagram 構建到執行檔中,以便您可以進行除錯。
- Wait for debugger on launch 選項意味著您的執行檔將不會在啟動時運行,並將等待除錯工具連接。此選項會覆蓋您為每個 VI 設置的 Run when opened 的屬性。

- 建立執行檔。
- 將執行檔與所有相關文件 ( 如在 LabVIEW 2009中的 application name.ini 跟 application name.aliases ) 一起移動到 target machine 上。
在 target machine 上
如果 target machine 上沒有防火牆,請跳至步驟 2。
- 在防火牆中 Create an exception for the NI Service Locator 並打開 port 3580。
- 在 target machine 上啟動執行檔
- 如果已選取 Wait for debugger on launch 的選項,則執行檔將啟動但不會運行。
在開發電腦上
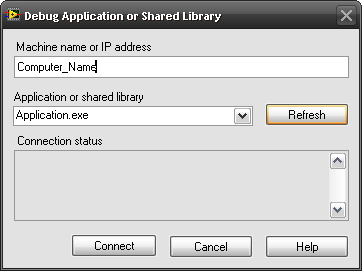
- 在 Project Explorer 工具列中,導覽到 Operate»Debug Application or Shared Library... 以啟動除錯工具。

- 輸入電腦名稱或 IP 地址,然後單擊 Refresh 按鈕。
- Application or Shared Library 下拉選單將列出所選 target 上所有可進行除錯的應用程式。
- 單擊 Connect 按鈕。
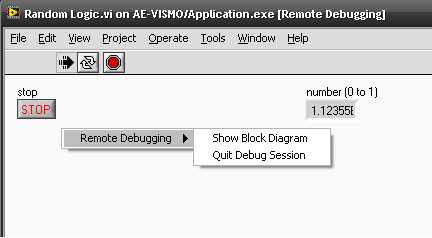
- 這會將除錯工具連接到 target 上的執行檔,並打開其中 top-level VI 的視窗。

- 要開啟此 block diagram,您可以:
- 在 front panel 中單擊滑鼠右鍵以查看允許存取的 block diagram 遠端除錯選單。
- 選擇 Window»Show Block Diagram 。此時,您可以使用 Highlight Execution、中斷點(Breakpoint)和探針(Probe)等工具進行除錯。
您可以使用
Quit Debug Session 來停止除錯,但讓 VI 在 target 上運行。
Additional Information
無論您選擇使用 LabVIEW 的預設 configuration 檔還是您自己的自定義 .ini 檔(可通過使用
Advanced 選單上的
Use the default LabVIEW Configuration file (LabVIEW.ini) 複選框),只要勾選
Enable debugging 選項,都會自動將
DebugServerEnabled=TRUE 添加到使用應用程式建立的 .ini檔(configuration 檔)中。如果您決定在項目中使用自定義 .ini 檔,LabVIEW 將建立一個該.ini檔的副本,並在該檔案中加入
DebugServerEnabled=TRUE。
在 LabVIEW 8.0.x 中,如果要在指定的應用程式中啟用除錯 ,必須手動將
DebugServerEnabled=TRUE 添加到自定義的 ini 檔中,並在 Application Builder 的 Application Properties 對話框的 Advanced 頁面上選擇
Enable debugging 。 同樣的步驟也必須在
Wait for debugger on launch 選項中執行,而其對應到的.ini檔中指令為
DebugServerWaitOnLaunch=TRUE 。這已經在 LabVIEW 8.2 中修復。
注意:有關使用 LabVIEW Application Builder 創建執行檔的說明,請參閱使用 LabVIEW Application Builder,參考文件為
Distributing Applications with the LabVIEW Application Builder。
如果 target machine 上有防火牆,則有可能會阻止除錯工具連接到執行檔。