In LabVIEW, this can be done in two ways depending on the file type that is saved to. The two main file types are .tdms and .lvm.
For a TDMS File:
Option 1 (Using Write to Measurement File Express VI):
- Acquire data in continuous mode using a DAQ Assistant. Note: This method will also work with DAQmx VIs that are configured for acquiring waveform data.
- Wire the output of the DAQ Assistant to the Write to Measurement File VI
- Configure the Write to Measurement File VI to log time in One column only with One header only, as in the settings below:

Now the time stamp will be logged in a column to the left of the measurements under the heading
Time, and the dt value will be logged under the heading
Time*. A screenshot of the resulting .tdms file in Excel is shown below:
 Note:
Note: Unlike with a .lvm file, a .tdms file will record a timestamp for every data point.
Option 2 (Using TDM Streaming API):
- Use the Get Date/Time In Seconds Function or the Get Date/Time String Function to get the timestamp data. Alternatively, you can use the High Resolution Relative Seconds VI if you want to use the relative current time and not the complete timestamp.
- Write data to a TDMS file at the channel level using the TDMS Write Function.
You can find an example using queued data in the following LabVIEW Community Example:
Timestamping Queued Data and Storing in TDMS Files using LabVIEW
For an LVM File
- The DAQ Assistant is set to acquire data continuously.
- Use the Get Date/Time in Seconds VI to acquire the time at which the data is acquired.
- Use the Format Date/Time String VI to convert the time stamp data into a string that can be wired into the comment section of the Write to Measurement File VI.
- Concatenate the time string with a tab constant so that the data appears correctly in the text file.
- Wire the final time data into the Comment input of the Write to Measurement File VI.

Now the CPU time will show up in the text file next to the data that you are writing in the while loop. If you are acquiring more than 1 sample in the DAQ Assistant, only one value of time will show up for all the samples that you acquire. The resulting measurement file will have one timestamp at the beginning of each measurement set. A screenshot is shown below.
 Note:
Note: You would also need to select the
Empty Time Column in the configuration for the Write to Measurement File VI if you do not want the default time data to appear.
Additional Information
Enabling the
One Column per channel option under the
X Value (Time) Columns will insert an additional column for each channel, increasing considerably the file size for each additional channel.
For Counter Inputs In LabVIEW & Signal Express
Most counters in C-series DAQ modules do not inherently timestamp their measured data. When using LabVIEW this can be solved with the "For a .lvm File" method above but applied to any file type.
When using Signal Express, the timestamps must be calculated outside of the program in software such as excel using the following formula:
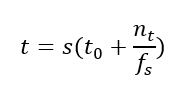
Where
t is the timestamp for given sample
s,
t0 is the starting time of the measurements,
nt is the number of total samples and
fs is the sampling rate (this is 1 kHz for most devices).
These .lvm files can be read in MathWorks (MATLAB)® through the function data = lvm_import(filename, verbose) call function in MathWorks (MATLAB)® as addressed in the
LVM file import.