Software Installation
The Amulet Display API is available in VI Package Manager for LabVIEW 2013 or later. Installing the Amulet Display API will install the VIs to the palette, examples in Example Finder, and prompt you to install GEMstudio™.
-
Open VI Package Manager and search for Amulet Display API.
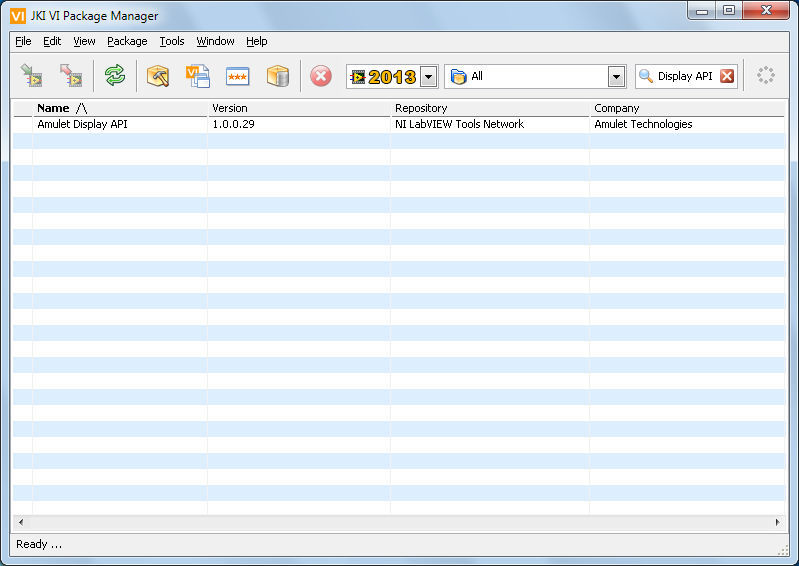
Figure 1. Searching for the API in VI Package Manager
-
Double-click the Amulet Display API and press Install. Continue through the prompts and accept the license agreement.
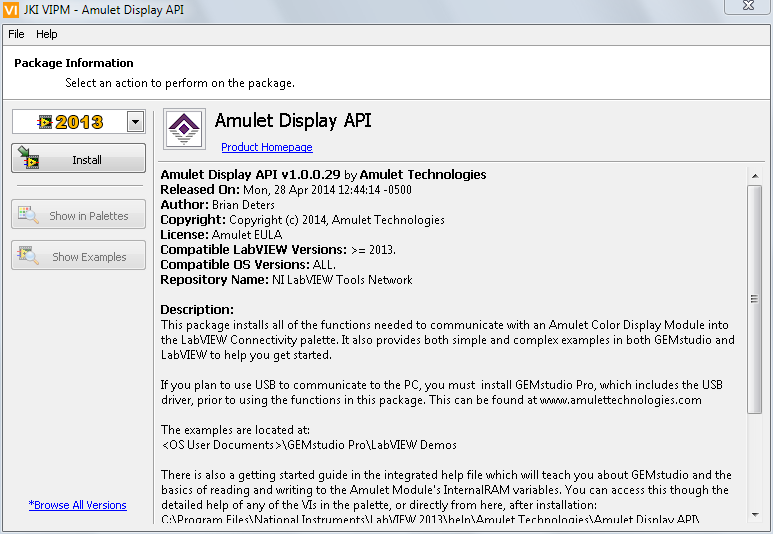
Figure 2. Installing the Amulet Display API
-
When the installation is finished, a prompt to install GEMstudio™ will appear. Select OK and follow the prompts to install GEMstudio™.

Figure 3. Installing GEMstudio™
-
Following GEMstudio™ installation, you will be prompted for a registration name and key. If you purchased NI Part Number 783305-01, this registration key was sent to you via email following the purchase. If you cannot find the email, please check your spam box to ensure the email was not accidentally marked as spam. Otherwise, please locate your order number from the purchase order and contact NI .
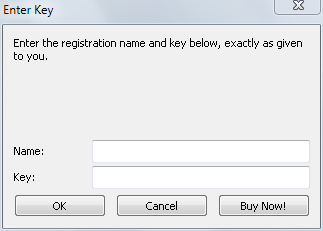
Figure 4. Activating GEMstudio™
Each example consists of a GEMstudio™ and LabVIEW project. To locate the GEMstudio™ projects, navigate to <OS User Documents>\GEMstudio Pro\LabVIEW Demos. To locate the LabVIEW projects, search for Amulet in the NI Example Finder. Each LabVIEW example explains which GEMstudio™ project needs to be deployed to your Amulet display module prior to running the example.
Hardware Installation
During the development process, it is recommended that the Amulet Display module be connected to the development computer via USB. The USB drivers will be installed when GEMstudio™ is installed.
-
Connect a USB A to Mini-B cable between the development computer and the Amulet Display module.
-
The drivers should automatically install successfully.
GEMstudio™
GEMstudio™ allows for the creation of a graphical user interface through a drag-and-drop experience. Complete human-machine interface (HMI) applications can be tested and deployed through GEMstudio™.
Upon launching GEMstudio™, you are presented with several options.
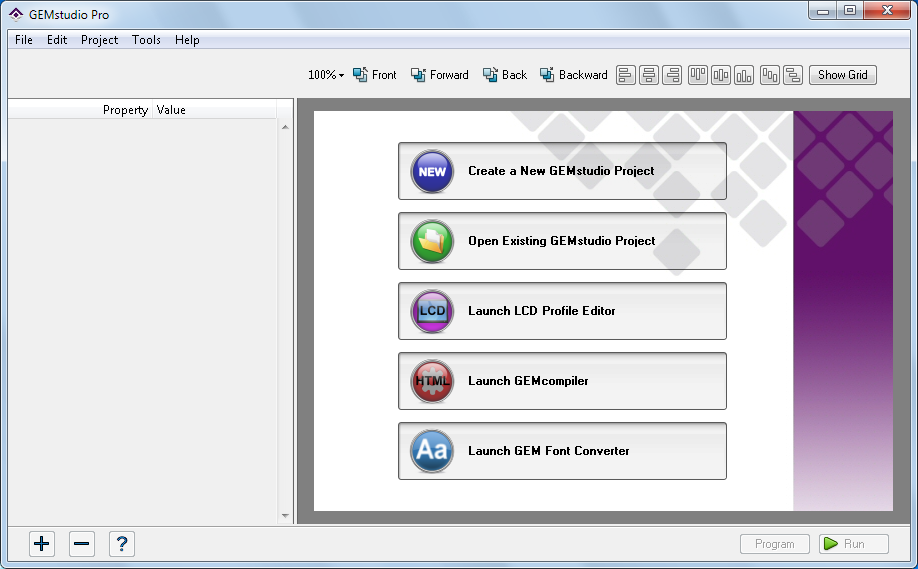
Figure 5. GEMstudio™ launch screen
-
Create a New GEMstudio Project - Allows you to start a new GEMstudio™ project.
-
Open Existing GEMstudio Project - Allows you to open an existing GEMstudio™ project, including examples.
-
Launch LCD Profile Editor - This option is only present in the licensed version of GEMstudio™. It allows you to create a new LCD profile if you are using a custom LCD display with the display module.
-
Launch GEMcompiler - Allows you to compile existing HTML-based projects and program it onto the display module.
-
Launch GEM Font Converter - Allows you to create an Amulet font file from any installed Windows font that you can use in any Amulet project.
In this section, you will build a fully-functional user interface in GEMstudio™. In later sections, you will deploy this interface to the touch panel and develop LabVIEW code to communicate with the touch panel.
This tutorial guides you to select a numeric value using a slider. LabVIEW will read the value of the slider, calculate 100 random numbers in the range 0 – slider value, and send it for display on the touch panel on a LineGraph. In addition, the current time will be display on the touch panel.
-
Create a new GEMstudio™ project by clicking Create a New GEMstudio Project.
-
If you are developing with the Amulet display module (NI Part Number 783304-01 or 783305-01), ensure the settings in Table 1 are enabled.
|
Setting
|
Value
|
|
LCD Size
|
480x272
|
|
LCD Manufacturer
|
Amulet
|
|
LCD Part Number
|
STK-480272C
|
|
LCD Rotation
|
No1
|
|
Board Name
|
MK-480272C
|
|
1 If your screen will be installed relative to the native orientation (ribbon cables on the bottom), set the LCD Rotation to the appropriate value. However, setting this value to any value other than No will require the Amulet OS to continuously redraw and recalculate the interface and touch panel.
|
Table 1. Project Property Settings
The remainder of the settings should use the default settings.
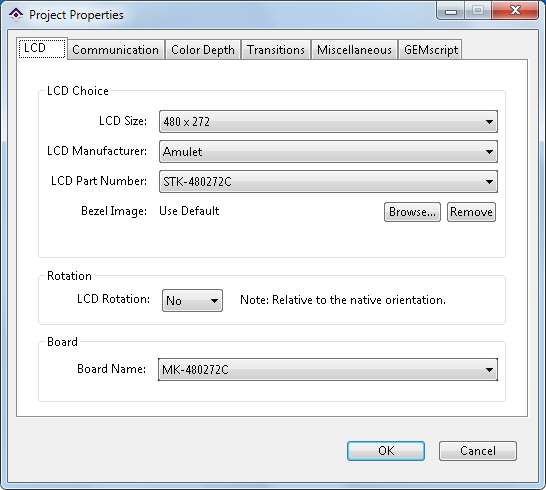
Figure 6. Setting up the project properties
The GEMstudio™ interface will load with a new project using the properties specified in the Project Properties dialog. The right side consists of the canvas that allows for ability to design the user interface via drag-and-drop while the left side consists of the property pane that lists the details and functions for each widget and page created.
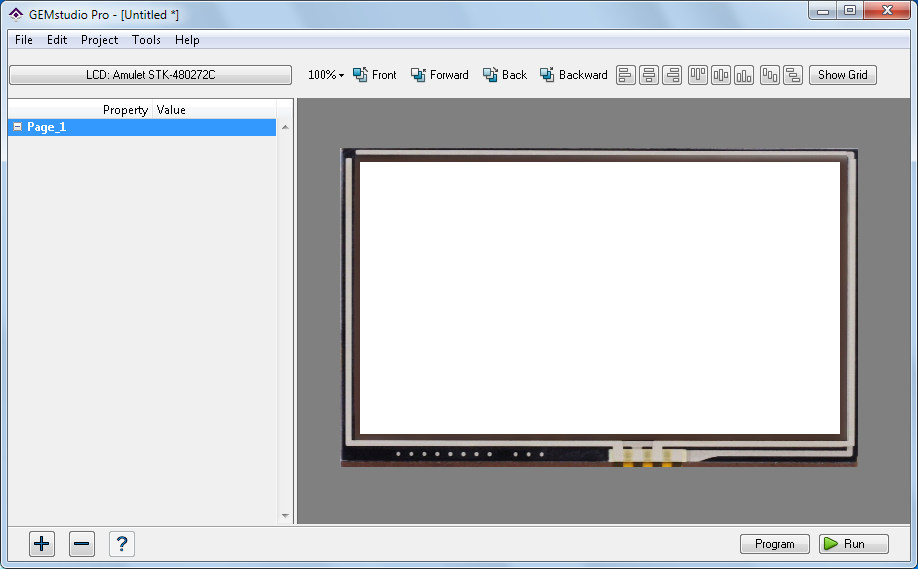
Figure 7. GEMstudio™ interface with the canvas on the right and properties pane on the left
Adding widgets (prebuilt navigation, controls, and indicators) can be done by clicking the + button in the lower left corner of GEMstudio™.
-
Add static text to the canvas by clicking +»Static Text.
-
Modify the properties of the static text by changing the text property to Time: and fontStyle to Bold.

Figure 8. Modifying StaticText properties
-
Use the justification and alignment tools in the toolbar to right justify and align the text in the middle.
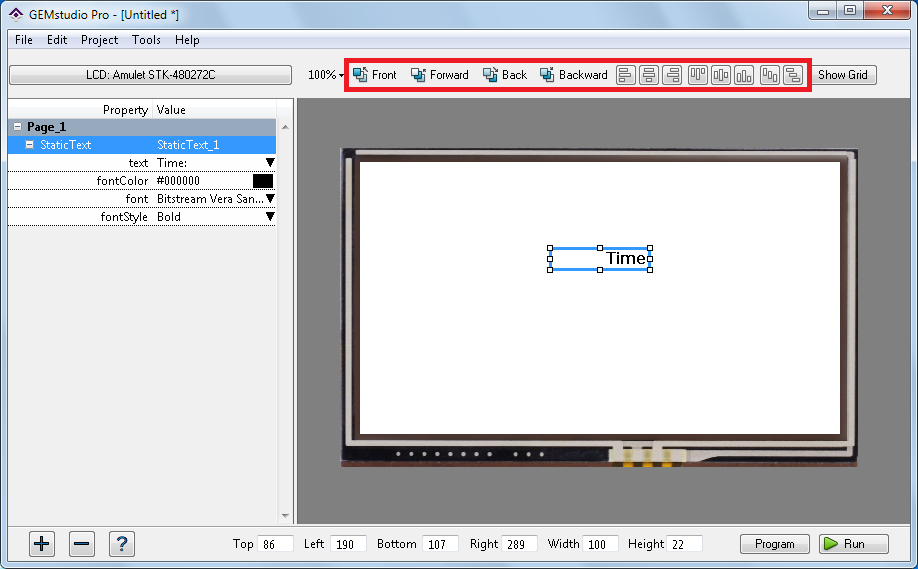
Figure 9. Justification and alignment tools
-
Add another static text by repeating steps 3-5. Set the text property as Amplitude.
-
Get numeric input from the user by adding a slider via +»Widgets»Slider.
-
In order to enable the LabVIEW Amulet Display API to read the value of the slider, the value of the slider must be written to the internal memory of the display module via a function call. Click on the href property to open the Event Method List window to create this function.
The Amulet OS makes space in the internal memory available to the module via internal RAM. Table 2 lists the number of internal RAM variables and data types that the OS provides.
|
Amulet Data Type
|
Size
|
LabVIEW Data Type
|
Number of Internal RAM Variables
|
|
Byte
|
8 bits
|
U8
|
256
|
|
Word
|
16 bits
|
U16
|
256
|
|
Color
|
32 bits
|
U32
|
256
|
|
String
|
25 character, null terminated
|
String
|
256
|
Table 2. Amulet Internal RAM Variables
The Event Method List window can be used to define function calls that allow widgets to read or write from internal RAM. For more information on the Amulet internal RAM, please see Amulet's website.
-
In the Event Method List window, press tab to show the autocomplete window. It is recommended that you complete the function call prior to providing parameters or else you cannot autocomplete the function call.
-
Complete the function call in the Event Method List to read:
Amulet:internalRAM.byte(x).setValue(intrinsicValue)
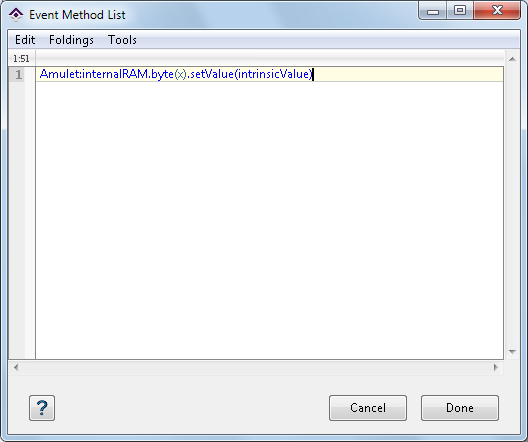
Figure 10. Entering the function call for the slider to store its value to internal RAM byte variable 0
intrinsicValue will return the current value of the widget.
-
Change the x to 0. The final function call should read the following:
Amulet:internalRAM.byte(0).setValue(intrinsicValue)
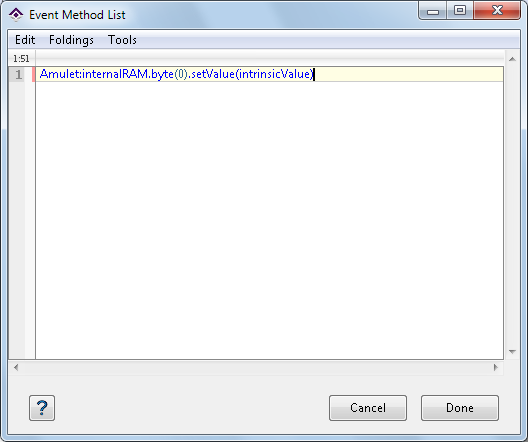
Figure 11. Completed function call for slider
-
Press Done.
This function call specifies that the value of the internal RAM byte variable 0 will be set by the value of the slider. The Amulet Display API in LabVIEW can read the current value of the slider by reading from this variable.
The slider does not include the ability to display the current value on the interface. A NumericField widget can be used to display numeric information on the front panel. GEMstudio™ allows us to link the NumericField to the value of the slider via the internal RAM without host intervention.
-
Add a NumericField widget by clicking +»Widgets»NumericField.
-
The numeric field should display the current value of the slider, which is residing in byte 0 of the internal RAM. Create a function call to get the value of byte 0 of the internal RAM by clicking on the href property to open the Event Method List window.
-
Complete the function call by using the tab key to display the options and show the following:
Amulet:internalRAM.byte(x).value()
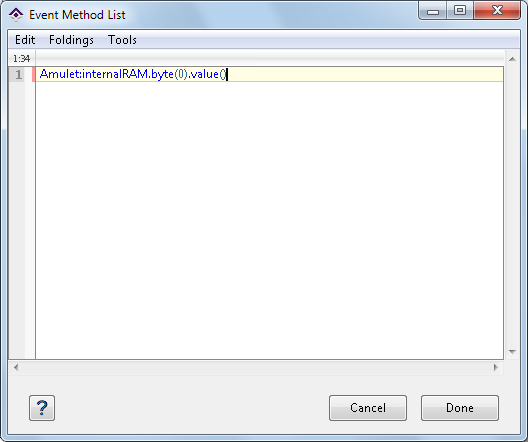
Figure 12. Completed function call for the numeric field
Change the x parameter to 0 in order to display the correct value in the numeric field.
-
Press Done.
-
Test the functionality of the interface thus far by running the interface in the GEMstudio™ emulator. Push Run in the lower right corner of GEMstudio™.
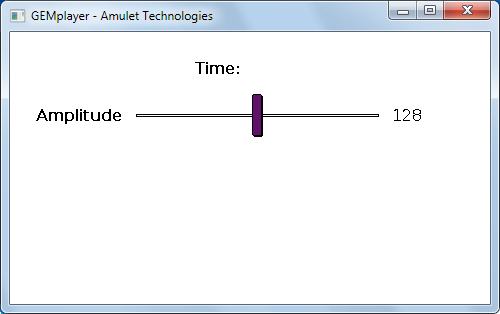
Figure 13. Testing the interface in the GEMstudio™ emulator
-
Move the slider in the emulator. The numeric field should update with the correct value of the slider as it is moved. You may need to reposition the widgets on the canvas so they do not overlap.
Numeric data can be exchanged between the Amulet display module and the host application by using either bytes, words, or colors. To display string data, the string data type should be used. In this project, the current time will be sent from the host as a string and displayed on the touch panel.
-
Add a StringField widget by clicking +»Widgets»StringField.
-
The string field should display the current time that the host placed in string variable 0 of the internal RAM. Create a function call to read the value of string variable 0 by clicking on the href property to open the Event Method List window.
-
Complete the function call by using the tab key to display the options and show the following:
Amulet:internalRAM.string(x).value()
Change the x parameter to 0 in order to display the correct value in the string field.
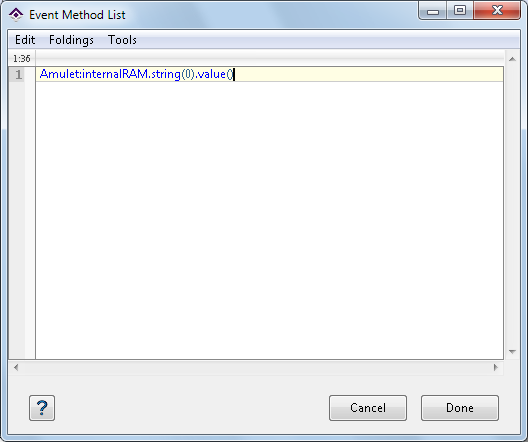
Figure 14. Completed function call for the string field
-
Press Done.
-
Test the interface to make sure the slider still works as expected. The current time will not be populated since there is no host application yet.
To finish the interface, display a graph of 100 random numbers generated by the host application. GEMstudio™ allows for arrays by utilizing consecutive internal RAM variables starting at a specific index. The host application will place 100 16-bit numbers in the internal RAM starting at index 0.
-
Add a LineGraph widget by clicking +»Widgets»LineGraph.
-
By default, the line graph does not display an axis. Right-click on the LineGraph widget in the properties pane and select Add/Remove Parameter.
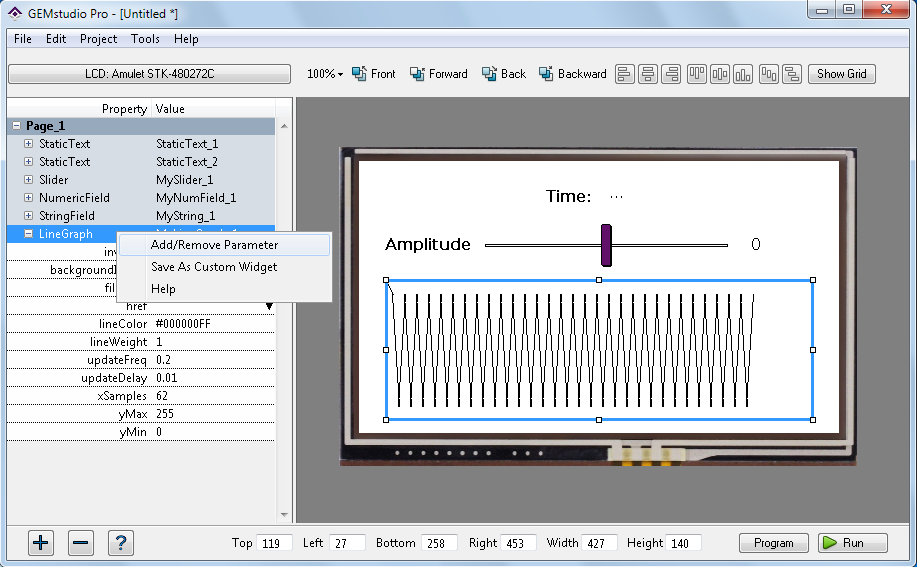
Figure 15. Showing additional parameters for the line graph
-
Enable the showAxis parameter by checking the checkbox. Press Save.
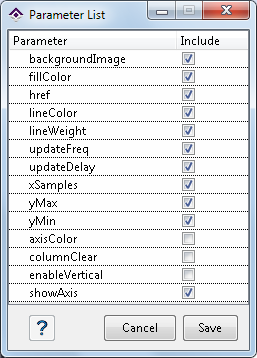
Figure 16. Enabling the showAxis property for the line graph
-
Check the showAxis property and change xSamples to 100. This will allow you to display all 100 samples on the graph with the axis shown.
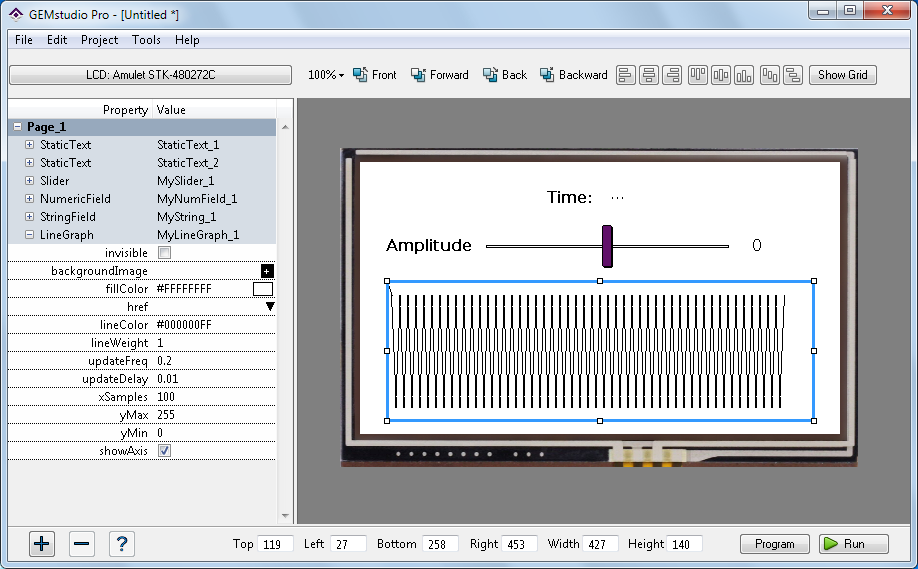
Figure 17. Modifying the properties of the line graph
-
Display the data from the internal RAM on the graph by creating a function call that reads 100 values starting at word variable 0. Click on the href property to open the Event Method List window.
-
Complete the function call using the tab key to display the options and show the following:
Amulet:internalRAM.words(x).array(y)
x is the starting index and y is the number of values. Change x to 0 and y to 100.
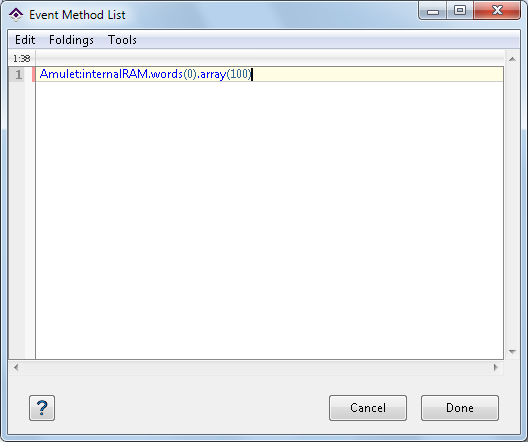
Figure 18. Completed function call for line graph
-
Press Done.
-
Use the mouse, alignment tools, and justification tools to arrange the user interface to look like Figure 19.
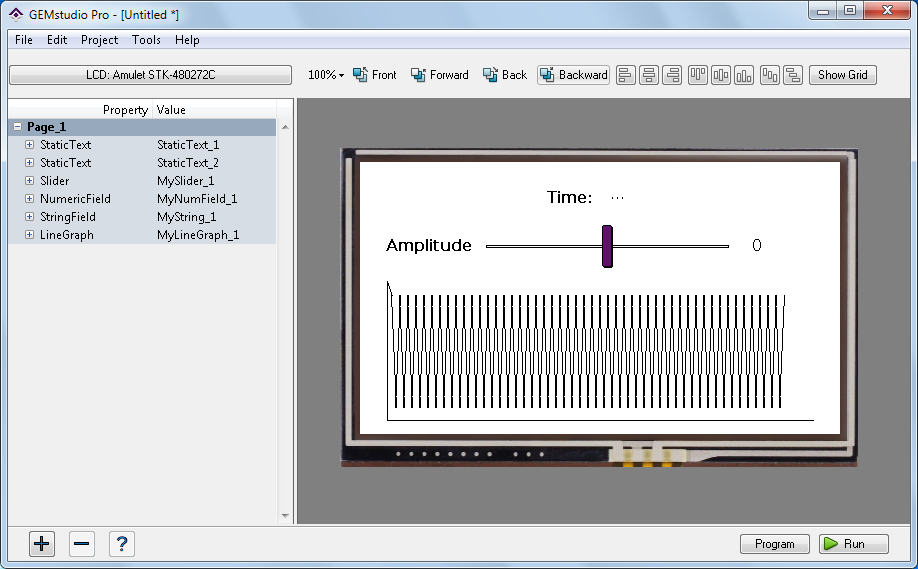
Figure 19. Completed user interface in GEMstudio™
-
Test the interface to make sure the slider still works as expected. The graph will not display data since there is no host application yet, but it should display the axis.
Programming HMI onto Display
After testing the interface, it can be programmed onto the Amulet Display module flash through GEMstudio™. Programming the HMI onto the display will allow the interface to start up automatically on module powerup.
-
Push Program in the lower right corner of GEMstudio™.
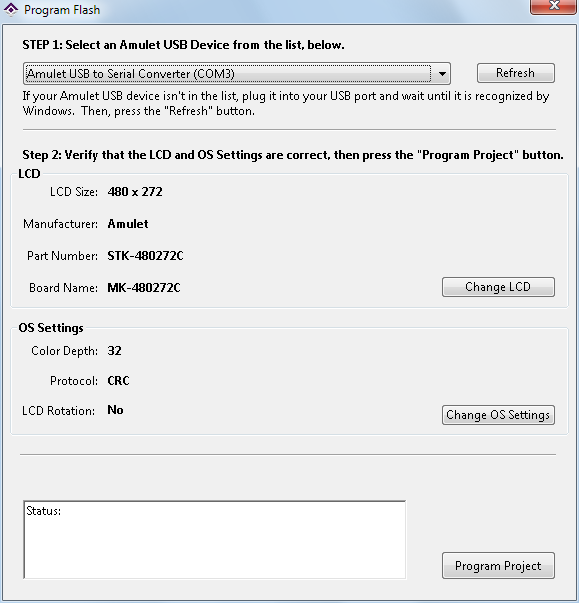
Figure 20. The Program Flash dialog
-
Select the COM port the Amulet Display module is connected to. If the module is connected via USB, it will be the Amulet USB to Serial Converter. If the display module is not listed, ensure that the driver was installed correctly.
-
Verify the LCD and OS settings. This information is extracted from the project settings.
-
Push Program Project. If the OS settings on the Amulet Display module are incorrect, you will be prompted to reprogram the OS. If so, reprogram the OS and then reprogram the flash with your project.
-
Verify the numeric field updates with the correct values from 0 to 255 as the slider is moved on the touch panel.
Amulet Display API
The Amulet Display API in LabVIEW 2013 or later enables communication between a host application and the Amulet Display module connected via USB or serial. Because the communication with the Amulet Display module occurs via USB or Serial with NI-VISA, this API can be used on a host computer or a real-time target. This section will create a LabVIEW application that will communicate with the interface designed in the previous section.
-
Create a new LabVIEW VI by going to File»New VI in LabVIEW.
-
Switch to the block diagram. Open the Amulet Display API in Functions Palette»Connectivity»Amulet Display API.
-
Place an Amulet VISA Open and create a control for the VISA resource name. This will open a connection to the Amulet Display module through the COM port you specify.
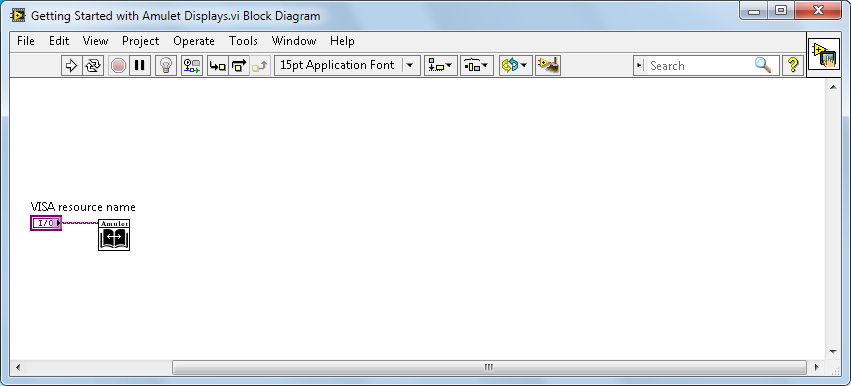
Figure 21. Opening a connection to the Amulet Display module
-
Place an Amulet Write InternalRAM. This polymorphic VI can write to any of the Amulet internal RAM variables. Write the current time to string variable 0 by selecting the Amulet Write String instance of the polymorphic VI. The current time can be obtained by using Get Date/Time in Seconds in conjunction with Format Date/Time String. Wire the Amulet Resource Name and error wires from Amulet VISA Open.
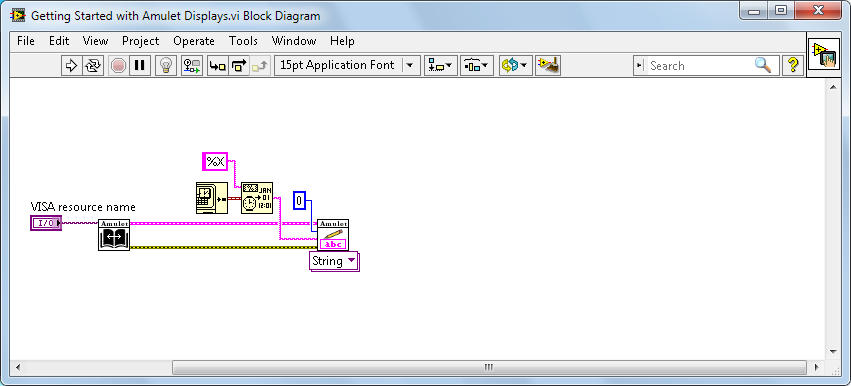
Figure 22. Writing the current time to internal RAM string variable 0
-
Place an Amulet Read InternalRAM. This polymorphic VI can read from any of the Amulet internal RAM variables. Read the value of the slider from byte variable 0 by selecting the Amulet Read Byte instance of the polymorphic VI. Wire the Amulet Resource Name and error wires from Amulet Write InternalRAM.
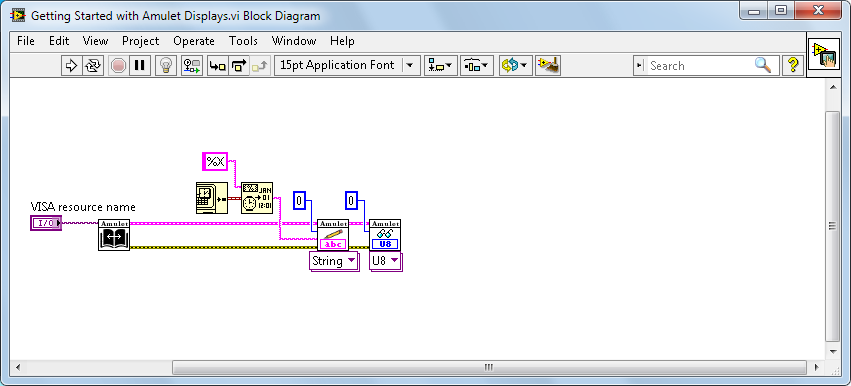
Figure 23. Reading the current value of the slider from internal RAM byte variable 0
-
Generate 100 random numbers scaled by the value of the slider using a For loop and Random Number (0-1).
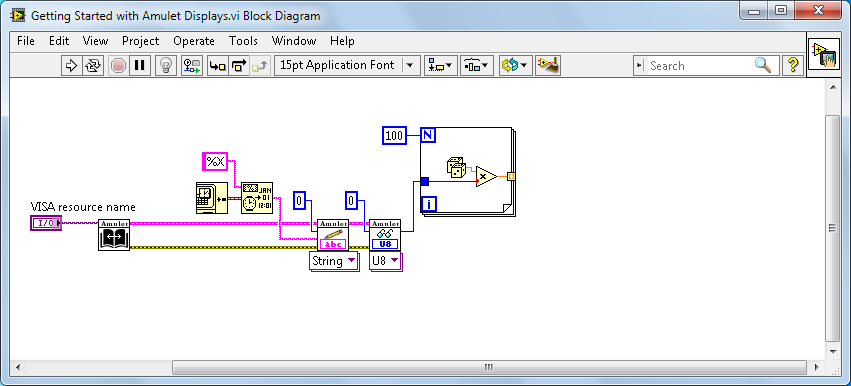
Figure 24. Calculating 100 random numbers and scaling them based on the slider value
-
Place an Amulet Write InternalRAM. Convert the double-precision random numbers to unsigned words and write it to the Amulet internal RAM words starting at variable 0 using the Amulet Write Word Array instance of the polymorphic VI. The conversion to unsigned words can be done using the To Unsigned Word Integer primitive. Wire the Amulet Resource Name and error wires from Amulet Read InternalRAM.
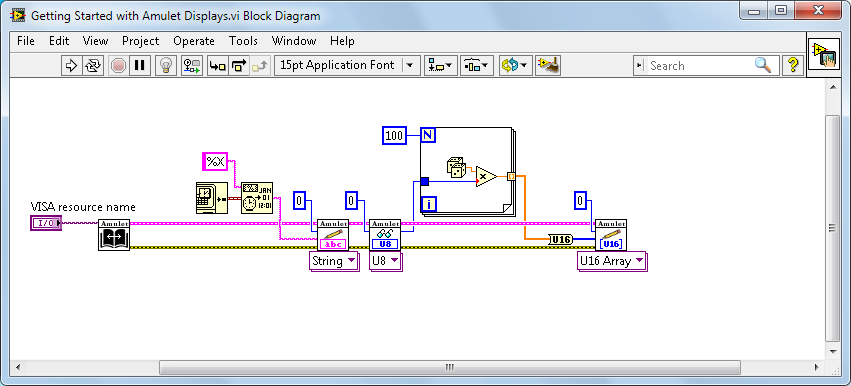
Figure 25. Writing the random numbers to internal RAM word variables starting at variable 0
-
Place an Amulet VISA Close. This will close the connection to the Amulet Display module. Wire the Amulet Resource Name and error wires from Amulet Write InternalRAM. Display any errors at the end with a Simple Error Handler.
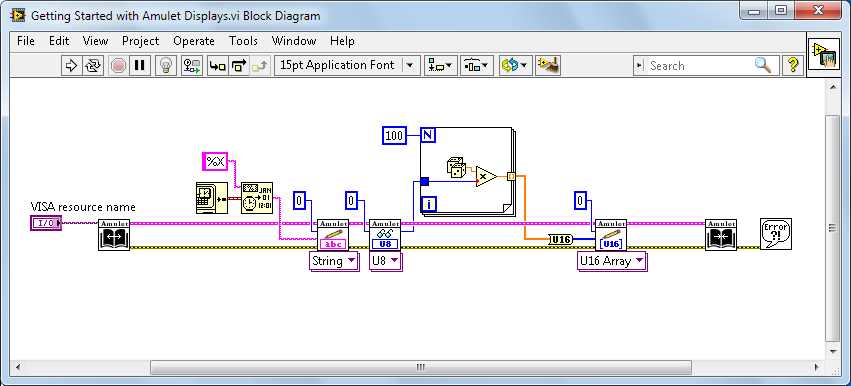
Figure 26. Closing the connection to the Amulet Display module and displaying errors
-
Drag a while loop around the Amulet Read/Write InternalRAM Vis and supporting code. This program should continuously generate data until directed to stop by the user. Add a control to the condition terminal.
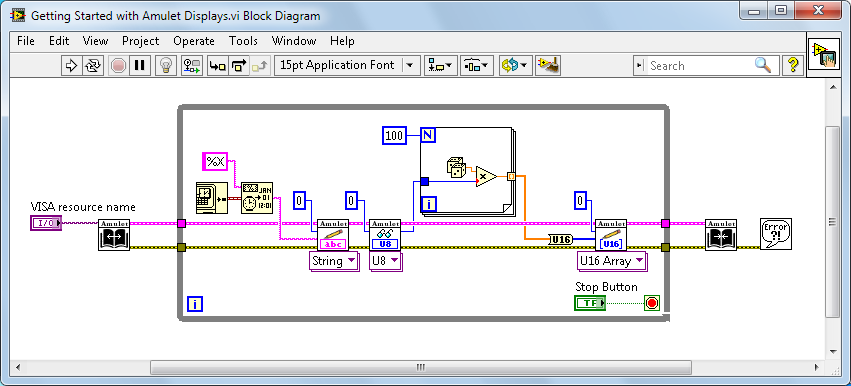
Figure 27. Continuously read and write data to and from the Amulet Display module
-
Add timing to the loop by forcing the loop to execute every second with a Wait (ms).

Figure 28. Completed LabVIEW code with timing
-
Switch to the front panel. Select the COM port that the Amulet Display module is connected to and run the VI.
-
The current time and 100 points of random data should be display on the interface. As the slider value is changed, the relative amplitude of the random data should also change.
System Deployment
During the development process, it is recommended that the user interface be deployed to the module through GEMstudio™ and the USB port. As deployment nears, embedded deployment is the preferred deployment method since the module will most likely be integrated into the system and a USB connection not ideal due to lack of retention.
The Amulet Display module contains a mass termination connector on the bottom that allows for the development of a custom hardware interface such as a PCB or cable into the final application. This mass termination connector provides access to the serial communication pins, power, and DIO available within the Amulet OS. NI also offers an interface board (NI Part Number 783306-01) that allows data to be transferred via a DB9 serial connector with built-in retention and a power connector that enables the display to be connected to the same power supply input voltage as a RIO-based product.
To programmatically deploy the user interface using the Amulet Display API in LabVIEW, a .PDB display file can be created in GEMstudio™. The PDB file contains all the files required to remotely program the entire user interface and can be created in GEMstudio™ by choosing File»Save As Production File. This file can then be remotely deployed or transferred to the target and locally deployed.