When a Camera Link camera is discovered by NI MAX, it populates the available camera attributes from a camera file specific to your camera. The camera files for Camera Link cameras can be found at the following location on Windows 7 and Windows 10 PCs:
C:\Users\Public\Public Documents\National Instruments\NI-IMAQ\DataTo get additional attributes to show up in NI MAX, you can add the attribute to the camera file using the NI Camera File Generator. To do this:
- Verify in the user manual for your camera that a given attribute is configurable through serial commands. You will also need to know the command syntax that the camera expects in order to set the attribute.
- Open the NI Camera File Generator from Start»All Programs»National Instruments»Camera File Generator.
- Select your Camera Link frame grabber from the Target Board dropdown menu and click Open Existing Camera File.
- Select your camera's camera file from the
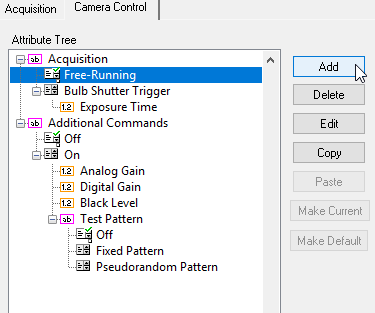
<NI-IMAQ>\Data folder and click Open. The file should appear as your camera model.icd. - Click on the Camera Control tab.
- In the Attribute Tree, you will see the hierarchy of all the attributes currently in the camera file. This hierarchy allows for sub-attributes, meaning attributes that are only accessible based on what you set for its parent attribute. In the Attribute Tree, select where you would like your new attribute to appear and click Add.
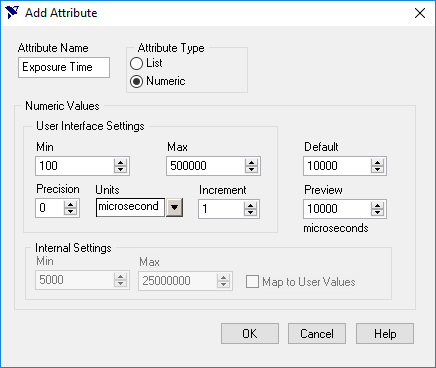
- In the Add Attribute box, configure the attribute you want to add. For example, if the image below shows how you might configure an
Exposure Time attribute. Click OK to finish adding the attribute.
- Now that the attribute is added, you need to configure the serial command that will be sent to the camera to set the attribute. With the new attribute selected in the Attribute Tree, select the Serialtab and then click Add.
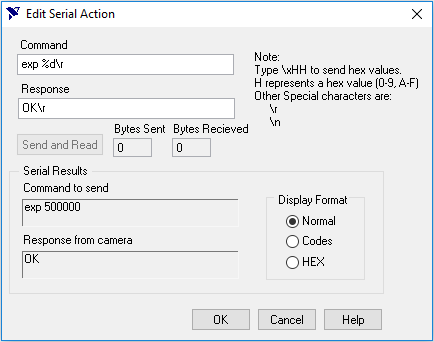
- In the Add Serial Action dialog box, enter the Command to be sent to the camera as indicated in the camera's user manual. Remember to include the correct termination character. Enter the Response that the camera will send back after receiving the command.
Note: Format specifiers can be used to pass arguments to the serial command. For example, to insert an integer value to be used when sending the command, you can use the
%d format specifier in the place where the value will be inserted, as shown below:
- You can test the command by clicking Send and Read, which will send the command to your camera, if one is connected. Once configured correctly, click OK. This attribute should now be shown in the Attribute Tree
- Repeat steps 6-10 for any addition attributes, then click the Save button to save the
*.icd file. - Close the Camera File Generator and open NI MAX. The new attribute should now show up for your camera. Setting the attribute in NI MAX will now send the configured command to the camera.