- Method Requirements
- Method 1: Recovering a NI Linux Real-Time target with a monitor and keyboard
- Method 2: Recovering a NI Linux Real-Time target without a monitor and keyboard
To use the methods/utilities with your controller, you will need the following tools:
- FAT16 or FAT32 USB drive with FAT on the first partition.
(Note: Some systems are unable to recognize a bigger USB driver than 8GB. Try to use a maximum size of 8GB USB drive or less.)
- Monitor and display cables (to view the BIOS and format steps).
- Mini DisplayPort Adaptor (if the monitor does not have a DisplayPort).
- USB Keyboard (to interact with BIOS and format process).
Note: If you don't have the above tools (spare monitor and Mini DisplayPort Adaptor to access BIOS) or are using a NI Linux Real-Time target with no monitor (e.g. 905x), please move on to Creating the Reset USB from NIRECOVERY.zip section, for which you only need FAT16 or FAT32 USB drive.
Back to the Top
For recovering an NI Linux Real-Time target with a monitor and keyboard, the "Reset USB" can be created from NI Measurement and Automation Explorer (MAX)
Create the USB recovery utility from MAX:
- Install LabVIEW and the LabVIEW Real-Time Module.
- Plug the USB storage device into the computer.
- Launch NI MAX
- Select Tools >> Create NI Linux RT Recovery USB Drive.
- Select your USB storage device under Drive.
- Select your Disk Image
- Click Format.
- Once complete, eject the USB from the computer.
- When finished with the Linux RT controller reset, use [External] Rufus to recover the USB drive, as it will not be discoverable by Windows.
NI Linux Real-Time target with keyboard or monitor.
- Ensure your Target is switched ON
- Plug the USB drive, keyboard, and monitor into the target.
- Reset the target (do not boot into safe mode by holding the RESET button for 5 seconds).
- Press the Delete or the F10 key while the target is restarting to enter the BIOS.
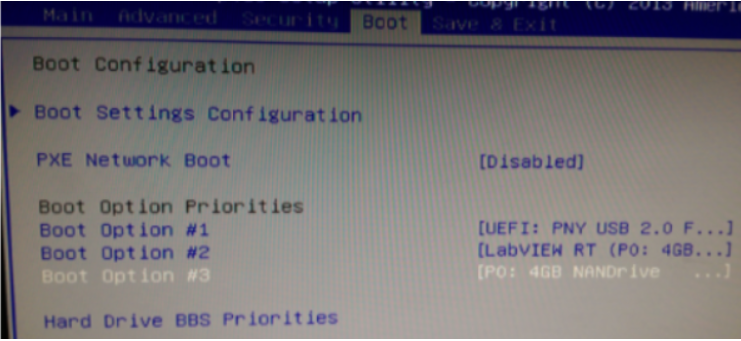
- In the BIOS go to the Boot tab and ensure that the UEFI USB drive is set as the first boot option.
- Note: It is important that you correctly configure this boot option or the reformat will not work properly.

- On the Save & Exit tab and proceed to Save Changes and Reset. When the target reboots it will begin the format process.
- The format process will start with a request, NI Real-Time Provisioning USB key.
- Continuing, will partition, format, and install safe mode to the target.
- Type y and press Enter to begin the partition and installation of the new safe mode.
- After the installation completes you will see a Safe mode was successfully installed. message on the console.
- Next, the console says Remove the Recovery USB key before rebooting.
- Remove the USB and then reboot the target.
- The controller will now boot into safe mode. In MAX, the Status should read Safe Mode (No Software Installed). Now you can install software to the target and configure a new password if desired.
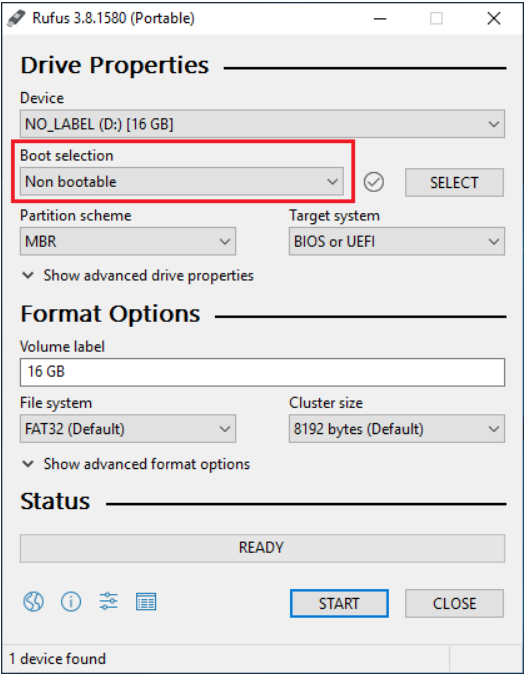
- To recover the USB drive for future use, use [External] Rufus or similar software on the PC to format the USB drive to make it discoverable by Windows. Under Boot selection choose the Non-bootable option.

For recovering an NI Linux Real-Time target without a monitor and keyboard, the "Reset USB" can be created from NIRECOVERY.zip found in the attachments on this page.
Creating the Reset USB from NIRECOVERY.zip
Use the steps below to create a USB drive from NIRECOVERY.zip (Attachments section) that can be used to reset the password on your controller (by formatting the target and reinstalling safe mode):
- Extract the contents of the provided NIRECOVERY.zip file to the USB drive.
- Rename the USB drive to NIRECOVERY.

NI Linux Real-Time target without keyboard or monitor
- Ensure your Target is switched ON
- Plug the USB drive into the controller.
- Turn the controller off by pressing the power button. If there is no power button, power off the controller by unplugging the power supply.
- Push and hold the RESET button (continue to hold through step 5).
- Push and release the POWER button. If there is no power button, power on the controller by plugging the power supply back in (continue to hold the RESET button while powering on).
- Wait 5 seconds while continuing to hold the RESET button.
- When the status LED illuminates after ~5 seconds, release the RESET button.
- After the installation completes you will see a Safe mode was successfully installed message on the console. If the monitor is not connected to the controller, wait a few minutes before proceeding to the next step.
- Next, the console says Remove the Recovery USB key before rebooting.
- Remove the USB and then reboot the target.
- The controller will now boot into safe mode. In MAX, the Status should read Safe Mode (No Software Installed). Now you can install software to the target and configure a new password if desired.
Intel ARM-based targets
Our Technical Support Engineering department will be able to assist customers who need to reset passwords on Linux Real-Time targets (ARM-based targets). To get in touch with a Technical Support Engineer, open a support request at NI Support.