To view or control a VI on a web browser, a Web Sever must be configured appropriately and a HTML file must be generated. The following steps show how this can be done:
1. Open LabVIEW and navigate to
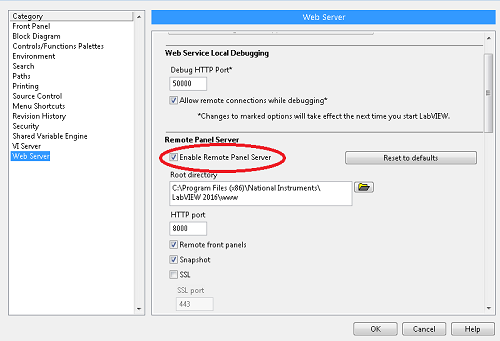
Tools»Options»Web Server.
2. Under the
Remote Panel Server section, check
Enable Remote Panel Server.

3. Under the
Visible VIs section, enter the name of the VI in the
Visible VI field and press the
Add button.
- By default, all VIs are set to visible.
- Refer to Syntax for the VIs Lists for more information on entering VI list entries.
 Note the following:
- The control time limit specifies the amount of time (in seconds) that a remote client can control a VI when multiple clients are waiting to obtain control. The default time is 300 seconds. If Use default contains a checkmark, you cannot edit this field.
- LabVIEW does not begin monitoring the time limit set on a particular VI until a second client requests control of the same VI. If a second client never requests control of the VI, the initial client never loses control of the VI.
4. Under the
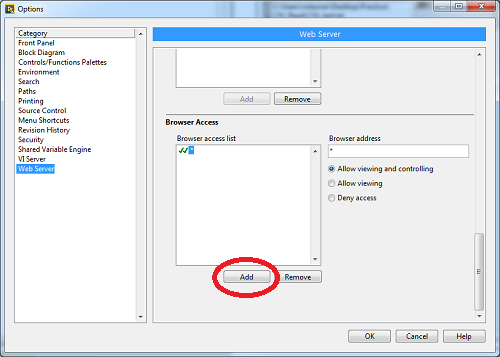
Browse Access section, enter the network name of the computer that needs to view the VI in the
Browser address field and press the
Add button. Ensure that the
Allow viewing and controlling option is selected.
- Similarly to the Visible VIs section, all browser addresses have access to the VIs by default.
- Refer to Syntax for Browser Address Lists for more information on access list entries.

5. Exit out of the
Options dialog box and navigate to
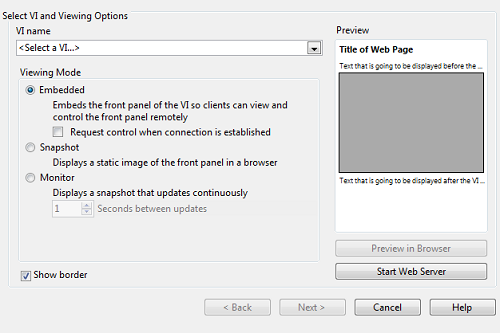
Tools»Web Publishing Tool to open the
Web Publishing Tool dialog box. Please note that the
Start Web Server button should be disabled if all previous steps have been followed.
6. Under
Select VI and Viewing Options section, browse to and select the desired VI. Ensure the appropriate
Viewing Mode is selected and press
Next.

7. Start the LabVIEW Web Server by selecting
Start Web Server, as shown in the image above. If it has not started, then the default port used for HTTP may be occupied by something else. To fix this, change the HTTP port number as shown in the image of step 2.
8. Under the
Select HTML Output section, enter the desired document title and HTML content and press the
Next button.
9. Under the
Save the New Web Page section, select where to save the HTML file and choose the file name and press the
Save to Disk button. To access the front panel, open this HTML file.
 Note the following:
- Even if you had enabled SSL, the URL will still show an http link. You just need to modify the link to say https instead of http and the correct https port number instead of the http port. After those changes are complete then the secure web page will work.
- Sometimes there can be a certificate error when the certificate used was not digitally signed and is therefore not trusted.