Setting Up the Hardware
This tutorial uses a cRIO-9074 CompactRIO Controller as the EtherCAT master and NI-9144 as the EtherCAT slave. To set up this hardware system, follow these steps:
- Insert the C Series I/O modules in the appropriate chassis (the CompactRIO master chassis and/or the NI-9144 slave chassis).
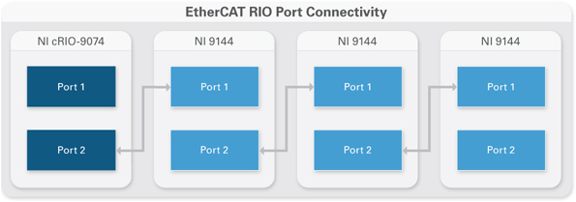
- Connect a standard Category 5 or better Ethernet cable from cRIO-9074 Ethernet Port 2 to NI-9144 Ethernet Port 1. You may daisy chain multiple NI-9144 chassis from the controller in this manner.
 Note:
Note: Port 1 on the cRIO-9074 is on the bottom. Refer to the User Manual of the cRIO controllers for the position of the Ethernet ports.
-
Wire an external power supply to each chassis, which then powers on the hardware.
Configuring the Master Controller
- After you have connected the hardware, install the required software on the host computer.
- Use an Ethernet cable to connect cRIO-9074 Ethernet Port 1 to the same network as your host PC.
- Launch the NI Measurement & Automation Explorer (MAX) configuration utility from Start » Programs » National Instruments » Measurement & Automation. Double-click on Remote Systems in the Configuration panel tree on the left to autodiscover the cRIO-9074 on the network, and click on the CompactRIO controller.
- Change the name of the master controller and select Obtain IP address from DHCP server under IP Settings. Click Reboot when you are done. (To use a static IP address, see the related links below.)
- To install the software on the real-time master controller, expand the cRIO-9074 under Remote Systems. Right-click Software and select Add/Remove Software.
- Install the recommended software set—NI-RIO driver software with the NI Scan Engine as well as NI-Industrial Communications for EtherCAT driver software—onto the CompactRIO controller.
- Once the controller has rebooted, find the CompactRIO controller under Remote Systems again. Click on Advanced Ethernet Settings in the lower right-hand corner.
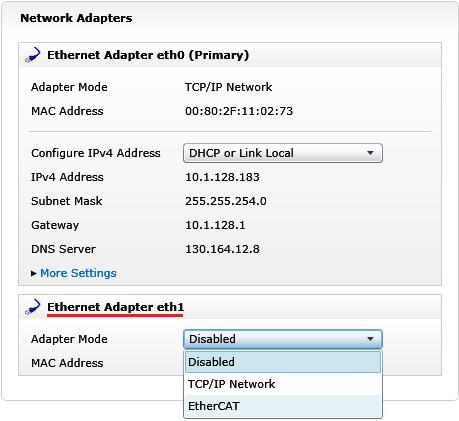
- Select cRIO-9074 Ethernet Port 2 (the MAC address that is not primary). Then select EtherCAT in the pull-down box under Mode and click OK
 Note:
Note: When the controller’s Ethernet Port 2 is in EtherCAT mode, you cannot use that port on an Ethernet network.
Configuring the Network in LabVIEW
- Launch LabVIEW from Start » Programs » National Instruments » LabVIEW X.X » LabVIEW. Click on Empty Project.
- Right-click on Project and select New »Targets and Devices.
- In the Add Targets and Devices dialog window, select Existing target or device and expand the category Real-Time CompactRIO to autodiscover the EtherCAT master on the host PC’s subnet. Select the cRIO-9074 and click OK.
- In the LabVIEW Project window, right-click on the cRIO-9074 and select New » Targets and Devices.
- In the Add Targets and Devices dialog window, select Existing target or device and expand the category EtherCAT Master Device to autodiscover the EtherCAT port on the controller.
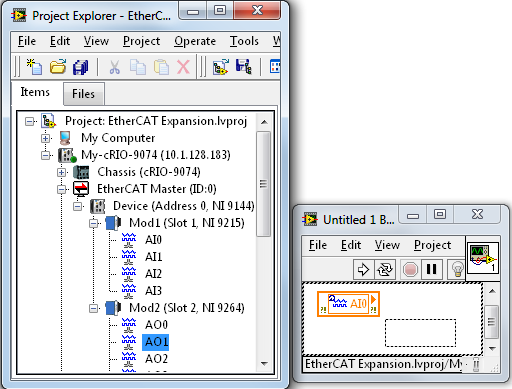
- Select the available EtherCAT master port and click OK. The Scan Slaves dialog window appears. The first option Scan Interface autodiscovers any slaves connected to the controller. Click OK. The LabVIEW Project now lists each slave device, its I/O modules, and the physical I/O on each module (called I/O variables).
- Once all the EtherCAT slaves have been autodiscovered, you may create a VI, or logic program, on the CompactRIO master controller. To program the NI 9144 modular slave in LabVIEW Real-Time, click and drag the I/O variables from the LabVIEW Project to the block diagram. With these I/O variables, you can read and write from physical channels in the NI 9144 chassis. When finished, click the Run button on the LabVIEW VI program to deploy the program to the real-time controller.

Note: If you use the I/O variables in a Timed Loop, you can synchronize the loop timing source to the NI Scan Engine. When you run the VI, the program automatically deploys onto the CompactRIO master. For more information about the LabVIEW I/O variable and CompactRIO Scan Mode, refer to Understanding CompactRIO Scan Mode.
Changing EtherCAT Modes in LabVIEW
LabVIEW streamlines the different EtherCAT states (that is, Operational, Init, Bootstrap, and so on) by grouping them into two LabVIEW Scan Engine modes: Configuration Mode and Active Mode. In Active Mode, the LabVIEW program gets real data from the network. In Configuration Mode, the network data is not updated and configuration of the EtherCAT network is enabled, allowing you to add new slave devices and modules and download the NI-9144 EtherCAT slave firmware.
To change the LabVIEW Scan Engine mode, right-click the cRIO-9074 master controller in the LabVIEW project explorer and select Utilities » Scan Engine Mode » Switch to Active (or Switch to Configuration). The LabVIEW Scan Engine mode can also be changed programmatically with the Set Scan Engine Mode function, accessed by right-clicking on the LabVIEW block diagram and selecting the Measurement I/O » NI Scan Engine palette.
You can change an individual slave's EtherCAT state by right-clicking on the slave device in the LabVIEW Project window and selecting Online Device State. The slave device's EtherCAT state can be changed almost completely independently from the LabVIEW Scan Engine mode, with only two restrictions. One restriction is that you cannot place a slave device into Operational or Safe-Operational state unless the LabVIEW Scan Engine is in an equivalent state (Active Mode). The other restriction is that you cannot place your device into Bootstrap state unless the LabVIEW Scan Engine is in Configuration Mode.
Adding Third-Party EtherCAT Slaves to NI Master Controllers
To have a third-party slave device show up in the LabVIEW Project window, you must import the slave's device profile XML file before configuring the slave with LabVIEW.
- Locate the EtherCAT XML Device Description File for your third-party slave. Some companies provide these XML files for download on their websites.
- Right-click the EtherCAT master item and select Utilities » Import Device Profiles to display the Import Device Profile dialog box.
- Click the file Browse button to select the device profile(s) in either of the following ways.
- Select a file and click Open to import a device profile.
- Open a folder and click Current Folder to import all device profiles under the folder.
- After selecting the device profiles, you can see the file import results. The file is imported successfully if Import Result reads Succeed. Otherwise, the file is not imported due to an invalid format or other reason.
- (Optional) Repeat step 2 to import other device profiles.
- Click Close to exit the dialog.
- You must restart LabVIEW to use the newly imported device profile.
Programming the NI 9144/45 FPGA in LabVIEW FPGA
The program written in LabVIEW Real-Time is deployed to the EtherCAT master, which is responsible for collecting, processing, and controlling the I/O in the EtherCAT network. Additionally, each NI-9144 slave chassis contains an embedded field-programmable gate array (FPGA) that can execute custom timing and signal processing to help you create intelligent distributed devices that are synchronized within 100 ns of each other. To take advantage of the programmable FPGA capabilities, you must use LabVIEW, LabVIEW Real-Time Module, and LabVIEW FPGA Module.
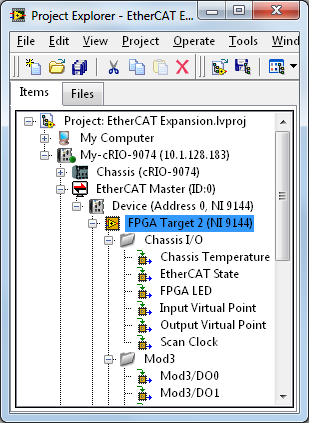
- When you add the EtherCAT Master Device to the LabVIEW Project (see step 5 in the previous section), you can either set up the NI-9144 slave to program in the NI Scan Interface or LabVIEW FPGA Interface. If you select the former, you can still program in LabVIEW FPGA by right-clicking on Device (Address 0, NI-9144) in the LabVIEW Project window and selecting New»FPGA Target.
- In the LabVIEW Project, the NI-9144 slave device features several FPGA signals. For example, Input Virtual Point and Output Virtual Point are digital timing signals used to synchronize FPGA code between different NI-9144 chassis. To program a module in LabVIEW FPGA Mode, drag and drop the module from Device (Address 0, NI-9144) onto the FPGA Target (NI-9144). In the Project Explorer window, you can drag and drop modules between Device and the FPGA Target to switch between Scan Mode and FPGA Mode.

- In the LabVIEW Project Explorer window, right-click on FPGA Target (NI-9144) in the LabVIEW Project and select New»VI to create a new FPGA program on the NI 9144. The FPGA I/O channels from modules listed under FPGA Target (NI-9144) can be dragged and dropped into the block diagram of this new FPGA VI.
- To deploy it to the FPGA Target (NI-9144), the VI must be compiled through creating a new Build Specification»New»Compilation. After the FPGA VI has compiled successfully, it will be listed under Build Specifications in the Project Explorer and can be downloaded to the FPGA Target (NI-9144) by right-clicking on it and selecting Download.
Differences in the LabVIEW FPGA Programming API
If you are familiar with programming in LabVIEW FPGA for CompactRIO and other NI RIO platforms, there are some differences between programming the master's local FPGA and the slave's FPGA. Since LabVIEW 2009, user-defined I/O variables are used to synchronize FPGA data with the Scan Engine. These user-defined I/O variables are also the only means for transferring data between the controller’s real-time VI and the-NI 9144/45 expansion chassis’ FPGA VI.
|
FPGA Transfer Methods
|
Local Chassis
|
Expansion Chassis
|
|
User-defined I/O variables
|
√
|
√
|
|
FPGA Host Interface
|
√
|
X
|
|
DMA transfer functions
|
√
|
X
|
|
FPGA front panel debugging
|
√
|
X
|
- Program the FPGA VI by clicking the NI 9144 FPGA I/O nodes from the LabVIEW Project and dragging them onto the FPGA block diagram. In this example, a proportional integral derivative (PID) function was used to control analog I/O in the NI 9144 chassis.
- Note the Reset FPGA PID Boolean variable. This is a user-defined I/O variable that allows the real-time VI on the NI EtherCAT master to communicate with the FPGA VI on the NI-9144. To create such a variable, right-click on Device (Address 0, NI-9144) in the LabVIEW Project and select New»User-Defined Variable. The variable name, data type, and data direction (from Host to FPGA or vice versa) may be set from the Properties window. In this case, the master controller is sending information to the NI-9144 slave, so the direction is Host to FPGA.
You can now program the user-defined I/O variable in the real-time VI used in this example to reset the PID function running in the FPGA VI.
- To run the FPGA VI, right-click on cRIO-9074 in the LabVIEW Project and select Deploy All to deploy the NI-9144 slave device. Put the LabVIEW Scan Engine into Configuration Mode by right-clicking the CompactRIO controller and selecting Utilities » Scan Engine Mode » Switch to Configuration and click the Run button on the FPGA VI. This starts the compile process and downloads the FPGA bitfile to the NI-9144 chassis. After you have successfully downloaded the bitfile to the NI-9144, the FPGA VI begins executing immediately.
Note: You may need to update the firmware on your NI-9144/45 slave chassis to run custom FPGA code. If you get an error message stating that your firmware needs to be updated, follow the instructions in the
NI-9144 User Guide and
NI-9145 User Guide under the
Updating Your Firmware section.
- When the compile and download process completes, you need to set the LabVIEW Scan Engine back into Active Mode before the FPGA VI will begin executing. To do so, right-click the CompactRIO master controller in the LabVIEW Project window and select Utilities » Scan Engine Mode » Switch to Active.
An important note is that there is a limit to the number of user-defined I/O variables that can be created in FPGA Mode. Refer to Optimizing an FPGA Application.