Introduction
To add, modify or remove permissions for your clients to access software on your Volume License Agreement (VLA), you must first determine whether you have named-user license, computer-based license or a combination of both. For a named-user license, you will need the login name of the user you want to grant permissions to. This is the name used to log onto the machine. For a computer-based license, you will need the client computer name. To find computer name, go onto the client machine and navigate to Start»Programs»National Instruments»NI License Manager. Select the Display Computer Information button and obtain the computer name. After obtaining the required information, you can assign permissions based on the model of your licenses.
For VLM 3.0 or newer
Once you have obtained the required information, launch NI VLM, and follow these steps as needed:
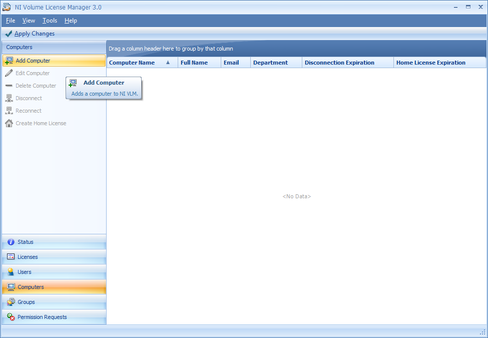
VLM 3.0: Add Computer
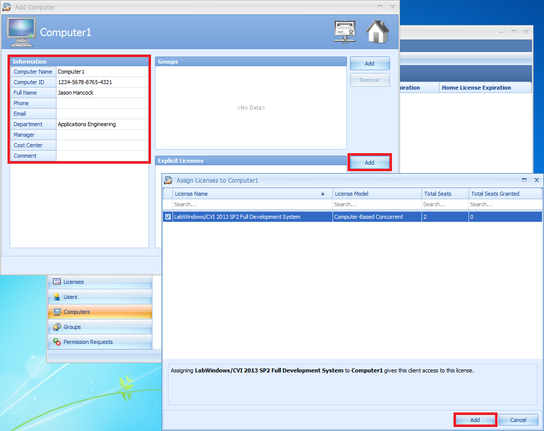
VLM 3.0: Adding Information and Permissions to Software
After following these steps, it only remains to make NI License Manager to point to the server, please refer to Configure NI License Manager to Point to a VLM Server.
If you are moving servers from one previously managed by VLM 3.0 or newer, you can import configurations for your users and computers by using NI Volume License Manager Import Utility. Please refer to Using the NI VLM Import Utility for instructions.
Note: After making any modifications within Volume License Manager 3.0 or newer be sure to click Apply Changes at the top left of the VLM Window. If this is not pressed then configuration changes will not be updated.
For VLM 2.1.1 and earlier
Once you have obtained the required information, launch NI VLM, and follow these steps:
- Click the Add Computer or Add User button. Enter the client information in the subsequent dialog box. (The fields in the owner section of the information tab are optional and can be used for your own record keeping).
- Select the Permissions tab, which lists available software packages included in your VLA.
- Place checkmarks next to each software package that the client will need to use.
- If a computer-based license, add all users connected to the computer by selecting the Users tab. Click OK, and repeat this process for each client computer.
- Click Apply Changes to refresh the server with these new settings and permissions. Failure to apply the changes will result in the changes being lost.
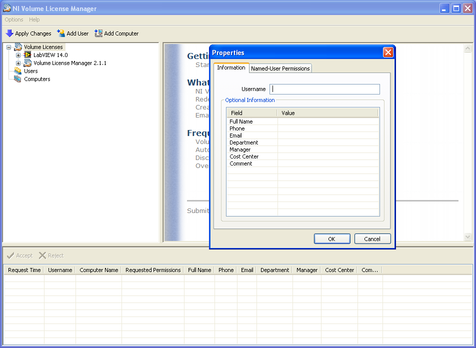
VLM 2.1.1: Adding New User Information
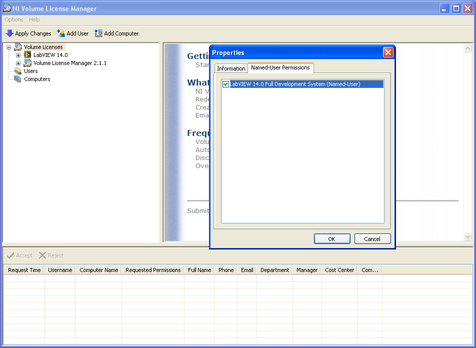
VLM 2.1.1: Adding Permissions to Software
You can also use the NI VLM Import Utility to help you import the client configurations from a prior server. To learn how to do this, refer to NI Volume License Manager Import Utility.
Note: If your client computer or user will not be connected to the VLM server through the network, you will need to create a disconnected license. Getting Started with NI VLM: Creating a Disconnected or Home License
Next Step: Creating a Disconnected or Home License Previous Step: Configuring Server Settings