The Full Compile Process

Figure 1. The Compile Process from Run Arrow to Bitfile.
Each step of the compilation process includes some subtleties and information you can use. NI exposes this information in a timely manner. You can use LabVIEW FPGA software to automatically or manually stop the compilation at any time due to an error, an estimate out of bounds, or a user-directed cancel.
Setting Compile Options before You Start
You can use compiler settings to increase or decrease the effort settings of the compile. These settings are available by right-clicking on the build specification for a particular FPGA VI and selecting Properties»Xilinx Options. The different Design Strategy settings are useful in a number of situations. Note that the default setting for the hardware selected is Default for all directives, which will use the Xilinx default implementation strategies. The options you can specify depend on your specific FPGA target. The options below apply to Xilinx Vivado compilation tools. For more information on the specific settings, refer to the appropriate LabVIEW FPGA Module Help pages for Xilinx ISE or Xilinx Vivado .
-
If you are concerned about overmapping resource usage, but you can easily meet timing constraints, choose Optimize area.
-
If resource usage is well within your bounds, but you are approaching a high clock rate, choose Optimize performance.
-
If you are writing an FPGA program that does not stretch resource or timing constraints, choose Reduce compilation time.
-
If you want to optimize power usage of the FPGA chip, choose Optimize power.
-
If you want to customize the effort levels across each dimension, choose Custom.
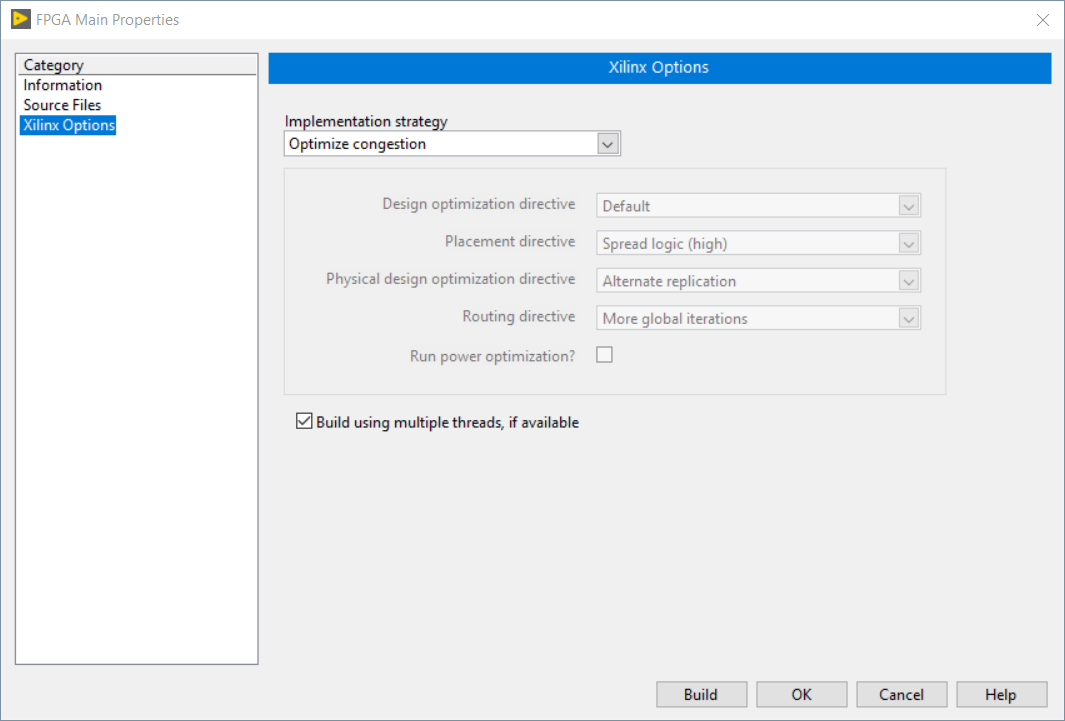
Figure 2. With the Xilinx Options page, you can set the compile effort level before compiling.
A Note for FlexRIO Users
In addition to compiling user LabVIEW FPGA Module code, LabVIEW FPGA must also include any FlexRIO Socketed CLIP and a small amount of fixed logic. In order to ensure that all of the extra logic meets timing and space requirements, all effort levels are set to High by default when using a Xilinx ISE target. Changing these settings might cause a user compile to fail due to non user-generated code, or might result in undesired behavior in user-generated code. As a result, effort level settings are disabled for all FlexRIO targets.
Starting a Compile
You can compile an FPGA VI in LabVIEW using the following methods:
-
Clicking the Run button in the FPGA VI first checks to see if there is a valid bitfile already created for the VI. If so, LabVIEW immediately runs the FPGA VI in interactive mode using the existing bitfile. If the FPGA VI has never been compiled or has changed since the last compile, the run arrow begins the compile process and runs in interactive mode after finishing the compile.
-
Pressing <Ctrl> and clicking the Run button forces a compile, compiling the VI regardless of the current state of the bitfile. LabVIEW does not run the VI after finishing the compile.
-
Right-clicking the build specification of the VI in the project and selecting Build checks to see if there is a valid bitfile already created for the VI. If so, LabVIEW reports to the user that the bitfile is valid and does not compile. If no valid bitfile is found, the compilation process begins. LabVIEW does not run the VI after finishing the compile.
-
Right-clicking the build specification of the VI in the project and selecting Rebuild forces a compile, compiling a VI no matter which state the current bitfile is in. LabVIEW does not run the VI after finishing the compile.
Generating Intermediate Files
The first step in the compilation process is the generation of intermediate files. For this process, LabVIEW parses your block diagram and converts the code to a form that the Xilinx compiler can consume. A number of errors might occur during this step, causing the compile to fail. These errors usually involve an illegal VI or combination of VIs placed in single-cycle Timed Loops.
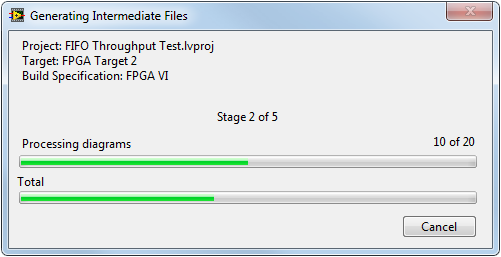
Figure 3. The Generating Intermediate Files progress dialog.
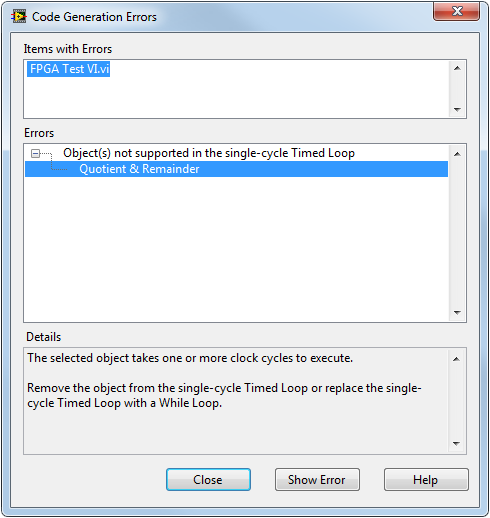
Figure 4. Example of errors from code generation.
Compilation Status Window
The Compilation Status window appear after code generation completes with no errors. This is the main window that guides you through the compile. It features a progress bar and some basic timestamps and VI info. As the compile continues, alerts at the bottom of the window tell you when a new report is complete. After the synthesis step, you see Estimated Device Utilization Report Details and Estimated Timing Report Details. Both of these reports appear early in the compile, so you can cancel the compile in a timely fashion if the reports indicate with high confidence that the compile will overmap your FPGA hardware or not meet your timing constraints.

Figure 5. The Compilation Status window is a dynamic interface that you can use to check various reports, minimize to the mini build specification-only view, and continue working in LabVIEW.
Compilation Status Window Features
-
Progress bar output
-
Configuration report covering Xilinx precompile options selected
-
Clickable alerts when the early estimates (and other reports) are ready to view
-
Mini build specification-only view to put the compiler status in the corner of the screen and continue working
-
Ability to inspect the raw Xilinx log directly
-
Save button once the compile completes to quickly save the Xilinx log or particular reports to a file for records or support
-
Ability to stop the LabVIEW FPGA compile server remotely
If you close the Compilation Status window during a compile and you later want reopen the window, right-click on an FPGA build specification and select Display Compilation Results.
Queuing Compiles
To more efficiently use the LabVIEW FPGA compile server, you can queue several compiles to run one after another. You can leave the compile server running for an extended period (for example, overnight) and ensure that it is busy working as much as possible. Queuing a compile is as simple as kicking off the next compile before the previous compile finishes. To do this, select a new FPGA VI or build specification and start the new compile. The Compilation Status window for that compile reflects that the compile is waiting in a queue above the progress bar.

Figure 6. The Compilation Status window shows that the compile is waiting in queue for the compile server to become available.
The Build Specifications pane of the Compilation Status window displays all of the compiles currently waiting in the queue.
Using a Remote Compile Server
By default, the LabVIEW FPGA compile server is set to “localhost.” It opens the compile server window when the Compilation Status window appears. FPGA compilation is a computationally intensive process and can tax both the processor and RAM of the development machine, making it difficult to continue working on some computers while the compilation is running in the background. Many FPGA developers choose to use a separate PC to run the LabVIEW FPGA compile server, and, to optimize compile time, they max out the RAM and processor of this machine.
Compiling on a Remote Computer
When launching a compile, by default the Select Compile Sever window appears. From this window you can either choose to Use the local compile server, or you can select Connect to a network compile server and specify a remote compile server by entering the name or IP address of the computer hosting that server and the appropriate user credentials.
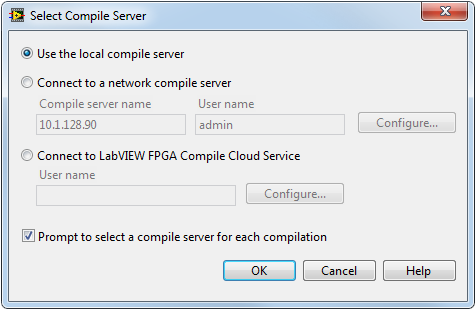
Figure 7. The Select Compile Server window.
If you remove the checkmark next to Prompt to select a compile server for each compilation, the Select Compile Server window no longer appears each time you begin a compile. You also can access these settings by selecting Tools»Options»FPGA Module if the Select Compile Server window has been disabled.
To setup a remote compile server, install the appropriate Xilinx compilation tools on the remote machine. Once you have done so, on the remote machine navigate to Start»All Programs»National Instruments»FPGA Compile Tools»FPGA Compile Server Configuration, place a checkmark next to Allow users to connect remotely to this compile server, and click OK. Prior to compiling, you also must manually launch the FPGA compile worker on the remote computer by selecting Start»All Programs»National Instruments»FPGA Compile Tools»FPGA Compile Worker.
Using the LabVIEW FPGA Compile Farm
The FPGA Compile Farm Server, helps streamline the FPGA compile process by allowing you create an on-site server to manage remote FPGA compilations easily.
Note: With LabVIEW 2013 FPGA Module and earlier, use the NI LabVIEW FPGA Compile Farm Toolkit.
You can connect to as many compile worker computers as you need, and the central server software farms out parallel compilations to those connected compile workers and manages the queuing of compiles. To reduce your FPGA compile times, the FPGA Compile Farm Server also includes support for Linux compile worker computers. You can find out more about getting started with the toolkit in the document Getting Started with the LabVIEW FPGA Compile Farm Toolkit.
Using the LabVIEW FPGA Compile Cloud Service
Another option for compiling FPGA VIs remotely is the LabVIEW FPGA Compile Cloud Service. The LabVIEW FPGA Compile Cloud Service, offloads your FPGA compilations to a high-performance, high-reliability cloud server to reduce the compile time of your LabVIEW FPGA VIs.
You can find out more about using this service in the document Compile Faster with the LabVIEW FPGA Compile Cloud Service .