Overview of the 1-D Interactive Panel
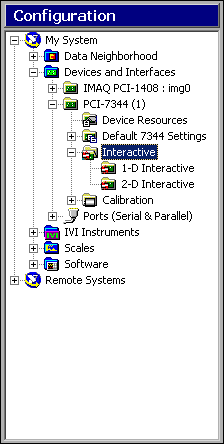
The Motion Controller Interactive Environment helps you test and debug your system using your current initialization settings. Click the plus sign next to Interactive to expand the section.

Note: Before you begin working in the Interactive Environment, click Apply and Initialize for any changes in your settings to take effect.

The 1-D Interactive Section
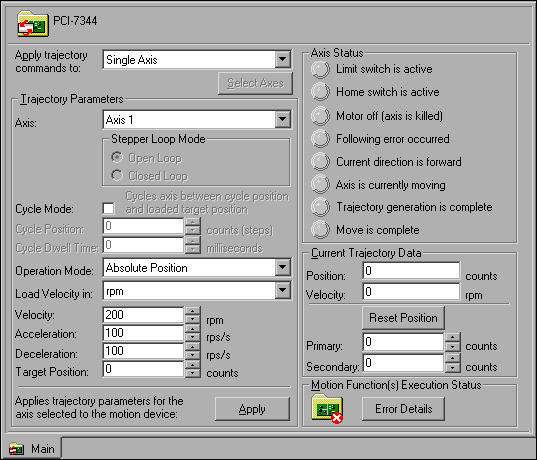
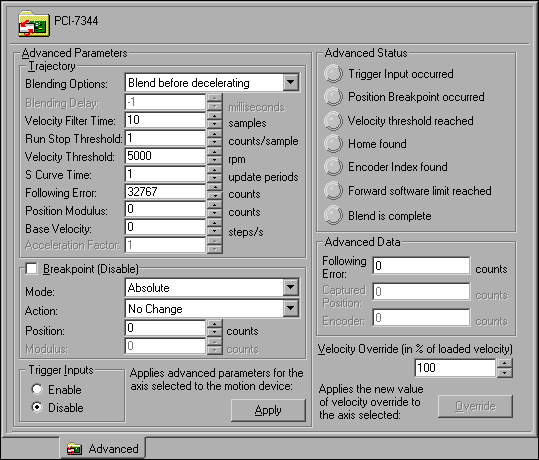
Click the 1-D Interactive icon in the configuration tree. The right side of the panel will show the following options to test and debug moves on a per axis basis. You can perform moves on one or more axes one axis at a time. Use the tabs at the bottom of the panel to switch between Main, and Advanced settings.


Use the Main tab to configure the general move parameters for an axis such as acceleration, maximum veliocity and target position. After you have started your move, the tab provides basic feedback, including axis position, actual velocity and status.

Use the Advanced tab to configure advanced move parameters such as breakpoints, trigger inputs, filters, and thresholds. The Advanced tab also displays information about your move.
Note: After you have finished a move, any changes that you make to the property pages must be reapplied on your interactive settings before beginning a new move. To apply your settings, select the Main or Advanced tabs and click Apply in the configuration view. For more information on any of the parameters on the property pages, right-click on the parameter name and select What's This? from the popup menu.

Performing an Open-Loop Stepper or No Motor Test
Complete the following steps to test your Motion Controller with an open-loop stepper motor. Before completing these steps, make sure your motors are connected properly and your motor drive(s) are powered up.
Note: It is not necessary to have motors and an amplifier connected to perform the test for open-loop stepper configuration.
-
Expand the Interactive folder on the navigation tree.
-
Select 1-D Interactive.
-
In the middle window, enter 10000 in theTarget Position field.
-
Click Apply at the bottom of the window.
-
Click Reset Position. The Position field under Current Trajectory Data should change to zero.
-
Click Start on the toolbar. Your motor should rotate, and the Position field under Current Trajectory Data should increase to 10000. If you do not have motors, the Position field should still change to 10000.
-
Click Kill in the toolbar to allow your motor to rotate freely.
-
Turn your motor by hand. Notice the Position field under Current Trajectory Data does not change. Stepper motors operating in open-loop mode cannot read a change in the position of the motor. The change you saw in the position for this configuration is based on the steps generated by the Motion Controller and not on any feedback device.
-
Click Halt in the toolbar. You should get holding torque on your motors again.
You have successfully tested your open loop stepper motor.
Performing a Closed-Loop Stepper Test
Complete the following steps to test your Motion Controller with a closed-loop stepper motor. Before completing these steps, make sure your motors are connected properly and your motor drive(s) are powered up.
Test the encoder feedback.
-
Expand the Interactive folder on the navigation tree.
-
Select 1-D Interactive.
-
In the 1-D Interactive window, change Stepper Loop Mode to Closed Loop.
-
Click Apply at the bottom of the window.
-
Click Kill in the toolbar.
-
Rotate your motor by hand. The Position field under Current Trajectory Data should change as you turn your motor. The position values for a Closed Loop stepper configuration are based both on the steps generated by the Motion Controller and the value that the encoder feedback reports back.
You have successfully tested your encoders.
Perform a closed-loop stepper move.
-
Click Halt in the toolbar. You should get holding torque on your motors again.
-
Click Reset Position.The Position field under Current Trajectory Data should change to zero.
-
In the middle window, enter 10000 for Target Position.
-
Click Apply at the bottom of the window.
-
Click Start on the toolbar. Your motor should rotate, and the Position field under Current Trajectory Data should increase to 10000.
You have successfully tested your Closed Loop Stepper motor.
Performing a Servo Test.
Complete the following steps to test your Motion Controller with a servo motor. Before completing these steps, make sure your motors are connected properly and your motor drive(s) are powered up.
Note: Due to their nature and in order to work properly, servo motors must be tuned for the Motion Controller's PID loop to control them properly. Refer to Understanding Servo Tune for more information.
Test the encoder feedback.
-
Expand the Interactive folder on the navigation tree.
-
Select 1-D Interactive.
-
Click Apply at the bottom of the window.
-
Click Kill in the toolbar.
-
Rotate your motor by hand. The Position field under Current Trajectory Data should change as you turn your motor. The position values for a servo configuration are based both on the torque output generated by the Motion Controller and the value the encoder feedback reports back.
You have successfully tested your encoder.
Perform a closed-loop servo move
-
Click Halt in the toolbar. Your motors should now exhibit holding torque. As a result of the PID loop, your motor will revert to the position it held before you pressed the Kill button.
-
Click Reset Position. The Position field under Current Trajectory Data should change to zero.
-
In the middle window, enter 10000 for Target Position.
-
Click Apply at the bottom of the window.
-
Click Start on the toolbar. Your motor should rotate, and the Position field under Current Trajectory Data should increase to 10000.
You have successfully tested your Servo motor.