By using this procedural document as a guide, modifications made to TDM files using Excel will maintain the integrity of the data file’s original schema. This will enable you to save the edited data set as an Excel file and read all its data and properties using DIAdem or LabVIEW and the free ExcelTDM DataPlugin, which you can download for free at ni.com/dataplugins.
TDM Excel Add-In and ExcelTDM DataPlugin Architecture Overview
Occasionally after TDM data files are written, manual modifications or expansions to the data file must be made. Users can open TDM files in Excel using the free TDM Excel Add-In and save their edits to a new Excel file. As long as modifications made to the data or properties in the new Excel file continue to follow the original data layout (as outlined in this document), the new Excel file can then continue to be read from more appropriate postprocessing software such as NI DIAdem using the free ExcelTDM DataPlugin. This process of manual modification using Excel may be repeated indefinitely as long as the schema is maintained.
An overview of the architecture is displayed in Figure 1.
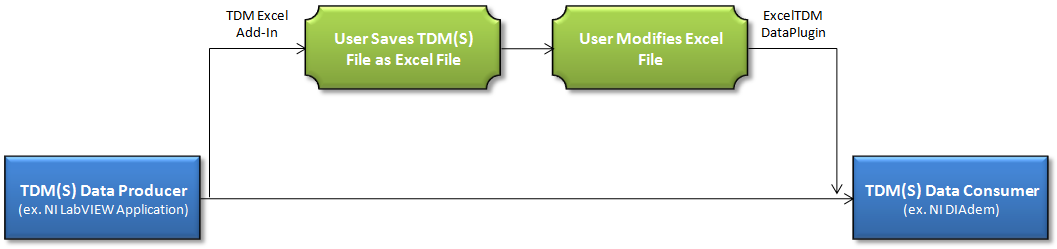
Figure 1. Users can manually modify a TDM file in Excel using the TDM Excel Add-In and then read the modified Excel file using the ExcelTDM DataPlugin.
Adding, Changing, or Removing File Properties
When TDM files are opened in Excel using the TDM Excel Add-In, all file properties are stored within the first worksheet of the workbook, as shown in Figure 2.

Figure 2. File properties are stored at the top of the first worksheet of the workbook.
All file properties are stored in the first two rows of the worksheet as name-value pairs, where the name for the property is contained within the first row (Row 1) and the value for the corresponding name is stored within the same column in the second row (Row 2). In the example shown in Figure 2, the Title file property is given the value DIAdem example data set.
To add new file properties to the data file:
- Navigate to the first two rows of the first worksheet in the workbook.
- Scroll to the right until you find the first column without entries in the first two rows.
- Enter the name for the property in the first row.
- Enter the value for the corresponding name in the second row. Note: only numeric, text and date/time properties are supported.
To change file properties for the data file:
- Navigate to the property name-value pair you wish to change.
- To change the name, edit the entry in the first row of the worksheet.
- To change the value, edit the entry in the second row of the worksheet.
To remove file properties from the data file:
- Navigate to the property name-value pair you wish to remove.
- Delete the property name and value from the first two rows in the worksheet. Note: Do not delete the entire column containing the property name-value pair, as you may mistakenly delete pertinent information located elsewhere in the worksheet!
- Cut and paste any remaining property name-value pairs existing to the right of the newly empty cells so that there is no longer a blank space separating file properties.
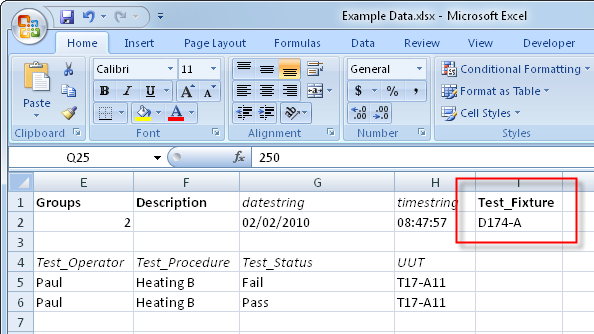
Figure 3. The manually added “Test_Fixture” property has been given the value “D174-A”.
Adding, Changing or Removing Group Properties
When TDM files are opened in Excel using the TDM Excel Add-In, all group properties are stored within the first worksheet of the workbook, as shown in Figure 4.
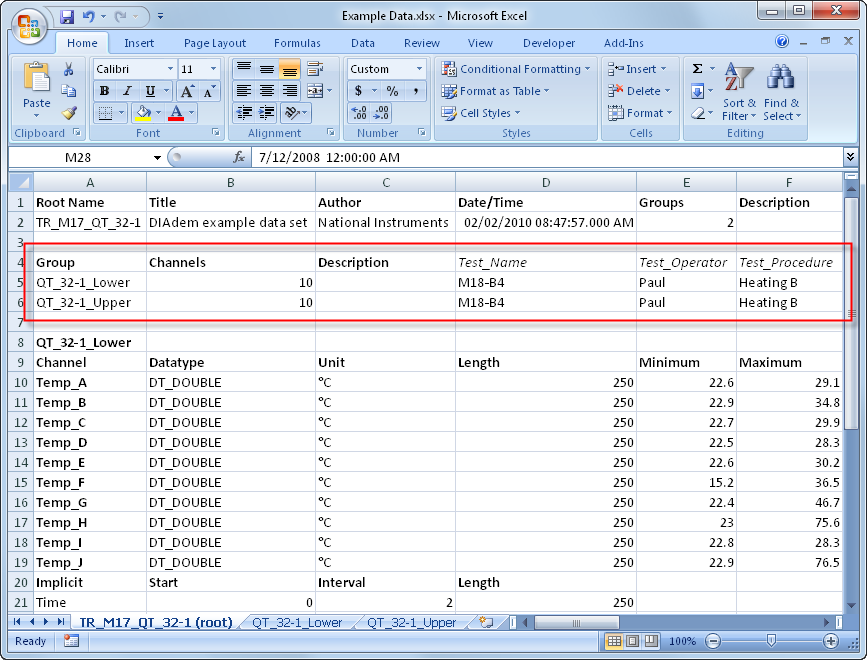
Figure 4. Group properties are stored immediately below file properties within the first worksheet of the workbook.
All group properties are stored immediately after the file properties in the worksheet. Like file properties, group properties are stored as name-value pairs, but since every TDM file may have an unlimited number of channel groups, it is possible for each name to have multiple value entries (each corresponding to the value of the property for a specific channel group).
Property names for group properties are stored in Row 4 in the first worksheet in the workbook, where the property in the first column (A) represents the name of the channel group represented by that row. Each subsequent row contains the values for the group properties for that row’s channel group. In the example displayed in Figure 4, the Test_Operator group property contains the value Paul for both the QT_32-1_Lower and QT_32-1_Upper channel groups.
To add new group properties to the data file:
- Navigate to the fourth row of the first worksheet in the workbook.
- Scroll to the right until you find the first column without an entry in the fourth row.
- Enter the name for the property in the fourth row.
- Enter the corresponding value for each channel group in the subsequent rows in the same column. Note: only numeric, text and date/time properties are supported.
To change group properties for the data file:
- Navigate to the property name-value pair you wish to change.
- To change the name, edit the entry in the fourth row of the worksheet.
- To change the value, edit the entry in the row of the worksheet corresponding to the appropriate channel group(s).
To remove group properties from all groups in the data file:
- Navigate to the property name-value pair you wish to remove.
- Delete the property name from the fourth row of the worksheet.
- Delete all property values for that property from subsequent rows of the worksheet corresponding to each channel group present. Note: Do not delete the entire column containing the property name-value pair, as you may mistakenly delete pertinent information located elsewhere in the worksheet!
- Cut and paste any remaining property name-value pairs existing to the right of the newly empty cells so that there is no longer a blank space separating group properties.
Note: to remove a single group property of an individual group, simply delete the content value in the cell located in the column corresponding to the desired property name and the row corresponding to the individual group.
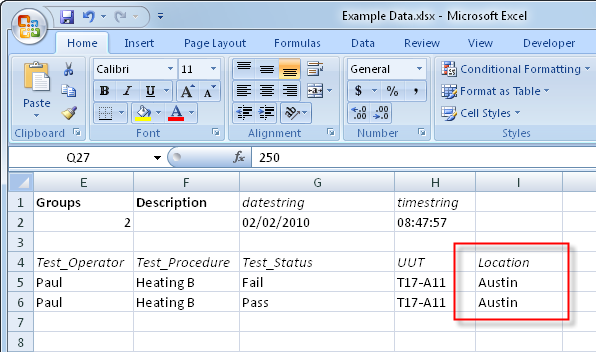
Figure 5. The manually added “Location” property has been given the value “Austin” for each of the two channel groups in the file.
Adding, Changing or Removing Channel Properties
When TDM files are opened in Excel using the TDM Excel Add-In, all channel properties are stored within the first worksheet of the workbook, as shown in Figure 6.

Figure 6. Channel properties are stored immediately below group properties within the first worksheet of the workbook.
All channel properties are stored immediately after the group properties in the worksheet and are organized in the worksheet by channel group. Like file and group properties, channel properties are stored as name-value pairs, but since every TDM channel group may have an unlimited number of channels, it is possible for each name to have multiple value entries (each corresponding to the value of the property for a specific channel in the group).
In the example displayed in Figure 6, the Unit channel property contains the value °C for all ten channels in the QT_32-1_Lower channel group.
To add new channel properties to the data file:
- Navigate to the channel group section containing the channel(s) to which you want to add new properties.
- Scroll to the right until you find the first column without a channel property name entry.
- Enter the name for the property header row.
- Enter the corresponding value for the each channel that should contain the property in the subsequent rows in the same column. Note: only numeric, text and date/time properties are supported.
To change channel properties for the data file:
- Navigate to the property name-value pair you wish to change.
- To change the name, edit the entry in the channel property header row of the worksheet.
- To change the value, edit the entry in the row of the worksheet corresponding to the appropriate channel.
To remove channel properties from all channels in the data file:
- Navigate to the property name-value pair you wish to remove.
- Delete the property name from the channel property header row of the worksheet.
- Delete all property values for that property from subsequent rows of the worksheet corresponding to each channel present. Note: Do not delete the entire column containing the property name-value pair, as you may mistakenly delete pertinent information located elsewhere in the worksheet!
- Cut and paste any remaining property name-value pairs existing to the right of the newly empty cells so that there is no longer a blank space separating channel properties.
Note: to remove a single channel property of an individual channel, simply delete the content value in the cell corresponding to the property name.
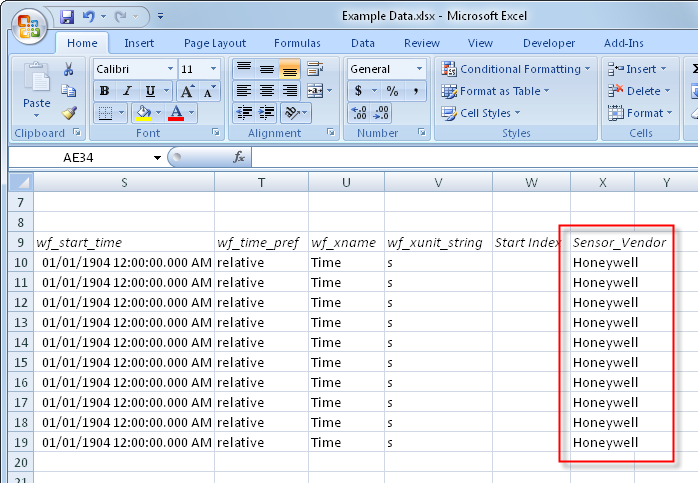
Figure 7. The manually added “Sensor_Vendor” property contains the value “Honeywell” for all ten channels in the channel group.