The TortoiseSVN interface is the most common approach to adding source code control via subversion. TortoiseSVN integrates with the Windows file explorer, allowing you to use the file explorer to manage projects under version control. This article will explain how to set up a repository, add a LabVIEW project to it, commit changes, and revert to old revisions.
You will first need to install TortoiseSVN. You can obtain it for free from the related links section.
Creating a Repository:This will create a special folder where all revisions of your project files will be stored. In production environments, the repository is usually stored on a server, and development work can be done on multiple clients.
- Open up the Windows file explorer and create a new, blank folder.
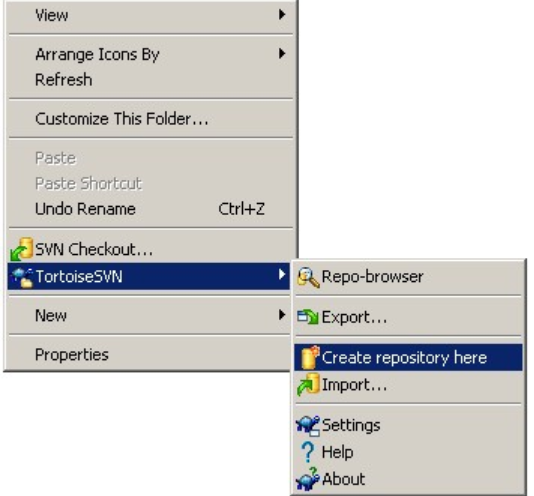
- Right click within the new folder and click on TortoiseSVN»Create repository here.

3. Click OK when prompted. This folder will now contain all of the revisions of your project. It is important to never modify any file within this folder, and it is a good idea to keep regular backups of the repository.
Adding a Project to the Repository:This step will select files to be added to the repository. This will not actually copy them into the repository, that will be done in the next step.
- Create a blank folder. Right click and select SVN Checkout...
- Type in the path of the repository you created in the form of
file:///c:/your-repository , where your-repository is your repository. This will check out the blank repository into the folder you just created. - Copy your LabVIEW project files (including your VIs) into the new folder.
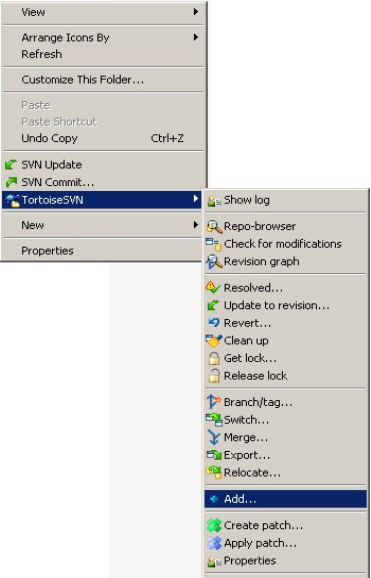
- Right click within the folder (but not on a file) and select TortoiseSVN»Add

5. The project files have been selected to be added to the repository, but the change has not yet been committed. If you add new files later, you can use this same method to add them to the existing repository.
Committing Changes to the Repository:A commit will enter your changes into the repository. Changes will only be entered into the repository when you commit, this includes adding and deleting files.
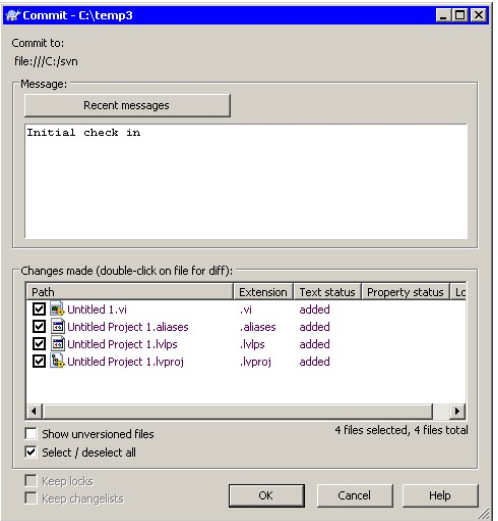
- Right click within the folder and select SVN Commit...
- Enter notes in the Message section to describe the changes that are being checked in. You can also select which modified files should be committed.

3. Click OK when ready.
Changing to a Different Revision in the Repository:This procedure will allow you to view and modify older revisions of your project, allowing you to backtrack if needed.
- Right click on a file to change or within the folder to change all files and select TortoiseSVN»Update to revision...
- Select the desired revision and click OK.
Updating to the Most Recent Revision:This is the quickest way to return to the most recent revision of the repository.
- Right click within the folder and select SVN Update. This will update all files to the latest revision.
.svn Folder Causes Mass Compile Issues:TortoiseSVN creates .svn folders under each source code controlled folder. The .svn folder stores unchanged versions of the files in the format Name.xyz.svn-base. (Example: Help.vi will be stored as Help.vi.svn-base). Mass compiling a folder under TortoiseSVN source code control results in LabVIEW mass compiling the files present in the hidden .svn folder too. Check the following
link for more information on how to get around this limitation. Note that this issue has been resolved in LabVIEW 2009. Use the following configuration token skipSVNFolders=true, in the labview.inifile, which can be located in the LabVIEW directory.
See the related links for more information on Subversion and TortoiseSVN.
Also included in the Related Links is information regarding version control using GIT.