Introduction
This tutorial is the first in a series of articles on component creation in NI Multisim and NI Ultiboard.
The purpose of this tutorial is to explain how you can create your own components for simulation and/or Printed Circuit Board (PCB) layout from within Multisim. You will create the component and then verify its operation. The Component Wizard is the primary tool used to create custom components in Multisim, and it walks you through all of the steps required to create a new component. Components details include symbol and optionally pin, model, and footprint information. Steps in the creation process include:
- Entering component information.
- Selecting a footprint and the component configuration.
- Selecting and/or editing the component symbol.
- Setting pin parameters.
- Mapping the symbol pins to the footprint pins.
- Selecting the simulation model.
- Mapping the symbol pins to the model pins.
- Saving the part in the database.
The tutorial steps you through the process of creating a simulation and PCB layout compatible component in Multisim. In the interest of completeness, you will learn how to create an advanced component with two sections. You will create a part with two schematic symbols, two models, but only one footprint. Many components are easier to create and not all steps outlined are required under most circumstances. Multisim also allows users to create simulation-only or layout-only components.
Part 2 of the component creation articles, entitled Creating a Custom Component in NI Ultiboard, outlines how to create a custom Ultiboard landpattern for layout. This landpattern is created manually so as to precisely define the shape, size, and dimensions of a Surface Mount Device (SMD). This footprint can be added to the Multisim database to define a custom component.
Single Section versus Multi-section Components
A single-section component is any component that has a single device per chip. A multi-section component is a component that has multiple gates or devices per chip. Examples of multi-section devices include logic gates or operational amplifiers. Letters, increasing from A-Z, enumerate the devices within multi-section components.
Simulation-only Components
Simulation-only components are designed to help verify designs; they are not transferred to board layout. There is no footprint information associated with them, and their symbols are colored black by default in the Multisim environment to easily identify them. An example of a simulation-only component is an ideal voltage source.
Layout-only Components
Layout-only components do not contribute to a simulation. They have no associated SPICE or behavior model. When connected parallel to the circuit, they will have no impact on the simulation. When connected in series, they will create an open circuit. Layout-only components are green on the Multisim environment. An example of a Layout-only component is a connector.
Creating a Texas Instruments® THS7001 Component in NI Multisim
The Texas Instruments® THS7001 is an example of a multi-section component. This component has a programmable gain amplifier (PGA) with a separate pre-amplification stage presented in a single integrated circuit (IC) package. In this package, both sections share power and reference voltage connections. The programmable gain is digitally controlled via three TTL-compatible inputs. For more details about this component refer to the file datasheet_ths7001.pdf located in the Downloads section.
In the next steps, you will learn to use the Component Wizard to create the THS7001 in Multisim.
Step 1: Enter Initial Component Information
- Select Tools»Component Wizard from the Multisim main menu. The Component Wizard window opens.
- Configure this window as shown in the following figure.
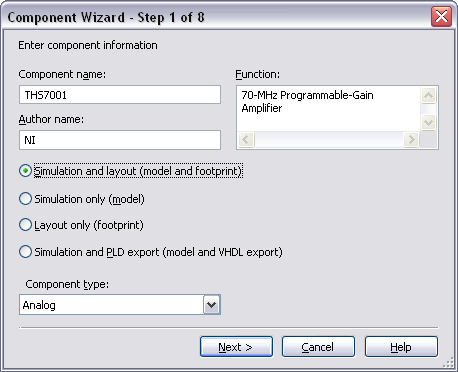
Figure 1. THS7001 component information.
- Click Next to continue.
Step 2: Enter Footprint and Package Information
In this step you will enter the footprint information. According to the datasheet, this component uses the HTSSOP-20 PowerPAD (PWP) footprint. You will select this footprint from the Multisim Master Database.
- Click on the Select a footprint button. The Select a Footprint window opens.
- Select the Master Database in the Database name listbox.
- Click Filter. This helps you do a quick search within the thousands of footprints.
- Click the Add row button.
- Configure the Filter window as shown in Figure 2.
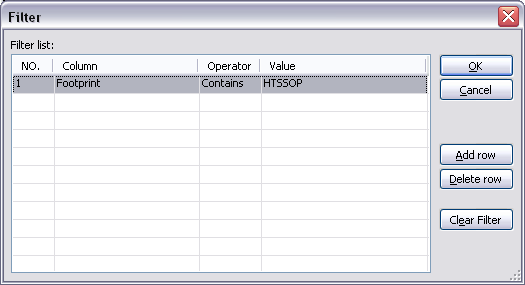
Figure 2. Filtering footprints.
- Click OK. The Select a Footprint window displays a list of footprints as shown in the following figure.
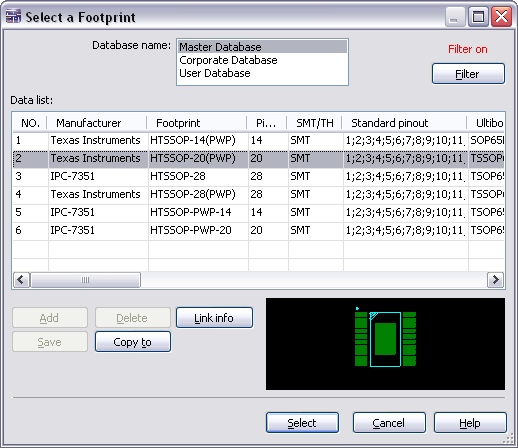
Figure 3. Selecting the HTSSOP-20(PWP) footprint.
- Highlight the footprint HTSSOP-20(PWP) and click Select.
Note: To learn how to create a custom footprint in NI Ultiboard take a look at the Creating a Custom Component in NI Ultiboard tutorial.
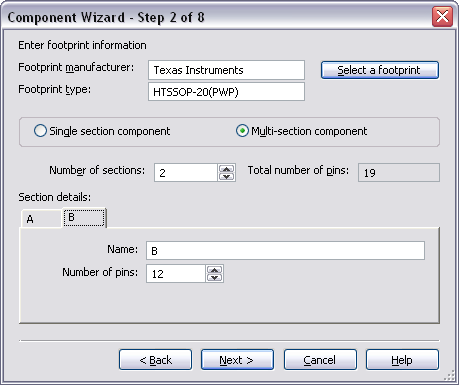
Now you need to define the number of sections and pins in the component. In this case there are two sections: A is the pre-amplifier section, it contains 7 pins; and B is the programmable gain amplifier section, it contains 12 pins.
- Configure the multi-section parameters as shown in Figures 4a and 4b.
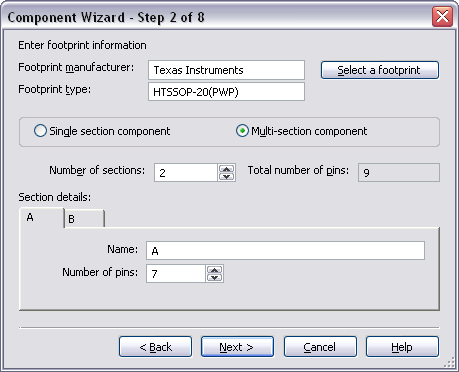
(a)
(b)
Figure 4. Multi-section parameters.
Note: When creating multi-section components, the number of pins must match the number of pins that will be used for that section’s symbol not the number of pins of the footprint. In the case of the THS7001, you will add the ground pin and the power-saving shut-down pin to the symbols for both sections.
- Click Next to continue.
Step 3: Enter Symbol Information
After defining the sections and selecting the footprint, assign the symbol information for each section. The Component Wizard generates a default symbol, however, you can edit this symbol in the Symbol Editor or copy an existing one from the Master Database. To save time when creating custom parts, it is recommended that you copy existing symbols from the Multisim database wherever possible. You can also load symbol files into the Symbol Editor.
- Click the Edit button. The Symbol Editor opens.
- Select File»Open and select the file pre_amp.sym. The Symbol Editor loads the symbol for the pre-amplifier as show in the following figure:
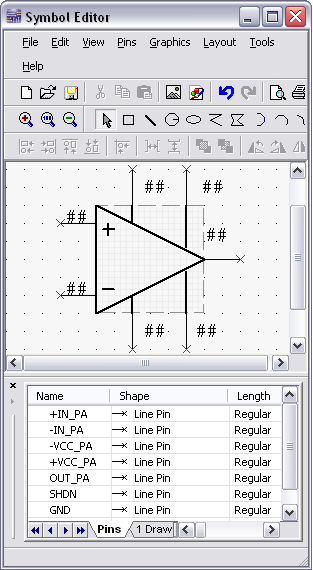
Figure 5. Symbol Editor.
- Select File»Exit to close the Symbol Editor, if asked to save changes choose Yes. The pre-amplifier symbol will now be displayed in the preview box (Figure 6).
If you plan to share this component with colleagues around the world, it is a good idea to create both ANSI and DIN symbols for the device. In this case, simply click on the Copy to button, then select Section A (DIN).
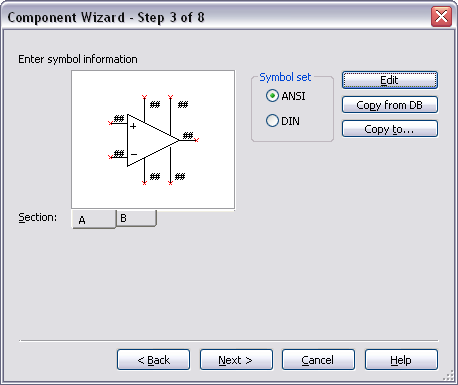
Figure 6. Pre-amplifier symbol.
Assign a symbol for the programmable gain amplifier section:
- Select B in the Section field.
- Click on Edit to open the Symbol Editor.
- Open the file pg_amp.sym.
- Select File»Exit to close the Symbol Editor, if asked to save changes choose Yes. The pre-amplifier symbol will now be displayed in the preview box as shown below:
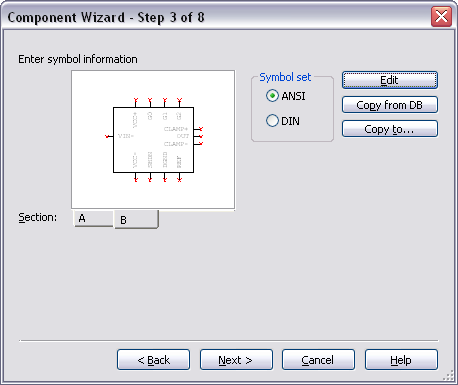
Figure 7. Programmable gain amplifier symbol.
- Click Next to continue.
Step 4: Set Pin Parameters
In this step you can select the pin model type (input, output, and so on) for each pin in the symbol. You can also configure whether to include or exclude that pin from Electrical Rules Check (ERC). If needed, you can add hidden pins to components in this step. Hidden pins are pins that do not appear on the symbol but may be used by the model and/or the footprint.
- Configure the Section and Type columns as shown in the following figure:
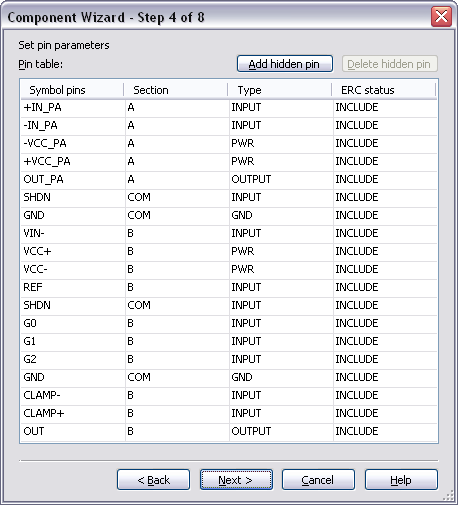
Figure 8. Pin parameters.
- Click Next to continue.
Step 5: Set Mapping Information between Symbol and Layout Footprint
Map visible symbol pins and hidden pins to the PCB footprint. Ensure that the mapping is accurate by comparing it to the datasheet information.
Note: Simulation-only parts do not require this step.
- Click the corresponding Footprint pins cell for each row and assign a pin number. The configured window will look like Figure 9. Note that pins 1 and 17 shared pins.
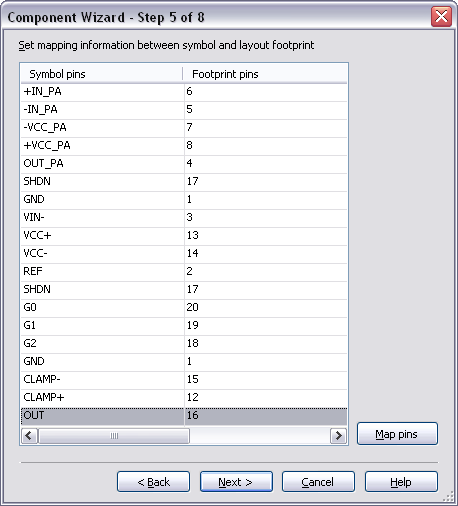
Figure 9. Mapping information between symbol and layout.
- Click Next to continue.
Step 6: Select the Simulation Model
When creating a component for simulation, you must provide the simulation models for each section. You can obtain or create new models in four ways:
- Download a SPICE model from a manufacturer website or other source.
- Manually create a subcircuit or primitive model.
- Use a Multisim Model Maker.
- Or edit an existing model.
Multisim provides Model Makers that create SPICE models for several categories of components based on their databook values. Model Makers exist for operational amplifiers, bipolar junction transistors, diodes, waveguides, and many others. For more information on the various Model Makers, consult the Multisim help file.
For the THS7001, you will use manufacture-provided SPICE compatible models. There are separate models for the pre-amplifier and the programmable gain amplifier sections. They can be found in the Downloads section.
Note: If you are creating a layout-only component, you are not required to complete steps 6 and 7.
- Select the A tab in the Section field.
- Click on Load from file.
- Open the file ths7001_preamp.cir. The SPICE model for the pre-amplifier will load and be displayed in the tab for section A as shown below:
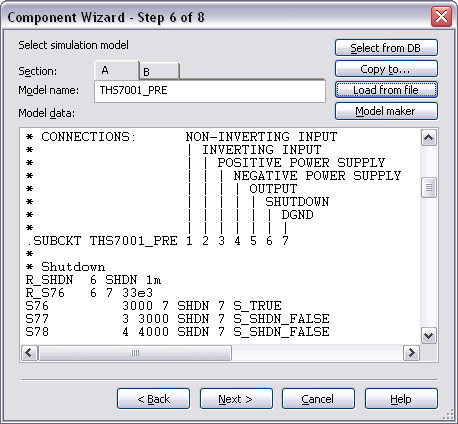
Figure 10. SPICE model for the pre-amplifier section.
- Select the B tab in the Section field.
- Click on Load from file.
- Open the file ths7001_pga.cir. The SPICE model for the programmable gain amplifier will be loaded.
- Click Next to continue.
Step 7: Map Symbol Pins to the Model Nodes
You must map the symbol pins to the SPICE model nodes in order for Multisim to correctly simulate the component. For all subcircuit or macro models, the model nodes are typically documented in the header text of the SPICE model. There is also a line that declares that the model is a subcircuit model and lists the model name followed by the model nodes that will connect to external circuitry.
For the THS7001, the model nodes of the pre-amplifier and the programmable gain amplifier are listed in the files ths7001_pga.cir and ths7001_preamp.cir. You can open these files in a text editor.
Let us examine the header and subcircuit (SUBCKT) lines for the pre-amplifier:
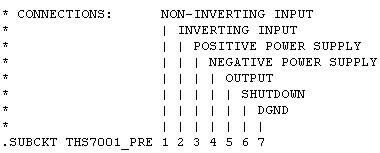
The .SUBCKT line declares that the model is a subcircuit model, lists the name of the model, and displays the external nodes. The comment lines (SHUTDOWN, OUTPUT, and so on) describe the order and operation of the model nodes.
- Complete the pin mapping table for the pre-amplifier (section A) as shown in Figure 11. You must select the Model nodes based on the order in which they appear in the SUBCKT line.
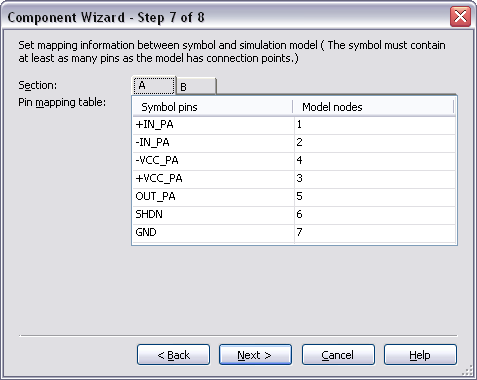
Figure 11. Section A pin mapping table.
- Select Section B and complete the pin mapping table according to the following figure:
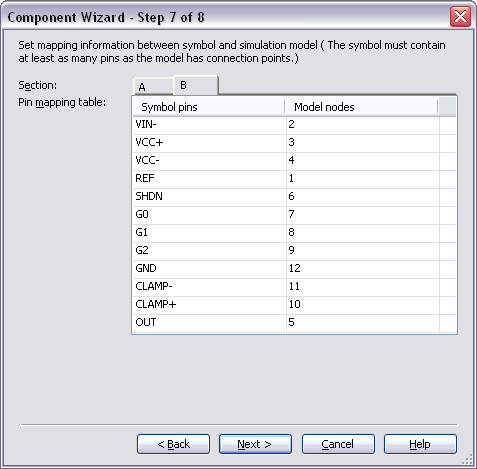
Figure 12. Section B pin mapping table.
- Click Next to continue.
9. Step 8: Save Component into the Database
Once all the previous steps are complete, save the component to the User or Corporate Database.
- Expand the User Database.
- Select the Analog group.
- Click Add Family and type Amplifiers as the new family name.
- Click OK.
- Highlight the new Amplifiers family as shown below:
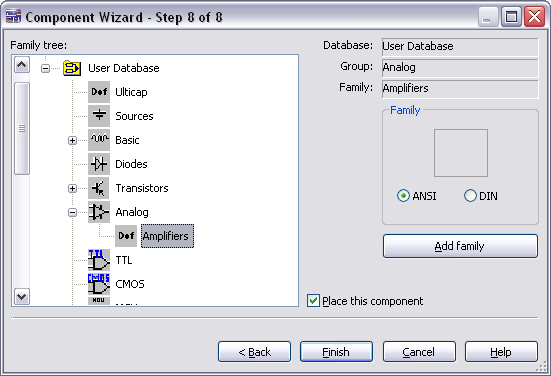
Figure 13. Saving the component to the database.
- Click Finish and place your custom component (Sections A and B) on the Multisim workspace area.
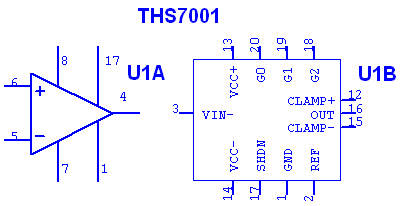
Figure 14. THS7001 Sections A and B.
10. Testing the New Component in Multisim
After creating and saving the custom component, it is available for use in Multisim. To test this component, use the test_circuit.ms11 file located in the Downloads section. Replace U2A with section A of your new component and replace U2B with section B. To replace a component, double-click on the component and then select Replace. Then navigate to the database and location that you saved your component and select it.
Figure 15 illustrates the expected response of the test circuit.
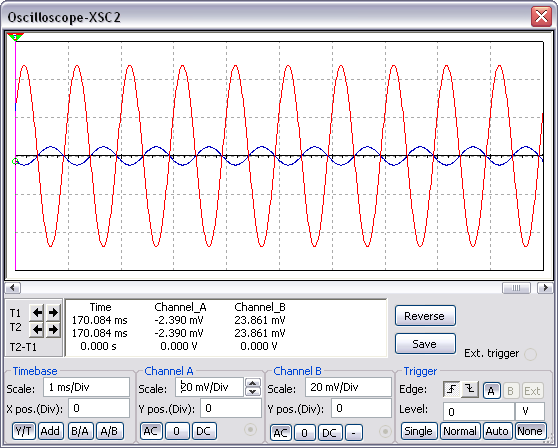
Figure 15. Time domain response of the PGA with Gain set to 111.