Considerations Before You Begin
Update on SignalExpress Versions: NI will no longer release new versions of SignalExpress. The last release for SignalExpress was 2015. Users are encouraged to transition to the FlexLogger™ Lite edition, companion software for compatible DAQ hardware. FlexLogger Lite ensures comprehensive sensor compatibility, instant offline setup, and a programming-free interface for streamlined data logging. Download FlexLogger Lite to simplify data acquisition processes.
Add IVI Instrument in SignalExpress
Follow the process below to insert an IVI instrument step for a physical or simulated instrument in NI SignalExpress:
- Download the IVI driver specific to your instrument from the Instrument Driver Network. For illustrative purposes, the IVI driver for the Tektronix TDS3054B Oscilloscope will be used in these instructions.
- Note, the IVI driver may not have your specific instrument's name in the title. Thus, when selecting the appropriate driver in step 6-ii below, make sure you select the driver name that you downloaded and installed in this step.
- Verify that your instrument is configured for remote control via GPIB/Serial/USB/ENET/etc.
- Connect the instrument to the PC and ensure that it is turned ON. Ignore this step if you are simulating your instrument.
- Launch NI SignalExpress.
- Insert an IVI Scope step by selecting Analog>>Acquire Signals>>IVI Scope from the Add Step menu.
- Choose Create New from the IVI Logical Name pull down control. NI SignalExpress will create all the necessary IVI Logical Names and settings without launching Measurement & Automation Explorer.
- Type in a name for IVI Logical Name (eg: TekTDS3054B).
- Select the appropriate driver from the pull down control (eg: tkds30xx).
- Select the VISA resource name from the pull down control (eg: GPIB0::1::INSTR). Leave this parameter blank if the IVI device is unavailable or not connected to the PC.
- Check the Enable Simulation Data option if you choose to simulate an IVI device. Leave it unchecked if connecting to real instrument.
- Select Initialize to save your settings and initialize the IVI device.
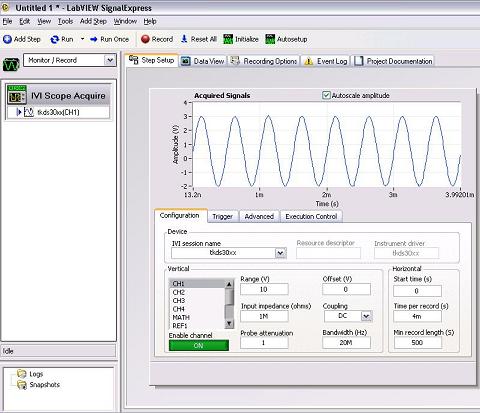
- Ensure CH1 is selected. Select the Enable Channel button to toggle it to the ON state.
- Adjust the remaining settings to match the characteristics of your incoming signal on CH1 of your device.
- Click the Run Continuously button in the NI SignalExpress environment to continuously acquire data on the IVI Scope device.
- Note: If simulating the IVI device, change the Range setting to 10V. No other changes are required.
- Click Data View. Drag your input data and drop it on the data display (eg. tkds300x(CH1)).
Additional Information
Follow the
Troubleshooting Instrument Drivers guide if you have problems regarding your instrument not being recognized in NI SignalExpress.
You must download and install the IVI driver type for your instrument. The IVI driver is typically installed through an executable. LabVIEW Plug and Play instrument drivers will not work with the steps detailed in the solution.