- Preparation Steps
- Method 1: Restoration using NI Measurement and Automation Explorer (MAX)
- Method 2: Restoration for cRIO with a USB Port
Before restoring the device, it may be necessary to complete some preparation steps, depending on the version of LabVIEW Real-Time being used.
For LabVIEW Real-Time 2009 and older
Note: The password will be removed during this process. The IP configuration will need to be reconfigured.
If the RIO device has physical DIP switches, follow these instructions:
- Set the IP RESET switch to ON.
- Reboot the controller.
- Set the switch to OFF
If your RIO does not have DIP switches, follow these instructions:
- Hold the RESET button until the STATUS LED turns solid orange or yellow.
- Release the RESET button and the controller will restart. The STATUS LED will blink three times indicating that the controller is in Safe Mode.
- Hold the RESET button again until the STATUS LED turns solid orange or yellow.
- Release the RESET button and the controller will reset the password, reset the IP configuration, and restart in Safe Mode.
- Find the RIO in NI MAX and restart the controller into Normal Mode.
For LabVIEW Real-Time 2010 and newer
Note: After this process, the RIO will be usable without a password, but all files that were on the RIO will be lost in the process.
The security settings of the RIO now carry through an IP reset. The RIO controller will have to be reformatted in order to clear the password.
- Reboot the controller into Safe Mode, by using the DIP switches or holding the RESET button as described above.
The following steps are for NI MAX 5.0 and newer:
- Open NI MAX and expand Remote Systems from the Configuration tree.
- Right-click on the device and select Format Disk.
- If a login window appears, select OK.
- Select Attempt to restart into safe mode to restart the controller in Safe Mode.
- Select Preserve the settings for all network adapters.
- Phar Lap ETS targets have the additional option of selecting a file system. We recommend the Reliance file system. For more information on the Reliance File system read this article: Format Real-Time PC or Real-Time PXI Target to the Reliance File System
- Click Format to format the controller and Yes to restart the controller once it has been formatted.
- If you choose to not preserve the network settings, after the controller restarts navigate to the Network Settings tab in NI MAX and configure the network settings.
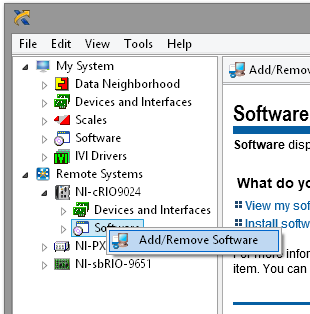
- Right-click on Software and select Add/Remove Software - the Software folder will not be visible in the configuration tree in NI MAX if the controller does not have a valid IP address.

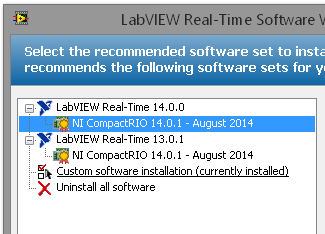
- Some controllers install using Recommended Software Set's (RSS)'s. If your controller does not have an RSS option, proceed to Step 11.
RSS's simplify the install process by automatically selecting the required base software components. Select the RSS for the version of LabVIEW Real-Time you wish to install.

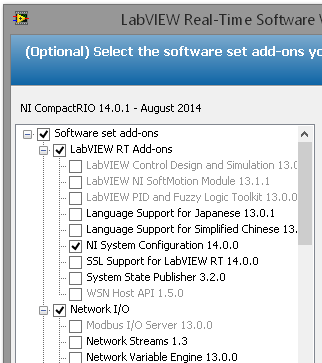
The RSS selection will select to install the base requirements for that Real-Time and driver version. Next, another window will open allowing the selection of other optional install components.

- If the controller does not have a RSS option then the specific software must be selected manually.
- Select Next. Review the software to be installed.
- Select Next to begin the installation process.
- After the software is installed the controller will restart. If you manually put the controller into Safe Mode, return the setting/dip switch back to off to allow the controller to restart normally.
Using the USB reset will leave the system in a state where it is unable to run LabVIEW Real-Time
In this file, you will find .cfg files for all cRIO chassis which drivers you have installed.
- On a PC that is connected to a working cRIO, from File Explorer go in the following direction:
- Local Disk (C:) >> Program Files (x86) >> National Instruments >> Shared >> Firmware >> cRIO
- Find the cRIO which you want to format and from that folder copy file which is called cRIO-90xx_x.x.x
- See the below table for a list of devices and their associated firmware folder names.
| Target | Folder Name | | Target | Folder Name | | Target | Folder Name |
| cRIO-9030 | 7755 | | cRIO-9048 | 78B7 | | cDAQ-9132 | 773B |
| cRIO-9031 | 774B | | cRIO-9048 | 78E7 | | cDAQ-9133 | 77BD |
| cRIO-9032 | 7841 | | cRIO-9049 | 78EA | | cDAQ-9134 | 7773 |
| cRIO-9033 | 7735 | | cRIO-9053 | 79DD | | cDAQ-9135 | 77BC |
| cRIO-9034 | 774D | | cRIO-9054 | 79DE | | cDAQ-9136 | 7833 |
| cRIO-9035 | 77DB | | cRIO-9055 | 7A2B | | cDAQ-9137 | 7835 |
| cRIO-9035 | 7875 | | cRIO-9056 | 79DF | | ELVIS III | 793C |
| cRIO-9036 | 77DC | | cRIO-9057 | 79E0 | | ELVIS RIO CM | 7885 |
| cRIO-9037 | 7840 | | cRIO-9058 | 7A2A | | cRIO-9603 | 7A38 |
| cRIO-9038 | 77B9 | | cRIO-9063 | 7740 | | cRIO-9608 | 7A39 |
| cRIO-9039 | 77DD | | cRIO-9064 | 7741 | | cRIO-9609 | 7A41 |
| cRIO-9039 | 7878 | | cRIO-9065 | 7742 | | cRIO-9628 | 7A3A |
| cRIO-9040 | 78E3 | | cRIO-9066 | 7743 | | cRIO-9629 | 7A43 |
| cRIO-9041 | 79D0 | | cRIO-9067 | 7744 | | cRIO-9638 | 7A3B |
| cRIO-9042 | 78E8 | | cRIO-9068 | 76D6 | | sbRIO-9607 | 77D6 |
| cRIO-9043 | 78E5 | | myRIO-1900 | 762F | | sbRIO-9627 | 77D5 |
| cRIO-9045 | 78E4 | | myRIO-1950 | 76D3 | | sbRIO-9637 | 77D4 |
| cRIO-9046 | 79CE | | roboRIO | 76F2 | | sbRIO-9651 | 775E |
| cRIO-9047 | 78E9 | | | | | | |
- Copy the "recovery.cfg" file to the USB drive (it should be FAT16/32 and be fully formatted)
- Plug in the USB drive to the controller
- Power off the RIO by unplugging the power
- Hold down the RESET button
- Power on the cRIO by plugging the power back in (continue to hold the RESET button while powering on)
- Wait until the status light turns on, then release the RESET button
- Wait for the controller to boot. This should take less than a minute
- Check that the password has been reset to the default.
- You will be prompted for a password, the default password is blank
- Reinstall the software on the controller.
If none of the provided methods solve the issue, please contact NI Technical Support for potential repair.
Back to the Top