Creating a Web Client Page in Lookout
You can create an HTML file to display and control a Lookout client process that can be accessed through Internet Explorer and downloaded to a remote computer. Lookout accomplishes this by creating a simple HTML page and inserting an ActiveX control on the page that runs your client process. When you create your HTML page, Lookout creates an entire support package necessary to run the process, except for a copy of the Lookout Web Client (Lookout Player). Please note the following requirements:
* For your web client page to work, Lookout Player must be installed on the remote computer prior to the first download. The Lookout Player is available free of charge.
* For your web client to connect to a server process, you need a Concurrent Client License registered on the server machine (P/N 778102-01; under System >> Options >> Change Client License). Otherwise the server will refuse the client connection.
* Lookout Web Client is only supported on Internet Explorer.
To create your Lookout Web client page, first configure the Web client export options, then export the page
Web Server Export Options
Before you can export a Web client page, you must set the export options.
- Make sure Lookout is in edit mode, and select File»Web server export options. The following dialog box appears.
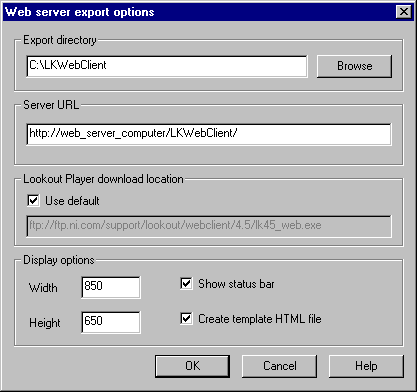
- Enter an appropriate value for Export directory. As mentioned earlier, when you create your HTML page, Lookout creates an entire support package necessary to run the process, except for a copy of the Lookout Web Client (Lookout Player). Export directory is where all these necessary process files (including the HTML page) will be exported to. The following are three different scenarios that you might have:
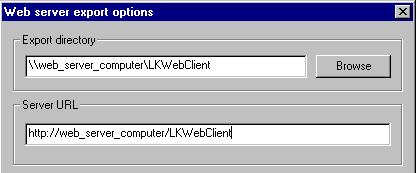
- Your development machine is different from the web server computer and you don't have network access from the development machine to that computer. In this case you can put an arbitrary folder on the development machine as the Export directory, as shown in the above picture. After you export the files to this directory, you can copy that directory and all its contents to the web server root directory.
- Your development machine is different from the web server computer and you have network access from the development machine to that computer. In this case you can export the files to the web server computer over the network. As shown in the following picture, in the Export directory field, enter a path to the web server root directory on the web server computer.
- Your development machine and the web server computer are the same. In this case you can directly export the files to the web server directory by entering a path to that directory in Export directory.
A web server root directory is the directory that the web server software exposes to the clients. Whenever you type http://web_server_computer, you are referencing the web server root directory on the web server computer. For example, assume the web server root directory is c:\Inetpub\wwwroot and you enter an absolute of c:\Inetpub\wwwroot\LKWebClient for the Export directory. The client.htm could then be accessed from the client machine with the following URL: http://web_server_computer/LKWebClient/client.htm. The default web server root directory for Microsoft Personal Web Server 4.0 or Microsoft IIS (Internet Information Services) 5.0 is c:\Inetpub\wwwroot. The default web server root directory for Apache Web Server 1.3 is C:\Program Files\Apache Group\Apache\htdocs. You can export to any web server root subdirectory. In the illustration shown above, a LKWebClient subfolder is used.
- Enter an appropriate value for Server URL, which is the path to your HTML page. It must include the complete web server path to the page, not including the page itself. For example, if the path to your page is http://web_server_computer/LKWebClient/client.htm use http://web_server_computer/LKWebClient/ as the Server URL. Do not use spaces in any of your path elements.
If you don't have access to web server software and only want to run the client on your Local Area Network, you can expose the client files through a shared folder. For example, if your HTML page is on a computer called server_computer in a folder called LKWebClient, then in Server URL you can type in \\server_computer\LKWebClient\. Make sure the folder LKWebClient is shared on the network. This creates an HTML file that does not require web server software. You cannot access this file over the Internet, but you can access it on your LAN.
- Select a Lookout Player download location (4.5.1 and above) where the Lookout Player (Lookout Web Client software) will be downloaded from. If you check Use default then the location will be the National Instruments ftp site. The Lookout Player may also be included on your Lookout software CD. If you already have Lookout software installed on the client computer, you don't need to install the Lookout Player. This URL will be included as a link at the top of the client HTML page, so that a user sitting at the client machine can easily download the Player:
The National Instruments ftp site will always have the latest version of the Lookout Player. However, we suggest keeping a copy of the Lookout Player installation file on your network for faster download. In that case, you can provide a path to the file instead of checking Use Default. For example, if you have the file lk45_web.exe in a folder named LookoutPlayer on a computer named Resources, you would enter \\Resources\\LookoutPlayer\lk45_web.exe as the Lookout Player download location. Make sure that you have shared the LookoutPlayer folder.
- Select your Display options, which set the size of your ActiveX display in pixels. If you set the Height and Width to values smaller than your client, scroll bars will be available on the downloaded page. Show status bar selects whether to include the Lookout status bar on your page. If you want your HTML page to look like a Lookout screen, select this option. If you want your client to appear as an ordinary web page, disable this option, maximize the control panel of your client application in Lookout, and make sure the background color of your panel matches the background color of your HTML file.
Showing the status bar allows viewers access to all of the functions Lookout enables through the status bar, such as opening the alarm window by clicking the alarms section of the status bar, navigating between control panels using the control panel navigation arrows, logging in by clicking on the user name section of the bar, and accessing the About Lookout information by clicking on the organization name.
IMPORTANT: Keep in mind the default login user account for a web client process is the (nobody) account. If you want someone to be able to log in using the set of accounts you have created, you must manually copy the Lookout.sec file from the server machine to the Windows\system (Windows 9x/Me) or WINNT\system32 (Windows NT/2000/XP) directory on the client machine.
Check the Create template HTML file option if you want your exported page to create an HTML file in addition to the web client itself. You can then add any other HTML features you want on the page yourself. If you do not change the file name or move your changes to another file, and you export again while this option is selected, Lookout overwrites any changes you might have made to the file yourself. In most cases, you should check this option the first time you export your Lookout Web client. Any time after that when you need to export a new version of the process, you should deselect this option to keep any changes or improvements to your HTML file from being overwritten.
Click
OK.
Exporting an HTML Page from Lookout
After you have configured your options, export the HTML page by selecting File»Export Web server files. If you have more than one process running, a dialog box prompts you to select which process to export.
When you export, Lookout creates two folders and an HTML page in the directory you set as your export directory. The folders are titled Lookout and System. The Lookout folder contains all the support files necessary to run the client process. It contains the following subfolders: cbxs, graphics, processfiles.
You can edit your client page in any HTML editor you choose. As created by Lookout, it only contains the minimum HTML coding necessary to display your Lookout process.
Download a Lookout Web Client
Any client process HTML page you create with Lookout can be downloaded to any computer that has an internet browser installed. Follow these steps to download a Lookout Web client.
- Open Internet Explorer and make sure the security setting for the Internet or your Intranet (depending on which one you are using) is Medium or lower. (You can do this by going to Tools»Internet Options and selecting the Security tab).
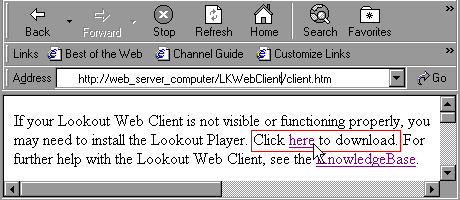
- In Internet Explorer, enter the URL for your HTML page. For example, if you used the Web server export options shown in this document and your HTML page is called client.htm, then the URL that you would enter in the web browser would be http://web_server_computer/LKWebClient/client.htm.
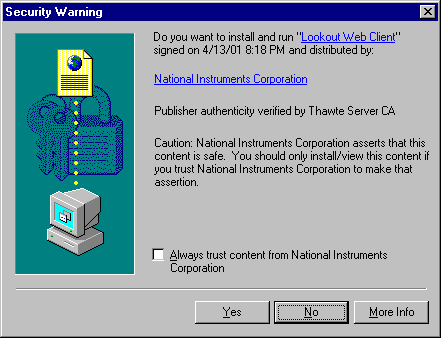
If your web browser security settings are not correct, you might get the following message: "Your current security settings prohibit running ActiveX controls on this page. As a result, the page may not display correctly." Click OK. Go back to step 1 and make sure you have the correct security settings. Refer to the troubleshooting section for more information.
If you have the correct security settings then you will get the following message (Click Yes):
- If your client computer does not have Lookout Player installed, you will be prompted to download the Lookout Player by: "Unable to display Lookout web client process without Lookout Player installed. Click on the link in your browser window to download Lookout Player." Click OK and then click on the Click here to download to get the Player. This is the link that you provided in the Lookout Player download location section of Web server export options (see the picture earlier in this document).
- After you download is finished, run the file to install Lookout Player on the client computer. You might be prompted to reboot. After installing Lookout Player, launch the HTML page again.
- Lookout Web Control will determine if any process-related files need to be downloaded to the client computer. If some files need to be downloaded, the following prompt appears.
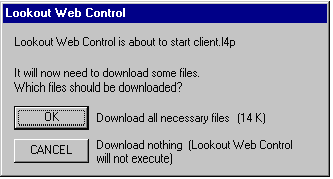
The dialog box shows you how much storage space is needed for the download. The amount of space needed depends on what files need to be added to your system.
Click OK. The files will be downloaded to the folder where the Lookout software is installed. After the files have been downloaded, the Lookout client process will appear, embedded in your web browser.
How the Lookout Web Client Download Works
The following is an explanation of what exactly happens when your web browser begins to load client.htm:
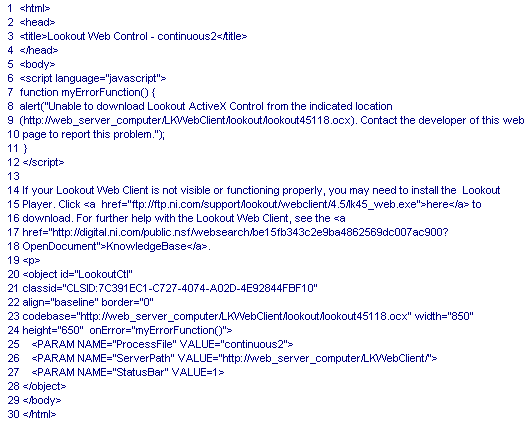
For reference purposes, the source code for client.htm is shown below.
The web client is an ActiveX control. This ActiveX control is the .ocx file that is created when you select Export web server files in Lookout (the .ocx file is created in the Lookout subfolder of the Export directory). You can think of an .ocx file as an executable that is running embedded in an Internet Explorer page. Each Active X Control is registered in the system registry under a Class ID.
When you try to download client.htm on your computer, Internet Explorer will interpret the HTML file line by line until it reaches line 20 in the above illustration. Line 20 tells it to launch the Lookout Web Client Active X Control object identified by the Class ID (line 21). It will go through the system registry to check whether the given Class ID has been registered on your computer. The first time you try to download client.htm, the ID will not yet be registered. And since the ID is not registered, it will use the remote location (line 23) to get the file. After downloading it, the .ocx file will be registered on your computer under the given Class ID. You can check this by going to the Downloaded Program Files subfolder inside the Windows directory on your computer. The Lookout Ctl.X.X.X.X Class will be installed there. (Since the .ocx file has been downloaded to your computer and registered under the given Class ID, any subsequent time that you try to download client.htm, the .ocx file specified in line 23 will not be downloaded again. Instead, the local .ocx file will be used).
Once the .ocx file is loaded, it will check whether the Lookout Player is installed on your computer. If it detects that there is no Lookout Player on your computer, it prompts you to download the Lookout Player.
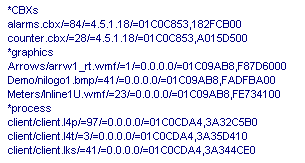
When the .ocx file is loaded, three parameters are passed along with it (line 25,26,27). The first two parameters are important, as they specify where client.fil is located on the web server computer. The client.fil is created when you choose Export web server files in Lookout (it will be located in the ..\Lookout\processfiles\client subfolder). The client.fil contains all the necessary information about all the objects, graphics, and other files that the particular process requires. A sample portion of client.fil is shown below:
Each time you open client.htm, client.fil is downloaded again to the Lookout directory on your computer. (If there is an incorrect URL in line 26, you will get an error message saying "Lookout Web Control could not download client.fil.") Once client.fil has been downloaded, the .ocx file will interpret client.fil and download any necessary files from the web server. It will prompt you that the Lookout Web Control is about to start and will need to download some files. Click OK. This will happen the first time that you try to download client.htm, as your computer will have none of the files required to run the process. This will also happen if any modifications have been made to the files (on the web server) which are required to run the process. After it is done with downloading all the files specified in client.fil, it starts Lookout embedded in Internet Explorer and loads the process.