Before You Begin
To use this tutorial, you must have the following software and hardware installed on your system:
- Visual Studio 2005, 2008, 2010, or 2012
- Measurement Studio 8.0.1 or later (Professional or Enterprise package). Refer to the Measurement Studio Readme for information about supported versions of Visual Studio. The Measurement Studio Readme files are available in the root folder of the installation CD and are linked from the Autorun menu.
- NI-DAQmx™ 8.1 or later
- A DAQ device that is supported by NI-DAQmx. Refer to the NI-DAQ Readme file for a list of devices supported by NI-DAQmx. You may also create a simulated device in Measurement & Automation Explorer (MAX) in place of an actual data acquisition device.
Refer to the DAQ Quick Start Guide and the device documentation for information about installing and configuring the software and hardware.
Creating a Measurement Studio Visual C# Project
To set up the project:
- Open Visual Studio from Start»All Programs»Microsoft Visual Studio Version»Microsoft Visual Studio Version.
- Select File»New»Project. The New Project dialog box launches.
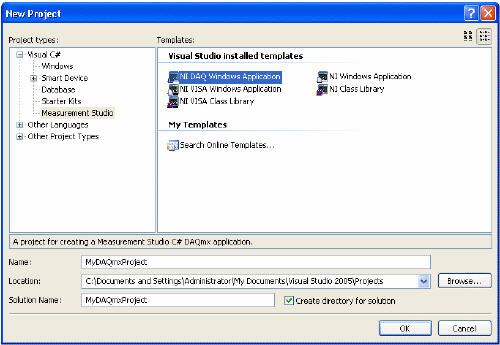
- In the Project types pane, expand the Visual C# or Visual Basic node, depending on which language you want to use to create your project, and select Measurement Studio. Code generation works in both languages.
- In the Templates pane, select NI DAQ Windows Application. Specify
MyDAQmxProject for Name and specify a Location of your choice. Click OK. The Measurement Studio DAQ Application Wizard launches.
Visual Studio 2010 or 2012: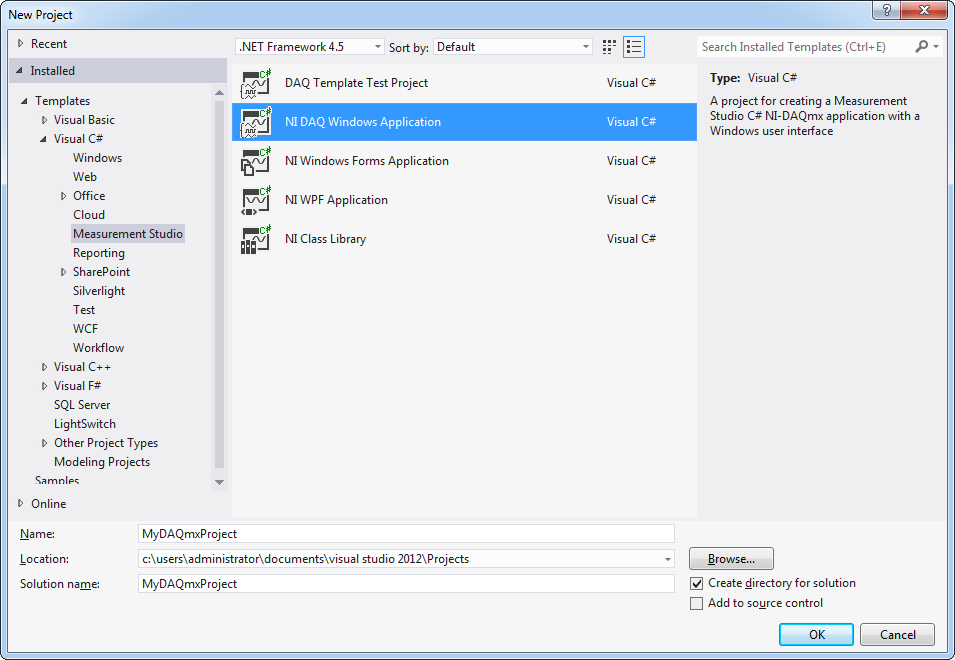
Visual Studio 2005 or 2008:
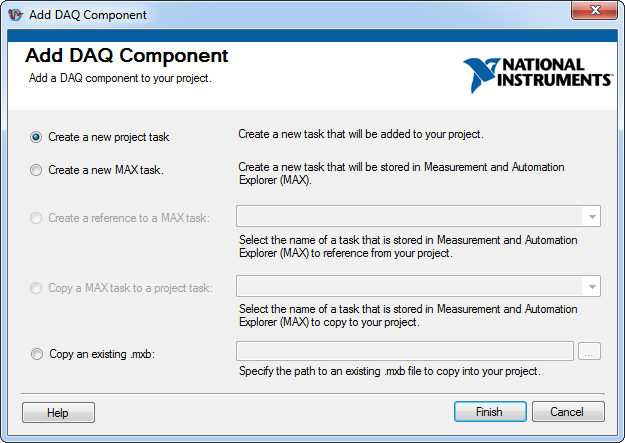
- In the Add DAQ Component dialog, you can choose to create a new project task, create a new MAX task, create a reference to a MAX task, copy a MAX task to a project task, or copy an existing .mxb. For this walkthrough, select Create a new project task and click Finish.
The Measurement Studio DAQ Application Wizard automatically sets up your data acquisition project and launches the DAQ Assistant.
To configure your task:
- In the Create New CVI/MS Project-Based Task dialog of the DAQ Assistant, you can begin to interactively define your DAQ task. Select Acquire Signals as the measurement type for your task.
- Next, select Analog Input»Voltage.
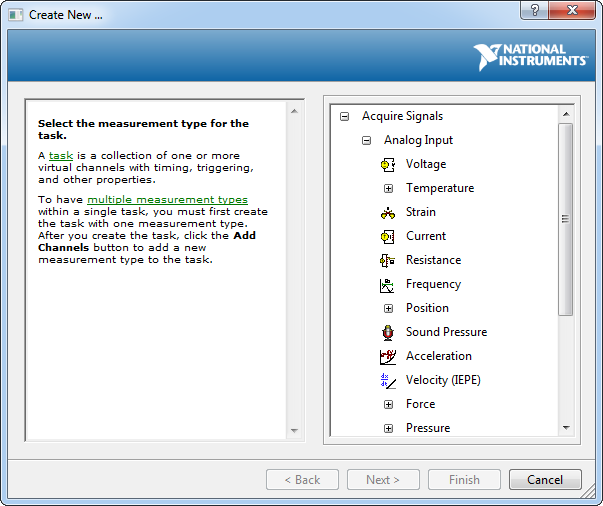
- From the Supported Physical Channels tree in the Physical tab, select the physical channel, such as ai1, on the DAQ device to which you connected the voltage signal. Click Finish.
Note: You can also use simulation in this walkthrough. For more information, refer to Creating NI-DAQmx Simulated Devices in the Measurement & Automation Explorer Help for NI-DAQmx.
- Using the DAQ Assistant, you can edit the configuration of your DAQ task. If the embedded DAQ Assistant help is not open by default, click the Show Help button in the upper-right corner of the window to display the help.
- To complete the DAQ configuration, select the N Samples Acquisition Mode in the Timing Settings section of the Configuration tab. For more information on timing, refer to Timing in the NI-DAQmx Help.
- Next, click the Run button in the toolbar near the top of the Edit DAQ Task dialog box. The test runs automatically. You can run the project task test in the DAQ Assistant to make sure you connected the signal properly. If necessary, you can modify the settings before any code is generated.
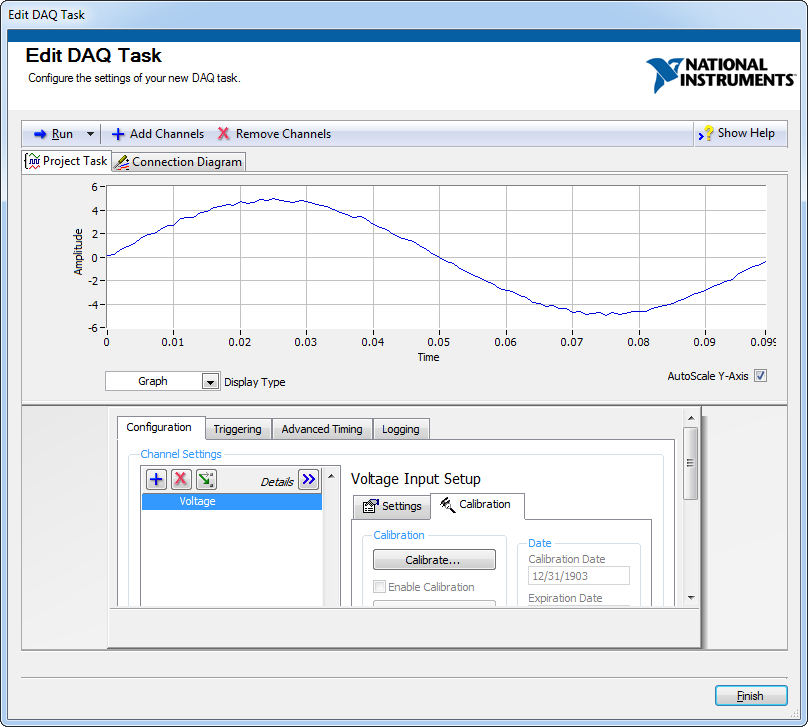
- Click the Finish button in the Edit DAQ Task dialog to complete the configuration of your DAQ task and to launch the Configure DAQ Component UI wizard.
To create a custom user interface for the task
- In the Configure DAQ Component UI wizard, you can customize and preview a user interface and code for your task.
- Click Finish to generate the task user interface in your project form.
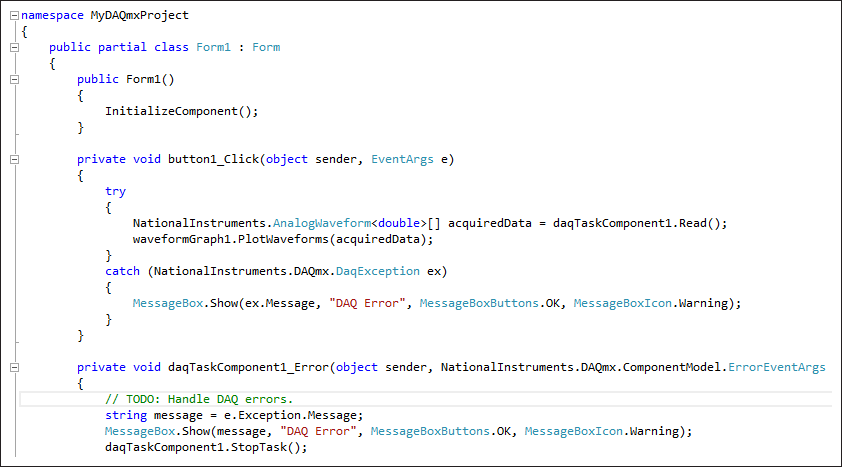
The wizard also generates event handlers and code to acquire data and present it on your generated user interface.
Visual Studio 2010 or 2012:
Visual Studio 2005 or 2008:
- Press
<F5> to run the application. - After you have started the application, click the Read button to begin acquiring data from your DAQ device.
Additional Documentation
To learn more about tasks, channels, and other NI-DAQmx concepts, refer to the NI-DAQmx Help located at Start»All Programs»National Instruments»NI-DAQ»NI-DAQmx Help.